This post will be updated in the next weeks with the test results as
they become available.
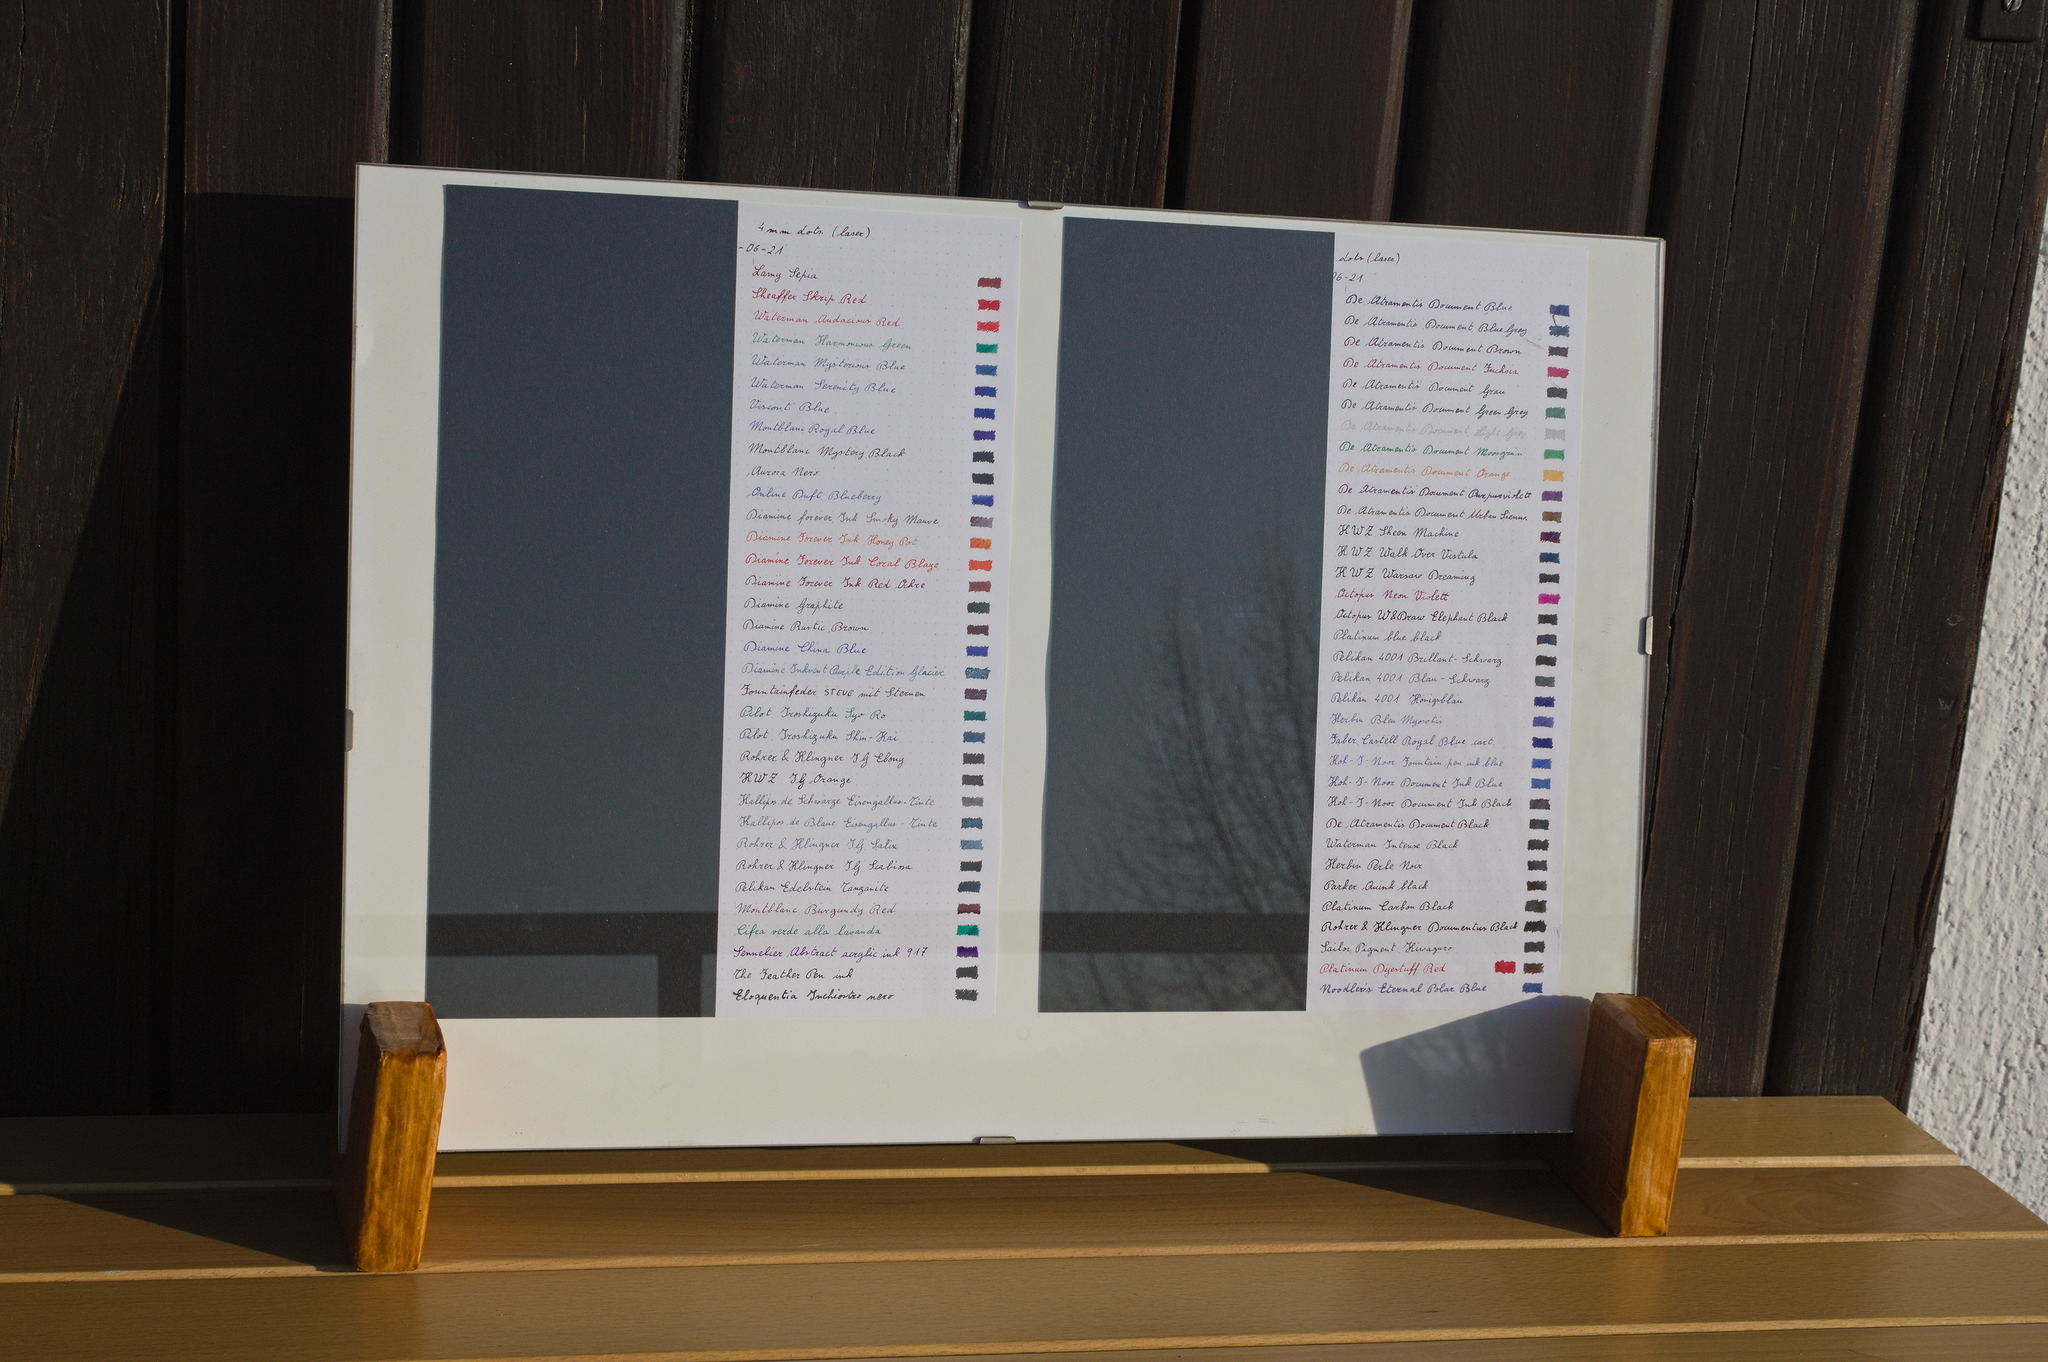
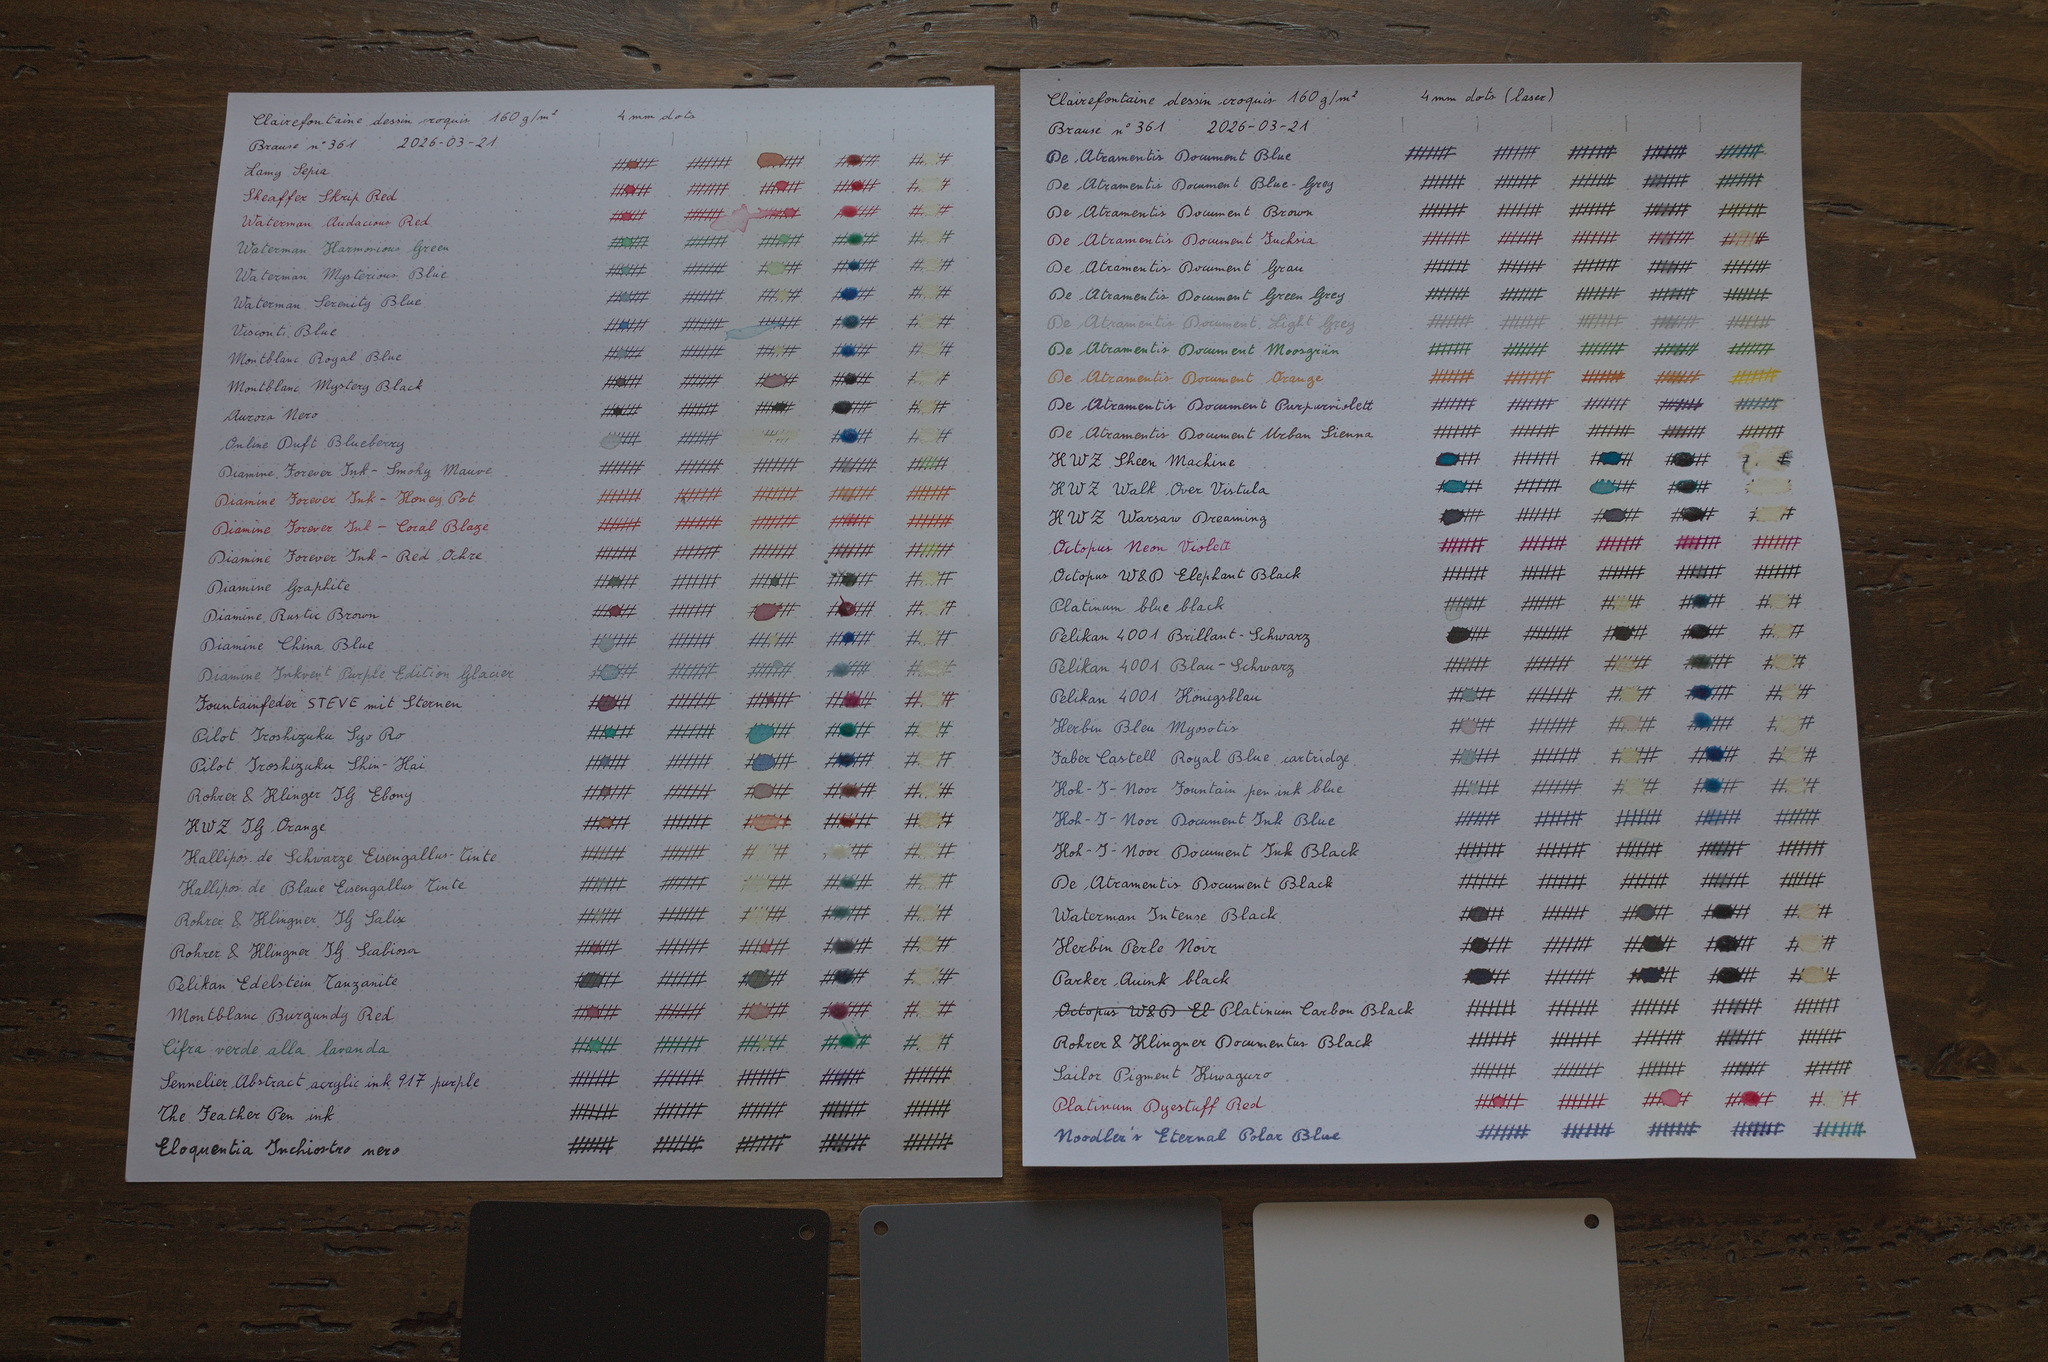
Most of the images in this post have no real alt-text: they are all
scans of the test sheet at various stages through the test, and the
results visible on them are described in detail at the end of the
post.
Most of the time, what people write by hand will either end up inside a
notebook in a drawer or cupboard where it’s well protected, or thrown in
the recycling where it doesn’t matter.
There are times, however, when things will be exposed to light: it
doesn’t matter whether it’s a work of artistic calligraphy that you want
to frame or a passive-aggressive notice left in the atrium of a
building; it is useful to know whether the work will remain legible or
it will fade into nothing in a short time.
A few inks are tested by the producers for lightfastness according to
some established standard, a few others are declared lightfast in a
generic way, but a lot come with no indication at all.
Proper testing according to the standard scales requires significant
equipment to precisely control the exposure, but it’s significantly
easier — and fun — to do a simple test to divide the inks into three
categories:
- suitable for framed calligraphy, i.e. it looks the same after 3 months
of direct sun exposure;
- suitable for complaining about the way your neighbours deal with the
trash, i.e. still readable after 3 months of exposure;
- not suitable for either, i.e. has faded significantly in the same time.
In the past I’ve done some such tests by taping some sheets to a
south-east facing window, and I’ve noticed that most of the results were
already apparent after a month, and there was basically no difference
between two and three months of exposure, but spring equinox to summer
solstice is a nice timeframe to use for such a test (and it leaves time
for a second test of different materials from summer solstice to autumn
equinox), so this is what I’ve chosen to do this year.
Rather than a window, now I have access to a south-facing covered
balcony that is protected from rain but receives quite a bit of direct
sun, so instead of taping sheets to the windows I’ve prepared a
sturdy cardboard panel that I can leave on a table on the balcony,
hopefully safe from the rain, but well exposed to the sun.
And then made a quick test, and realized that without the window glass
in front, the black strip used to cover the unexposed half of the sample
doesn’t lay flat and lets some sun in, so I used an old cheap
glass frame instead of the panel.
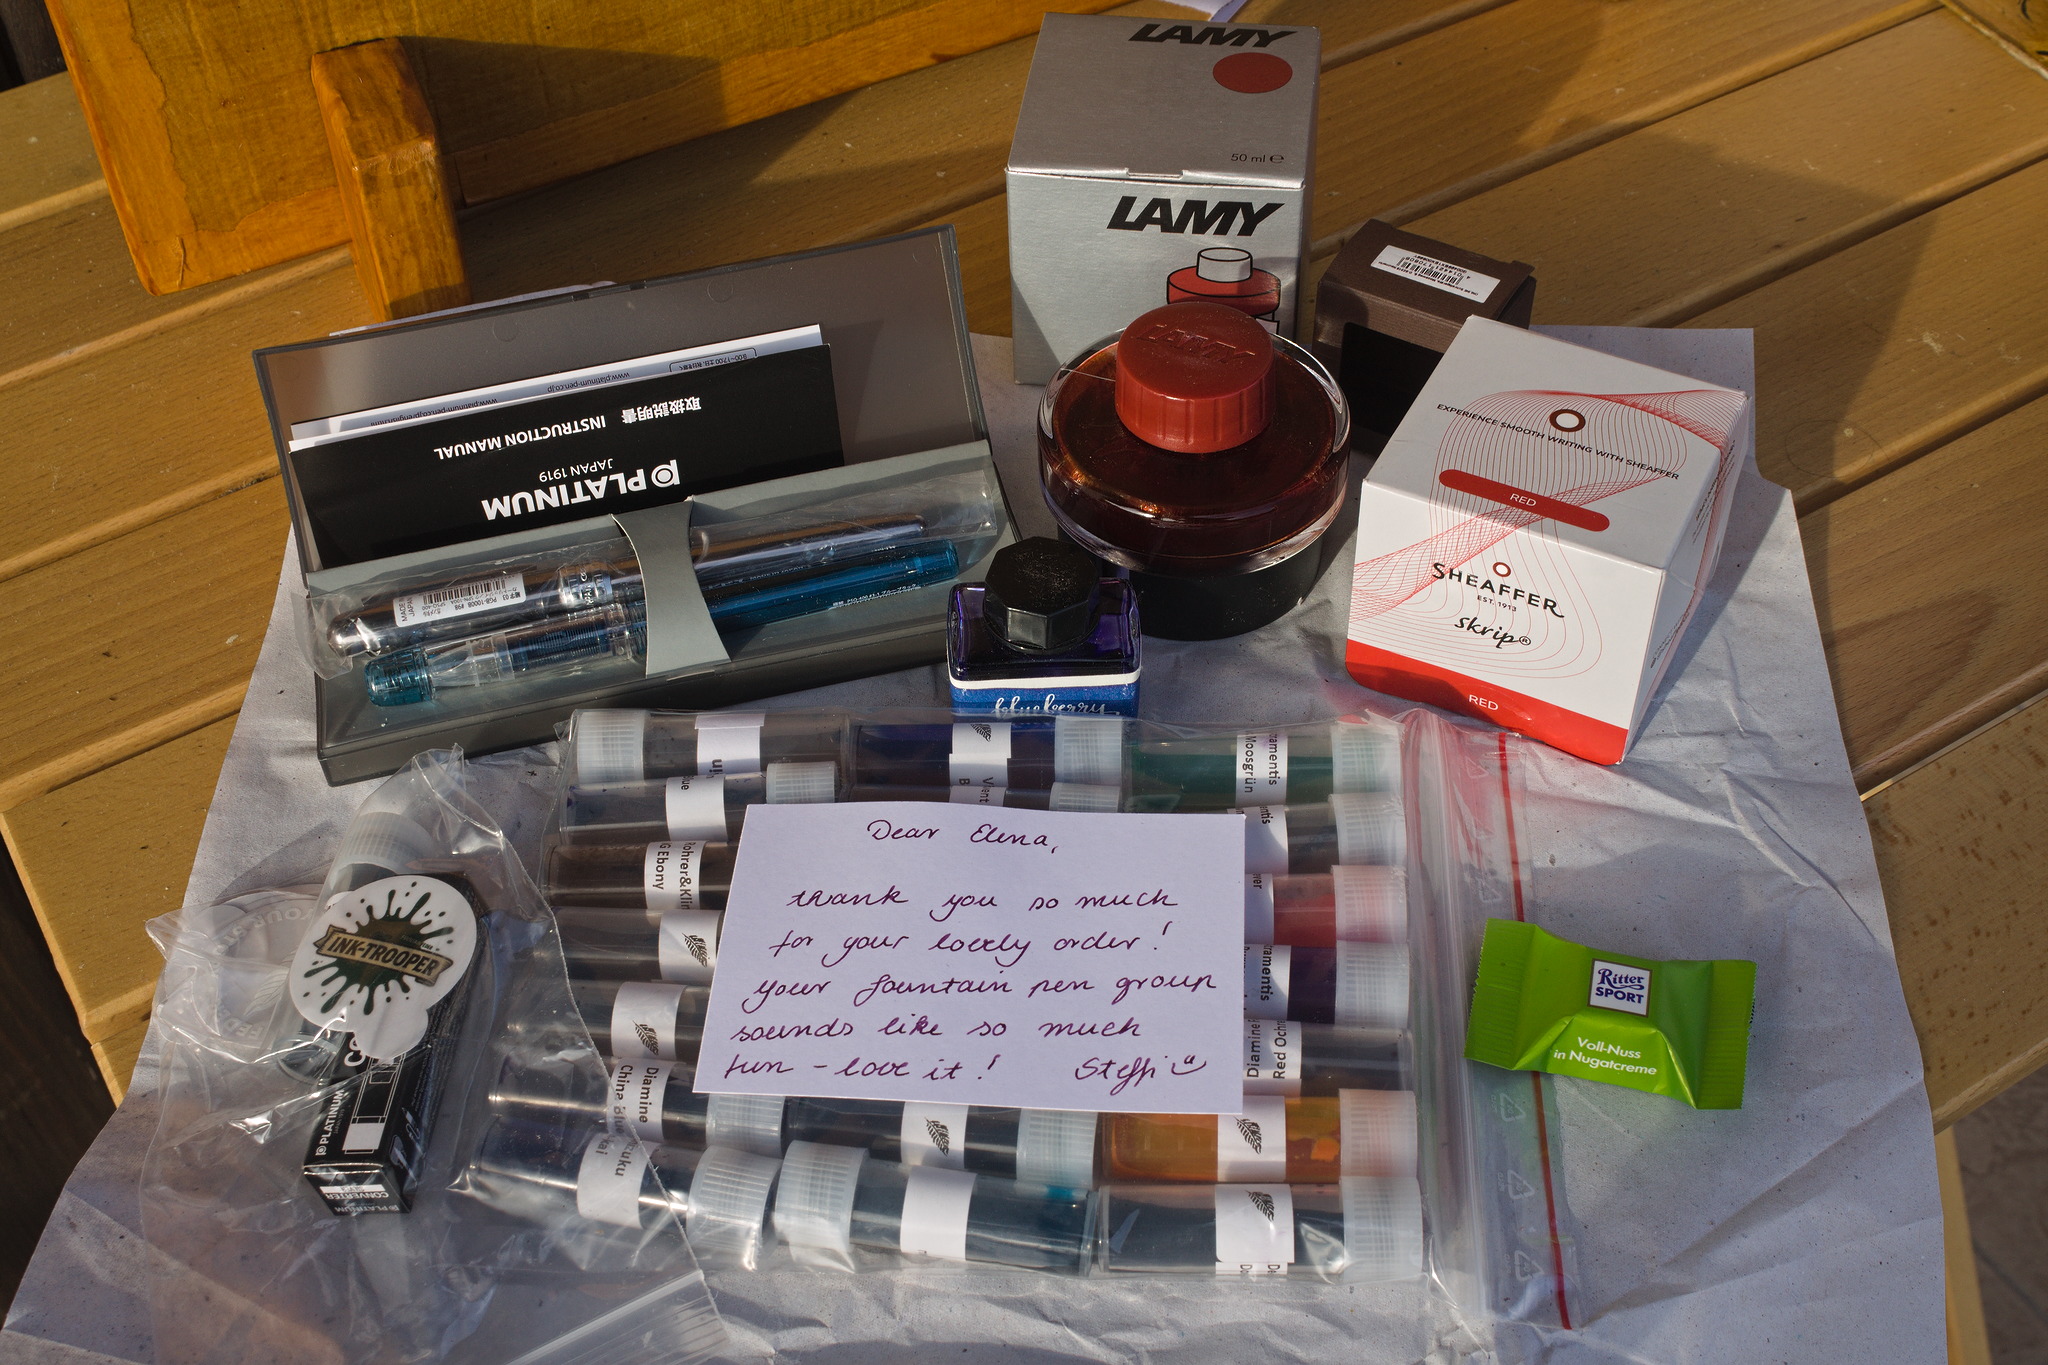
The next step, already in January, was mentioning in a fountain-pen
enthusiasts forum that I planned such a test, and asking if people were
interested in having me buy a few samples of more inks when I was
buying my next pen.
The word “enthusiasts” is probably a hint of the reason why soon
afterwards I received a package with the pen I had planned to buy, its
converter, and a couple dozens ink samples.
And then a couple envelopes with additional samples of inks that weren’t
available on the shops, from said enthusiasts.
Added to the inks I already had acquired since the last lightfastness
test, it meant that they couldn’t all fit in one single page, and thus I
had some room to add some inks I had already tested: some were requests,
and for others I tried to select ones that felt relevant.
Since I’m changing the test setup, I’ve decided I should probably keep
doing this until I’ve tested again all of the inks I still have
available.
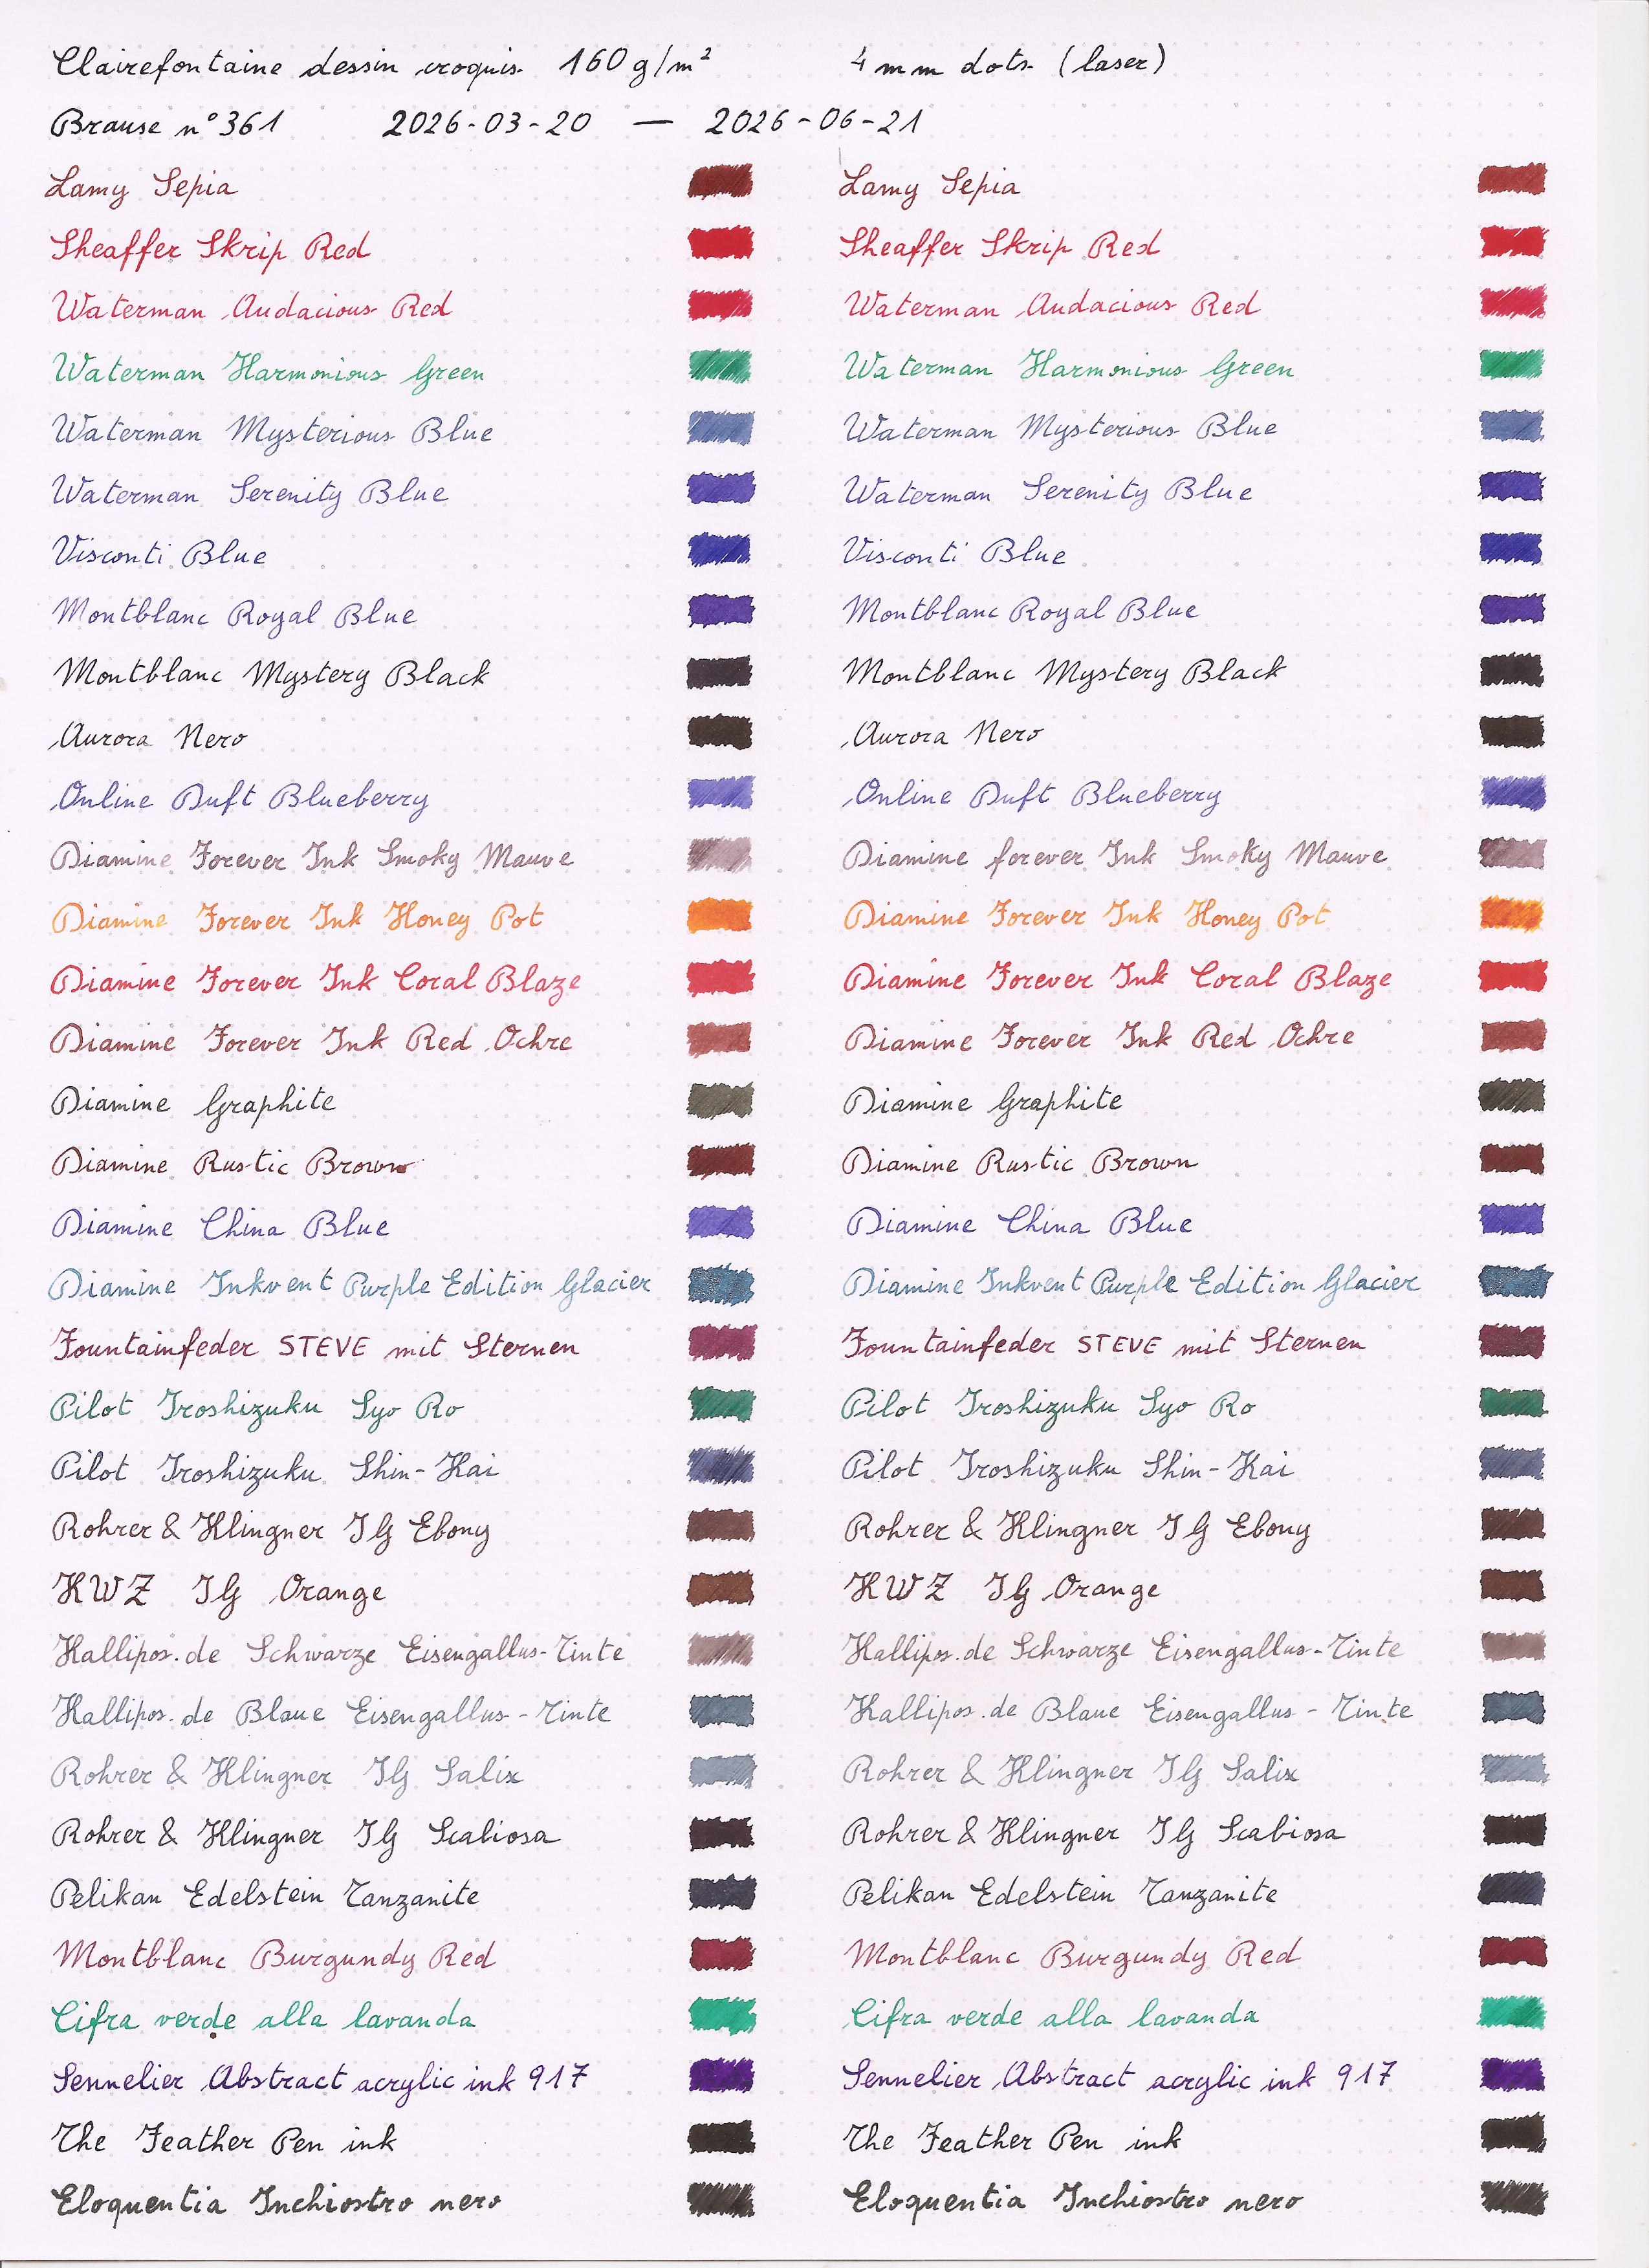
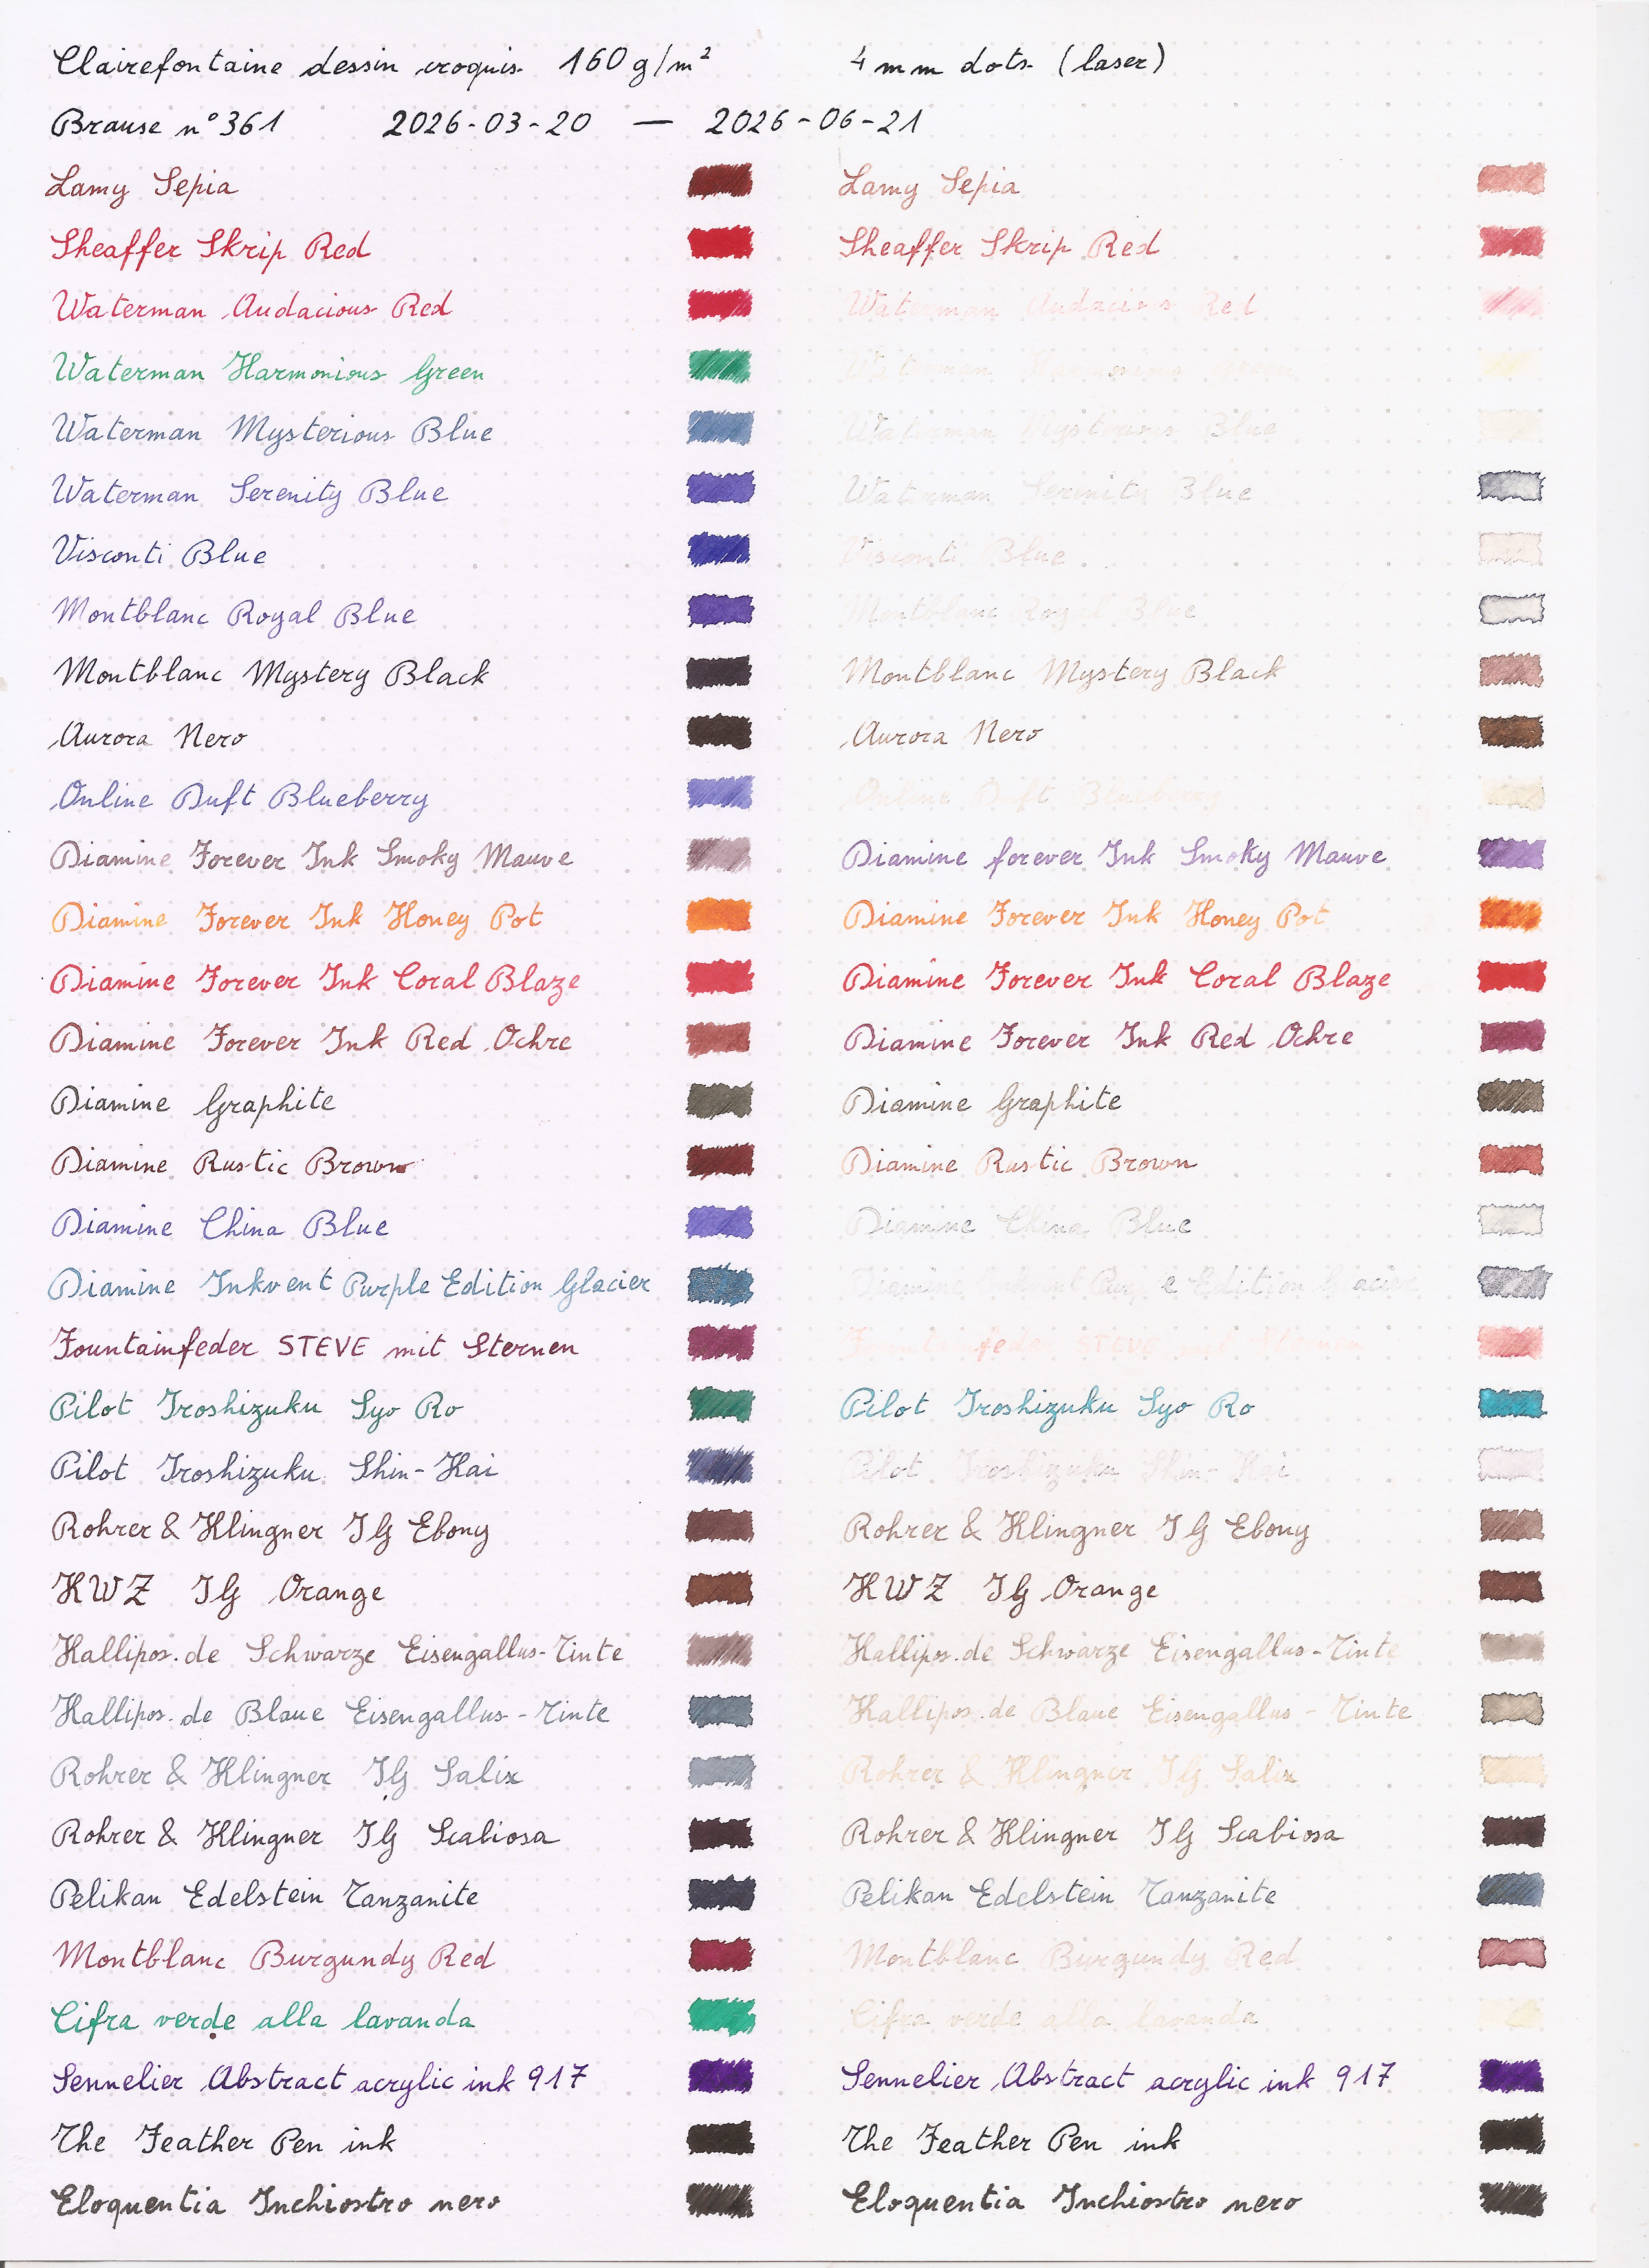
For the paper, I’ve used A4 sheets of Clairefontaine Dessin Croquis
160 g/m²,
one of my staples that I’m sure I will have available in the next years,
printed with a dot pattern with a laser printer, using this pdf.
And as for the pen I’ve used a fresh Brause n°361 nib: loading a fountain pen
with all of these inks wouldn’t be a reasonable effort, and the 361 is
one of the writing implements I use most anyway. I also used a glass pen
to fill a couple of squares on the paper with more ink.
One side of each sheet was then covered with a strip of 300 g/m² black
paper (also from Clairefontaine), kept in place with three dots of
non-permanent two sided tape, put in the frame and set out in the sun on
the morning of 2026-03-20, the day of the spring equinox.
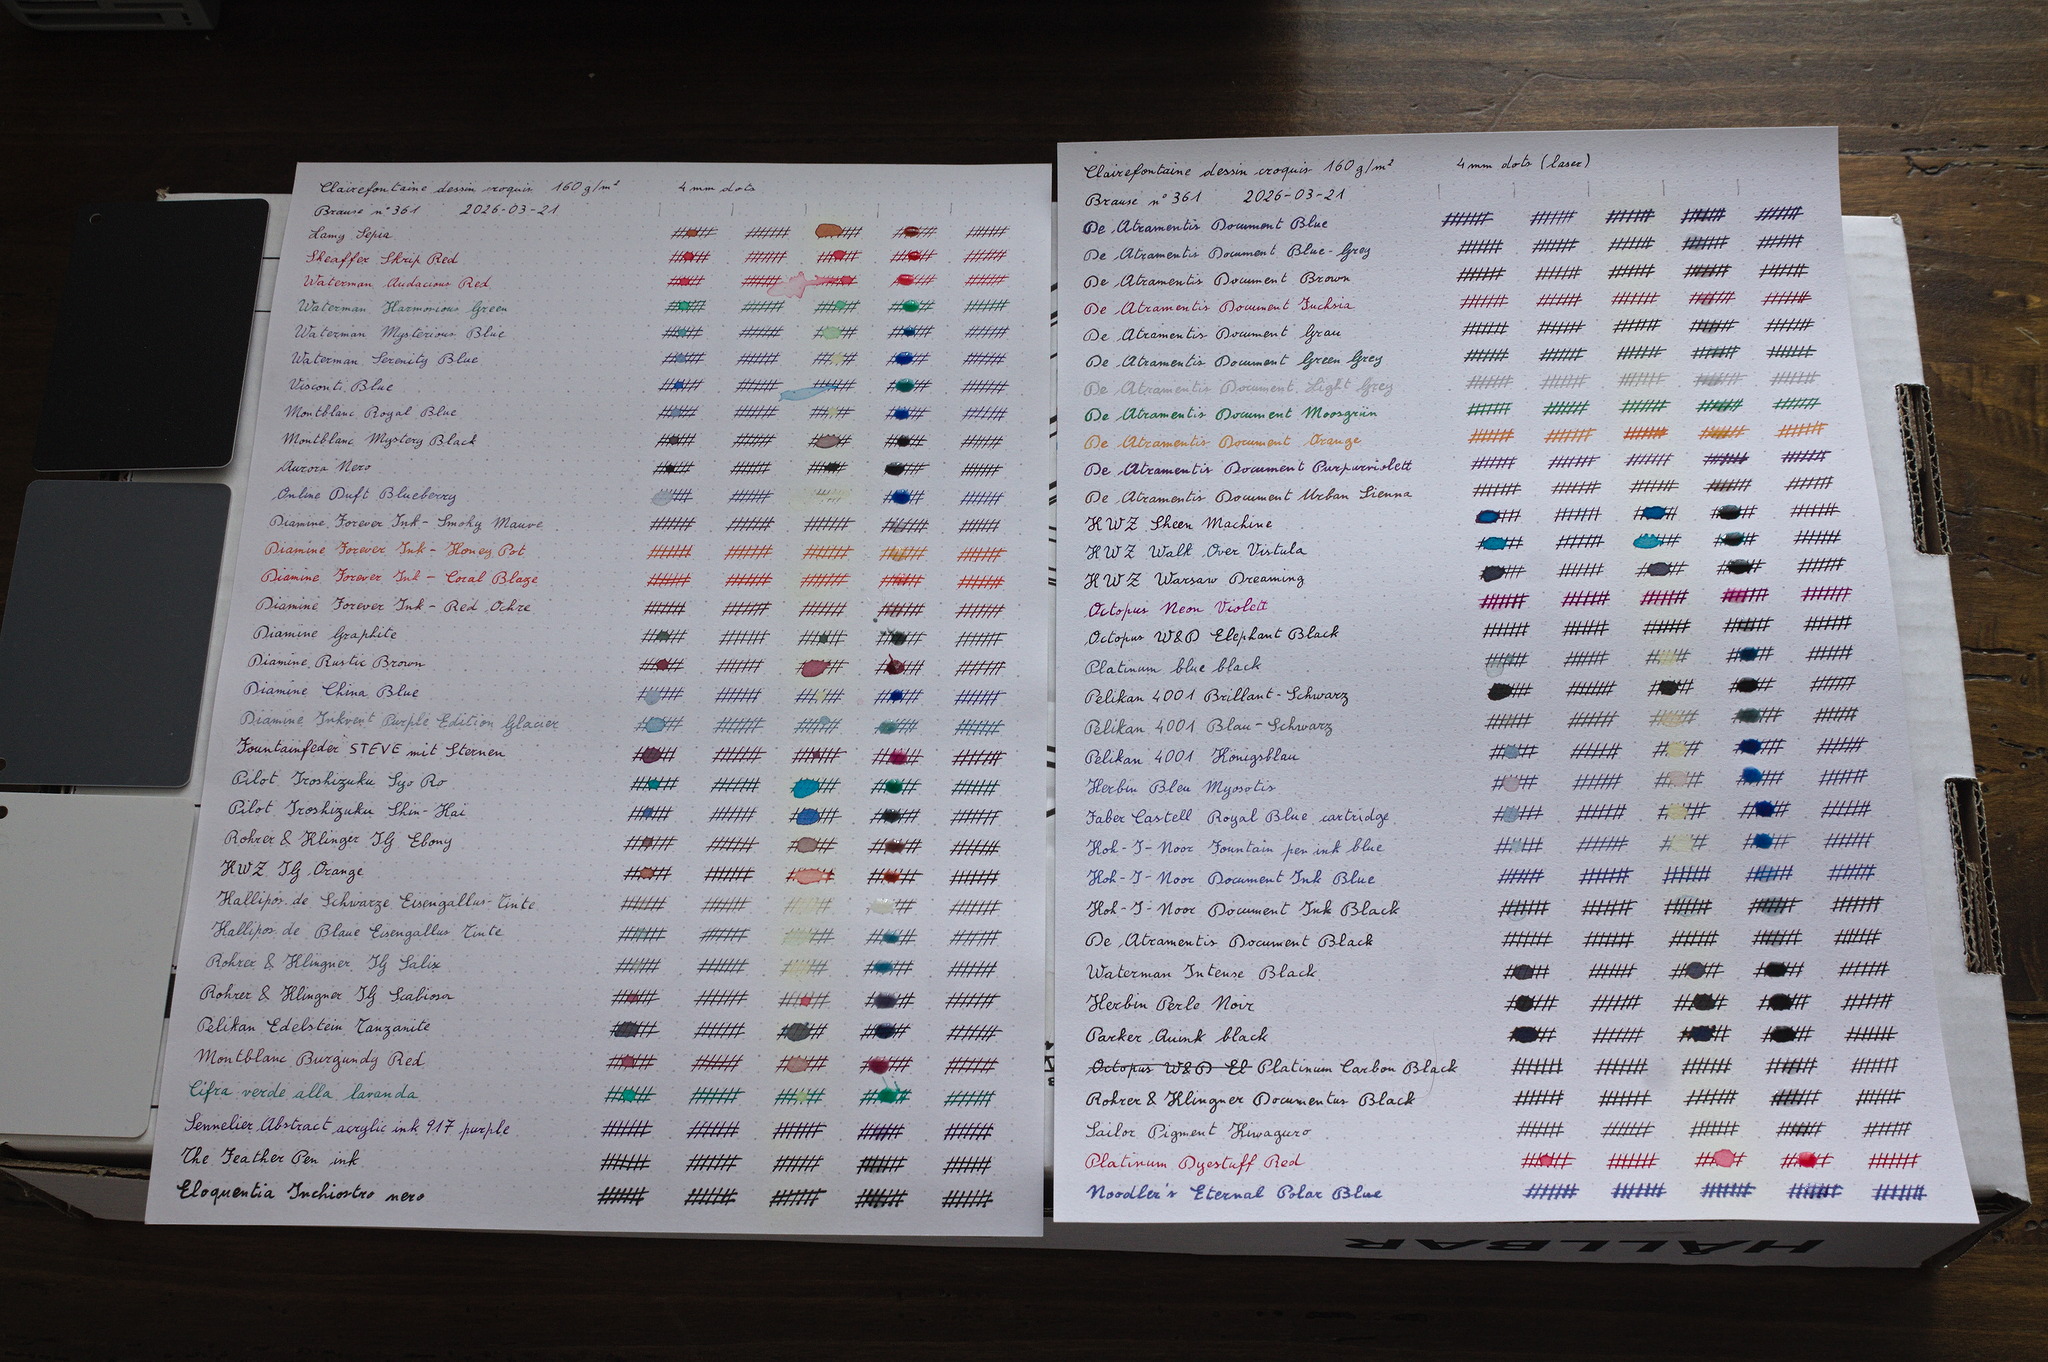
While I was filling the sheet for the lightfastness tests, I decided to
also prepare a second set of sheet, for a liquid resistance drop test.
On each line, beside the name of the ink, I added five sets of crossing
parallel lines, and let everything dry for a few days.
Then I used a syringe to put a drop of a liquid on each set of lines,
waited for it to be absorbed into the paper and to dry, at least
overnight, but sometimes also for a day or two (life happened), and then
looked at the results and did the next test.
The first liquid was water, with the usual wild difference between
washable and permanent inks, and all of the intermediate possibilities.
The second liquid was isopropyl alcohol, and I was surprised to see
that, with very few exceptions, most inks didn’t change at all. I
wonder whether that’s related to the fact that instead of forming a drop
it was absorbed almost immediately into the paper, and dried in a very
short time.
The third liquid was hydrogen peroxide: beside the individual results I
noticed that its column yellowed visibly; I wonder whether that means
that the paper I used has optical brighteners, and it will also yellow
under the sun: that wouldn’t be ideal, but it would also be a surprise,
for paper that is acid free and sold for arts.
The fourth liquid was citric acid, by mixing a bit less than a teaspoon
of citric acid granules in just enough very warm water (heated to 70°C,
i.e. the lowest temperature available on my kettle) to dissolve most of
the acid. I forgot that I had some old PH strips until one hour after
I’ve put the drop on the paper, and I don’t know whether something had
changed, but when I did remember about them it showed a deep red between
1 and 2. I don’t think I can trust those strips too much, however.
This backfired badly: the drop of citric acid never dried out, but
formed a sticky paste that prevented me from scanning the results,
and I’m not sure whether I’ll do the last test, which was supposed to be
household bleach.
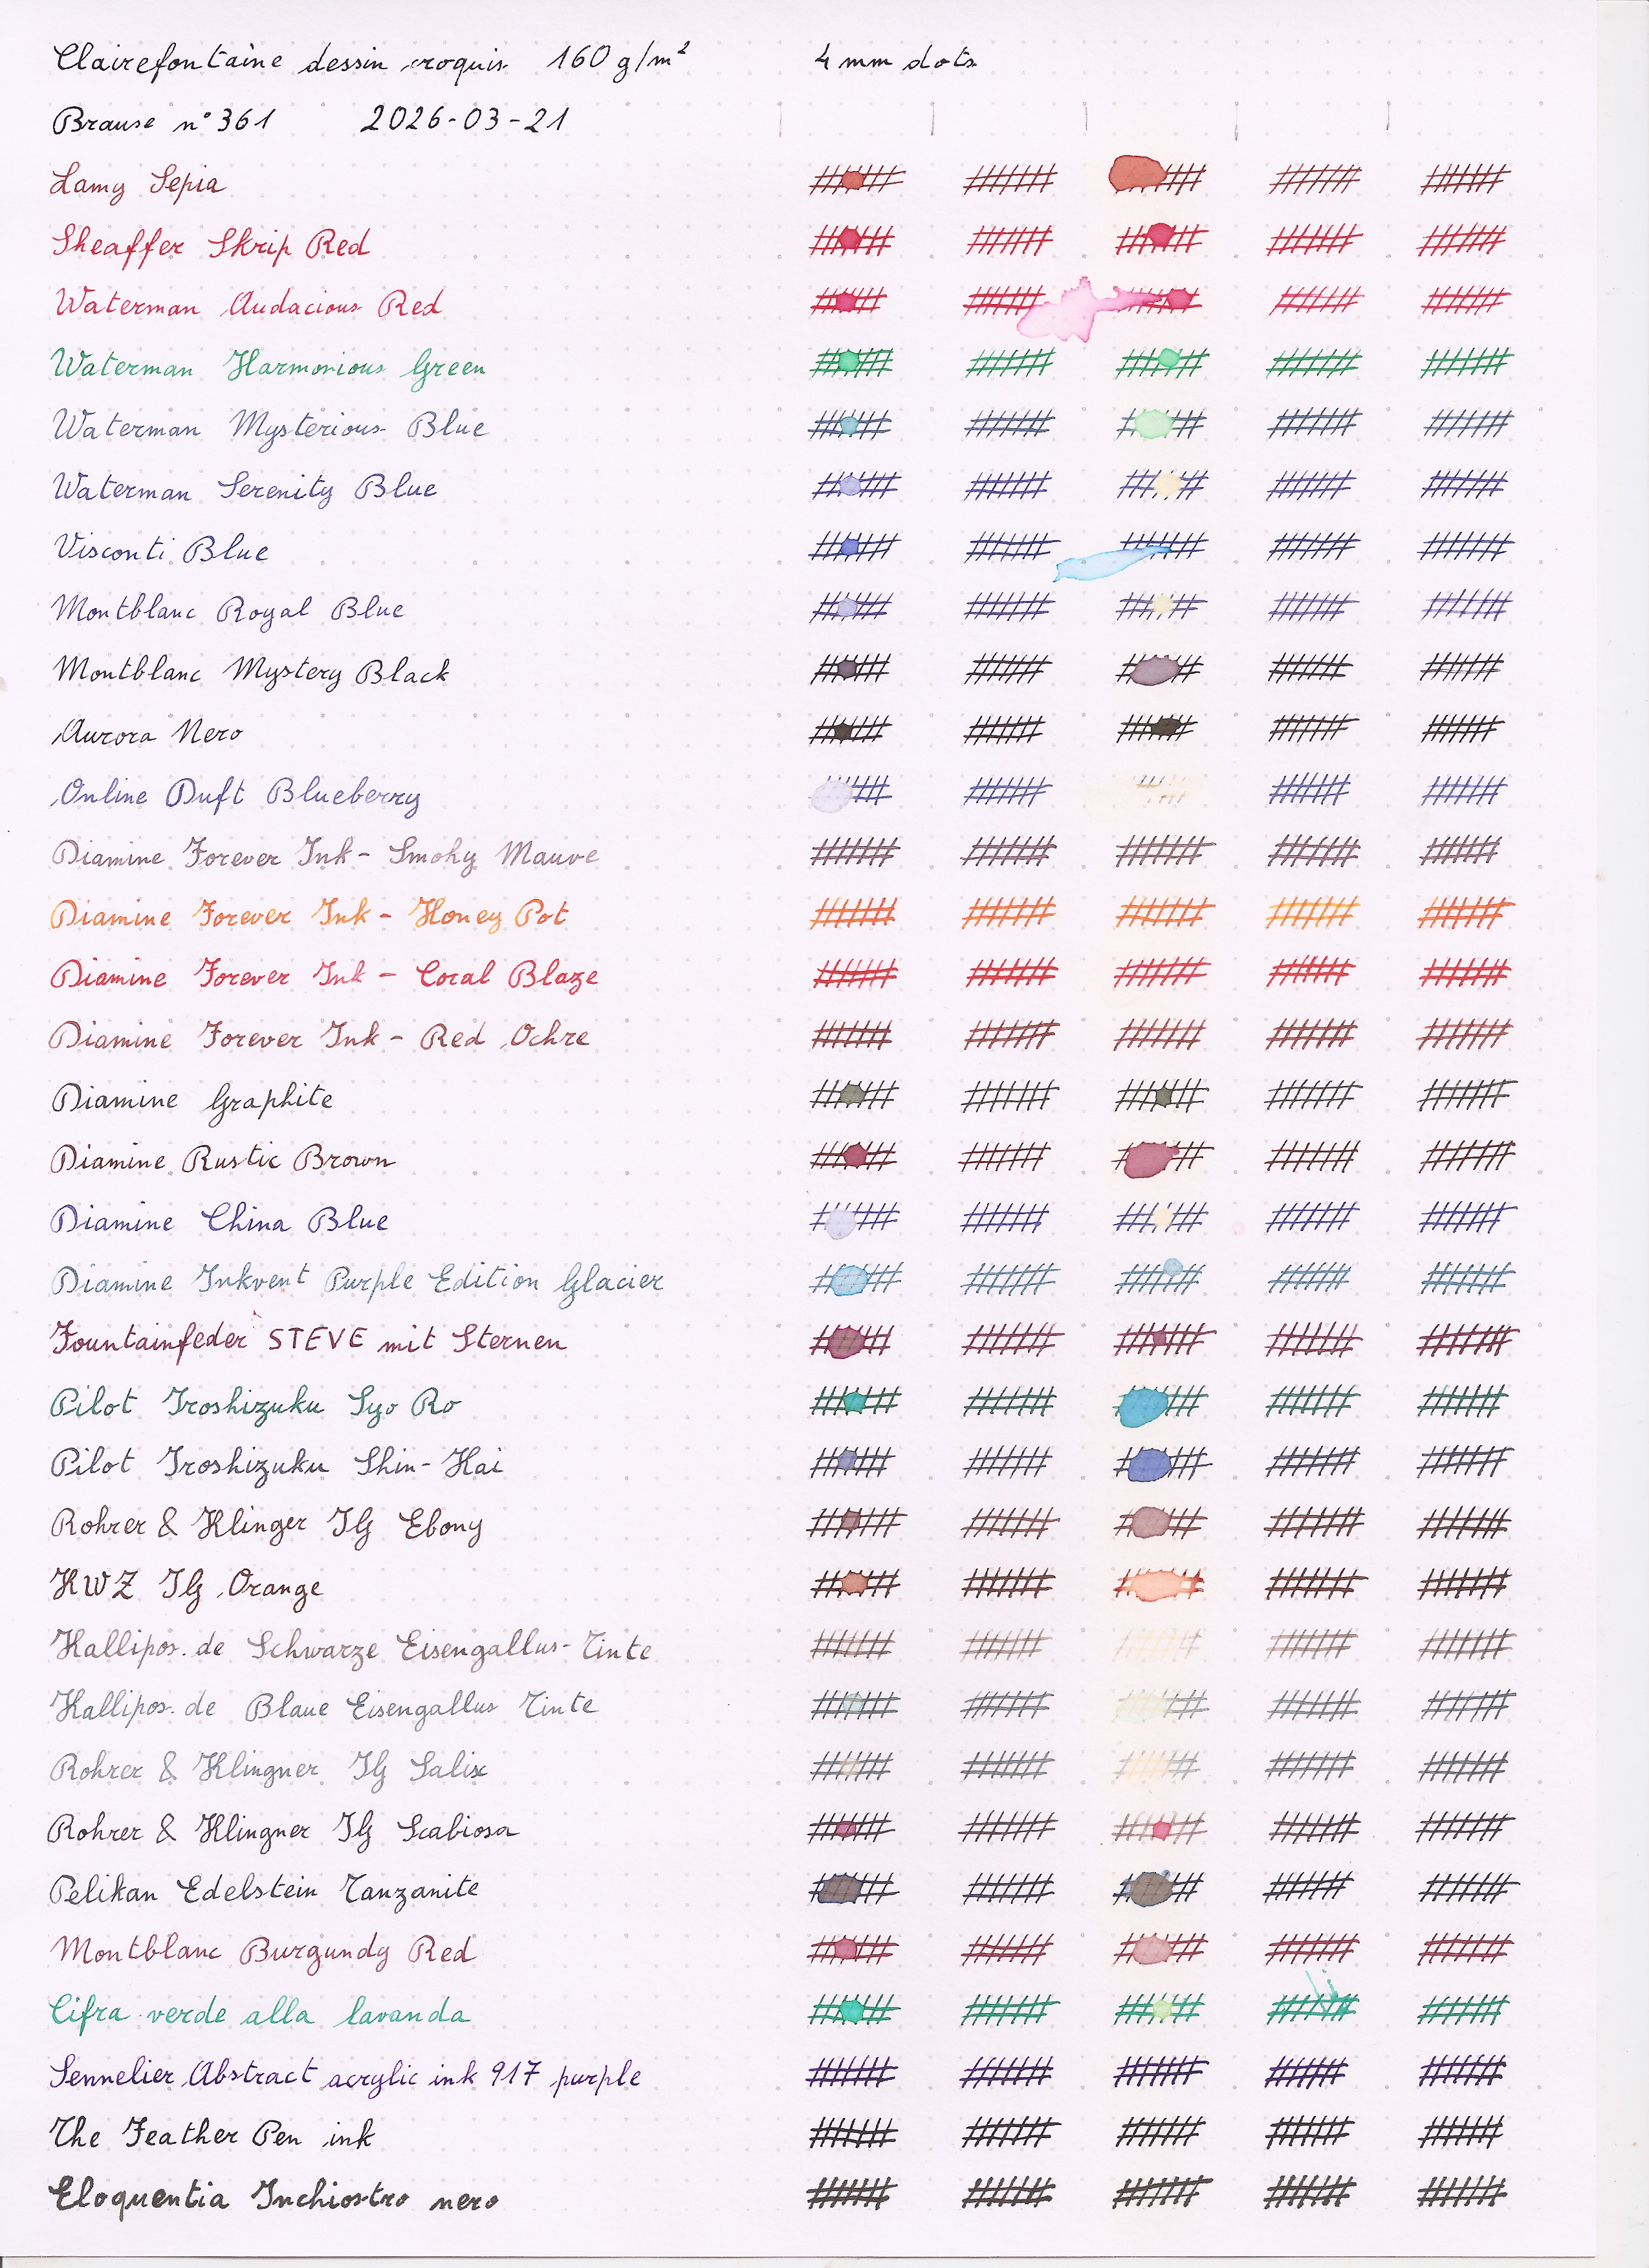
Luckily I had scanned the partial results, and they are shown here.

After a month or so, I checked, and the citric acid had dried enough
that I dared put the sheet in the scanner, so I did the final test with
household bleach, and that one was pretty hard on the inks, with very
few survivors.
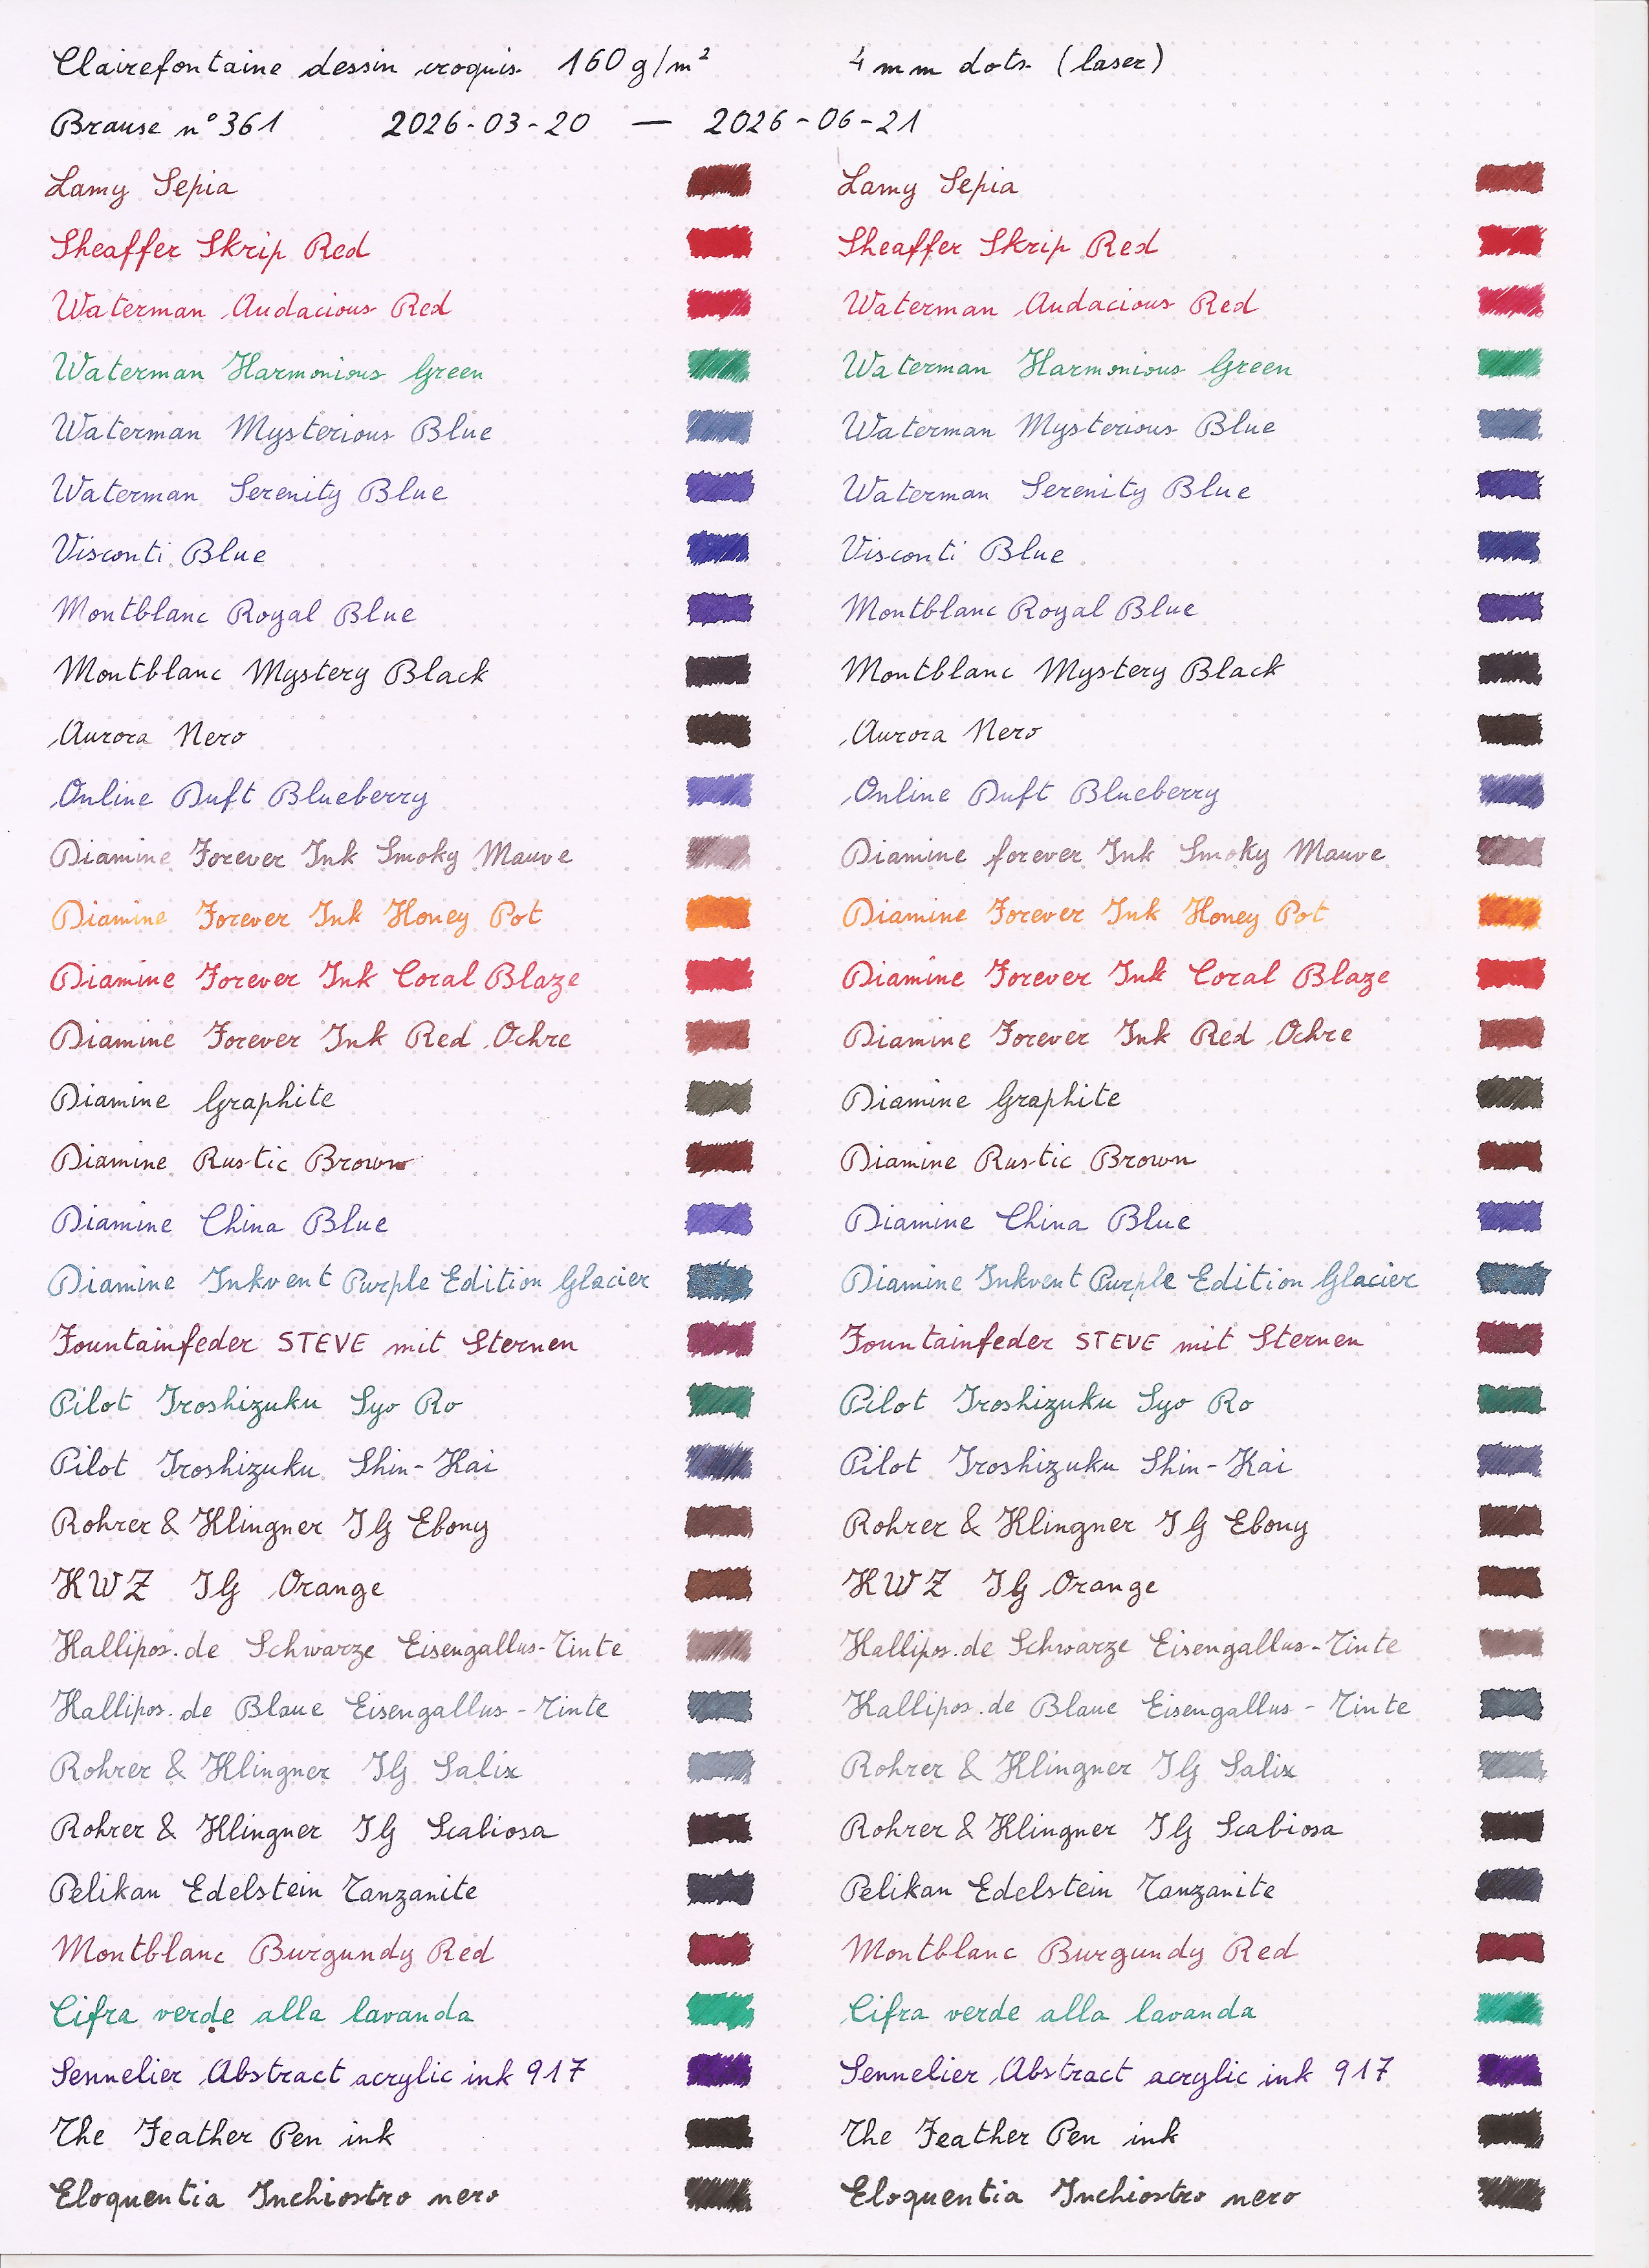
After one full day with plenty of sun, nothing really had changed,
except possibly for a vague hint that the Herbin Bleu Myosotis may have
have been a bit lighter than it started, but it may also have been a
suggestion.
After three days, however, some results started to show, with the most
fugitive inks starting to be visibly changed, becoming either paler or
in some case duller.
And the full week showed more of that, with a few more inks starting to
show visible change.


After two weeks the paper had significantly yellowed, something I did
not expect from drawing paper (and which means that I will probably use
a different paper when making similar tests in the future).
As for the inks, there were a couple more inks with visible changes, but
mostly it was more of the same as seen in the previous week.
Three weeks started to show changes in the black and most irongall inks, and of course more changes in the even less resistant inks.
Week four saw a bit more clouds and rain than the first few weeks, and
there weren’t big changes, but mostly more of what had already started
to happen earlier.
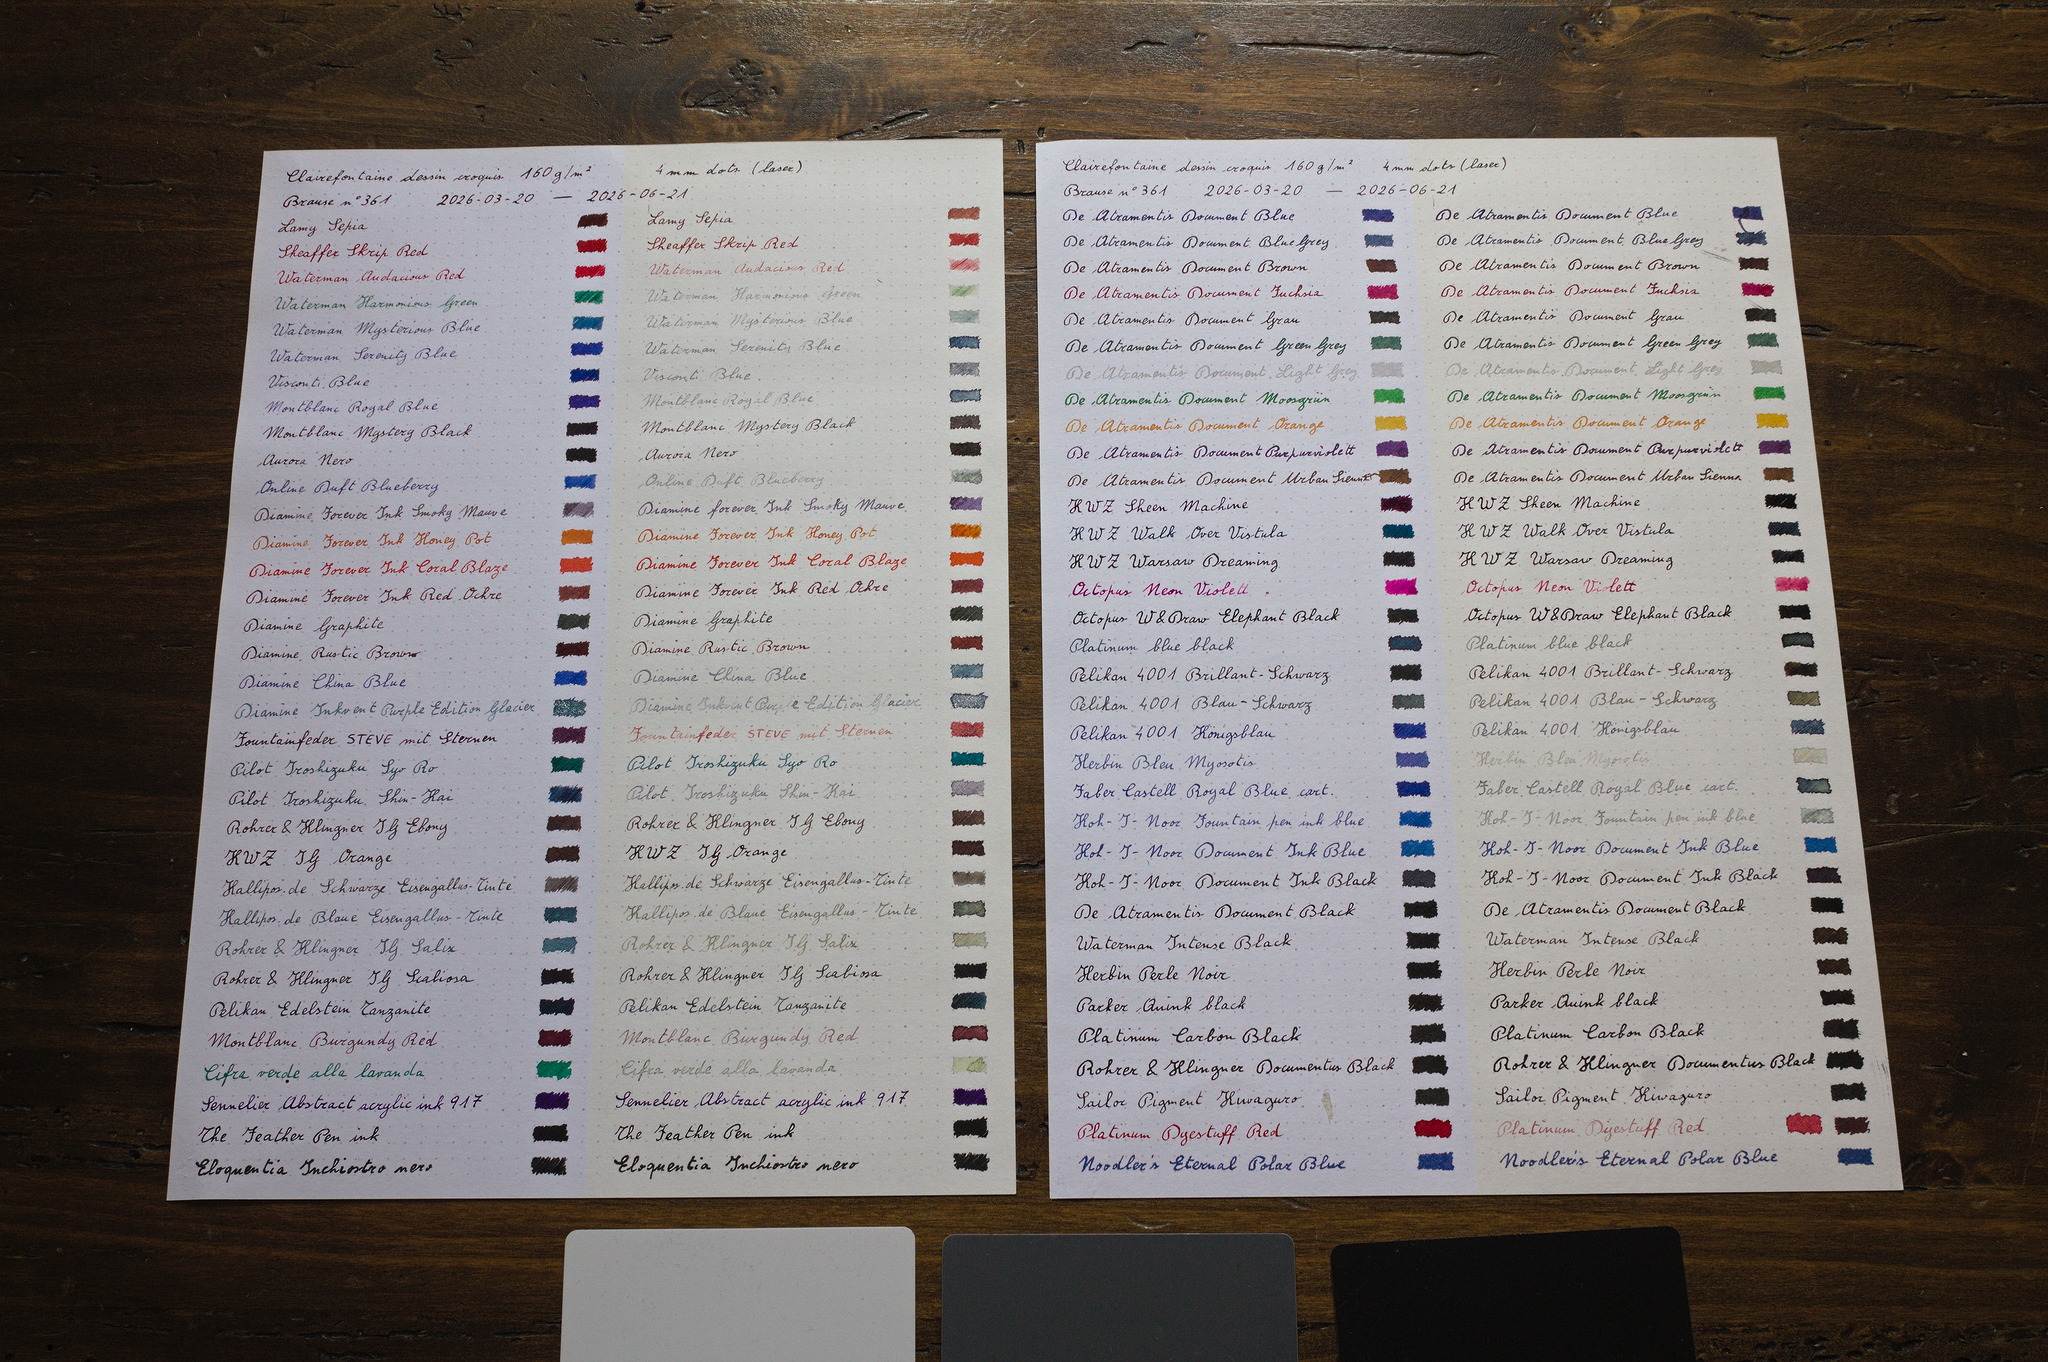
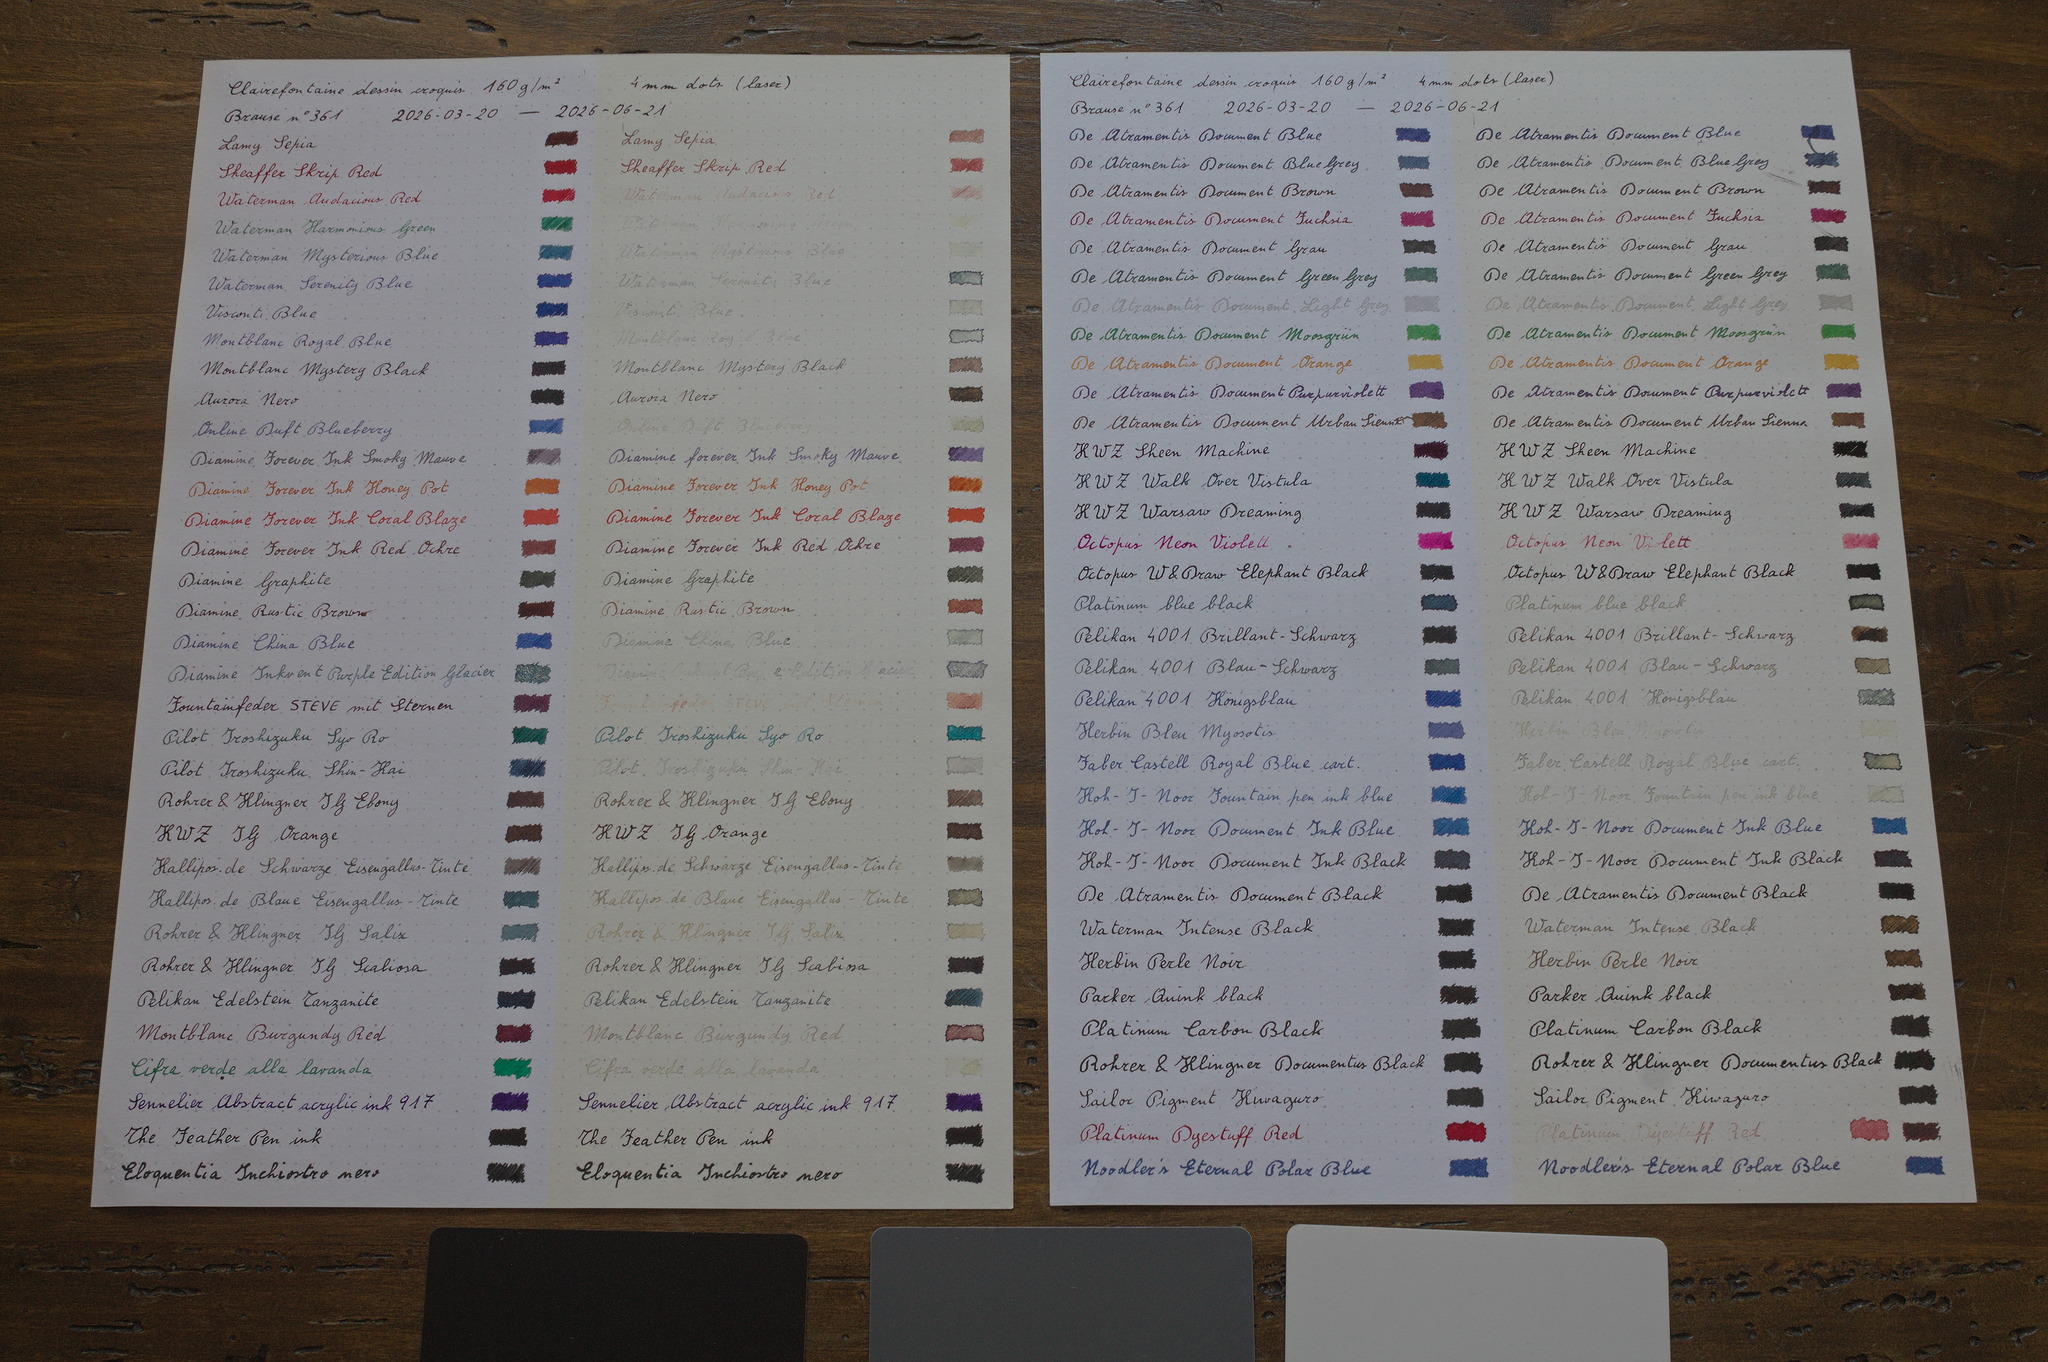
A month didn’t change much compared to the four weeks, but I did the
scans for completeness, and took a picture, and from now on I’m going to
update monthly.
After two months there were almost no surprises, but many of the inks
that had started to fade are now a pale trace of themselves.
The only unexpected thing was a bit of hue change in a couple of the
Diamine Forever inks.
The next update will be the final one, at the three months mark.


These are the inks I’ve tested, and here I’ll add notes on the results,
as soon as they will be available, keeping this section updated.
When nothing is mentioned, it means that there were no changes, either
under the light or under the various liquids.
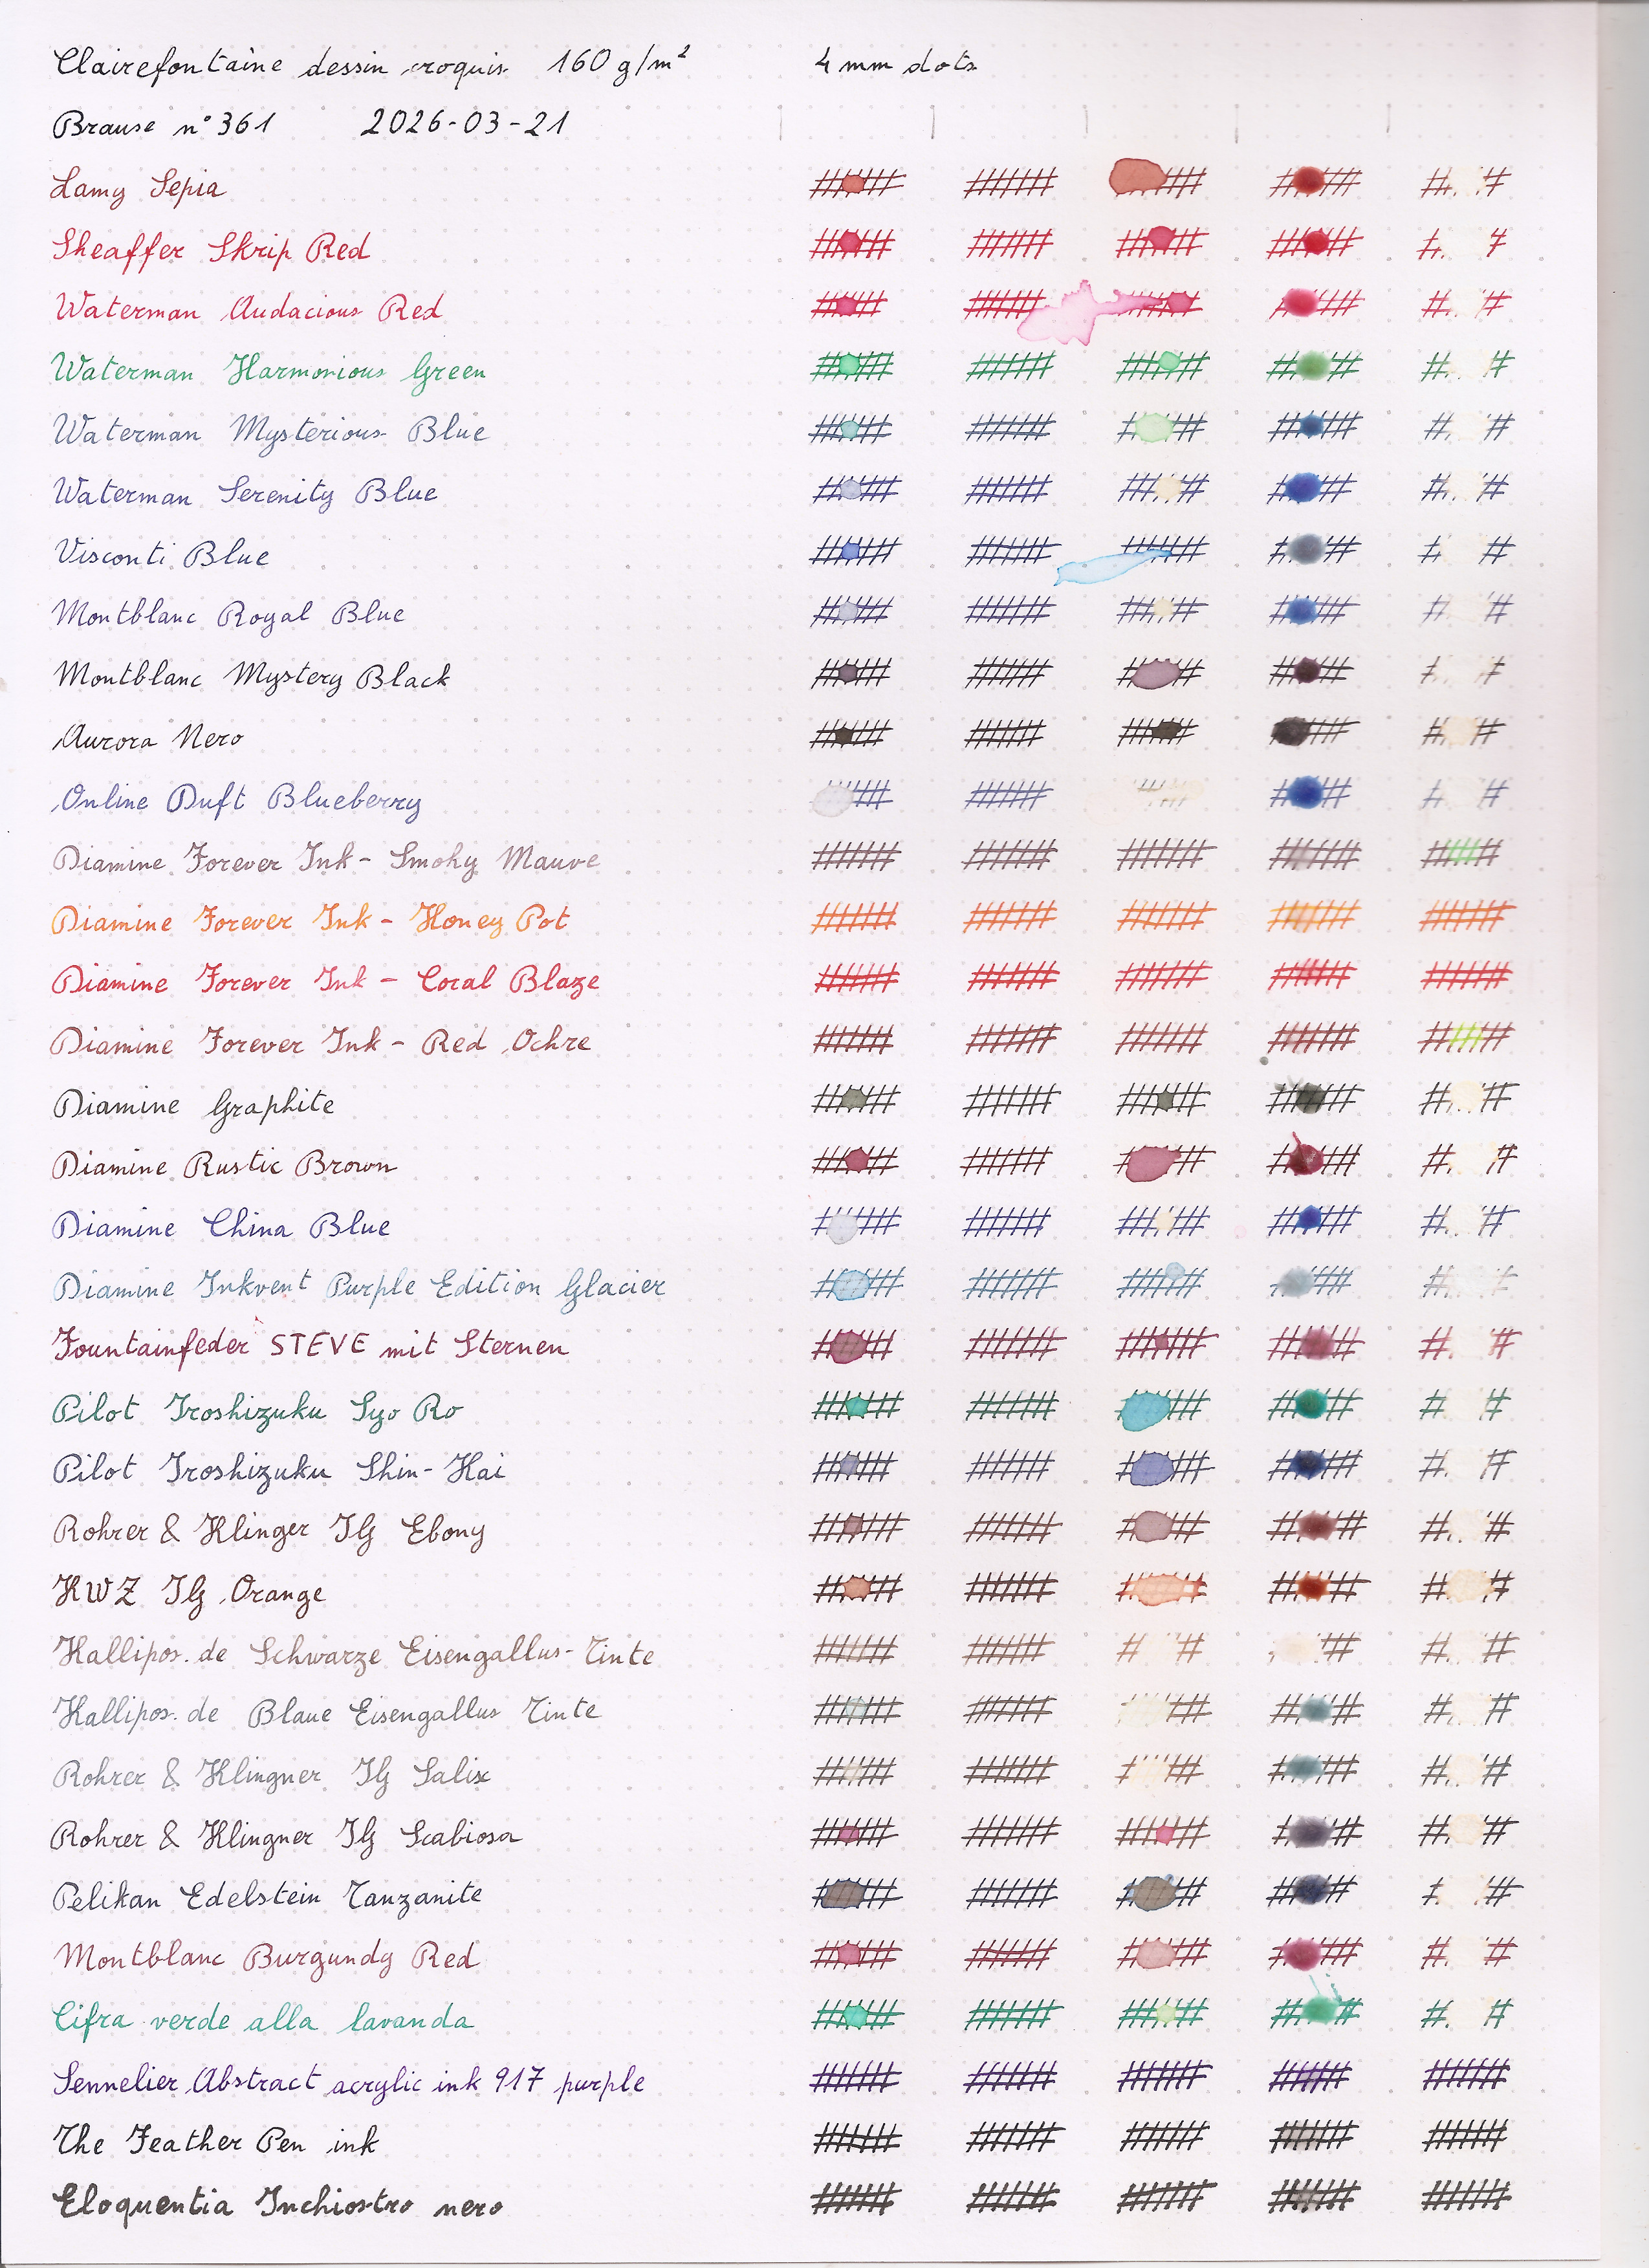
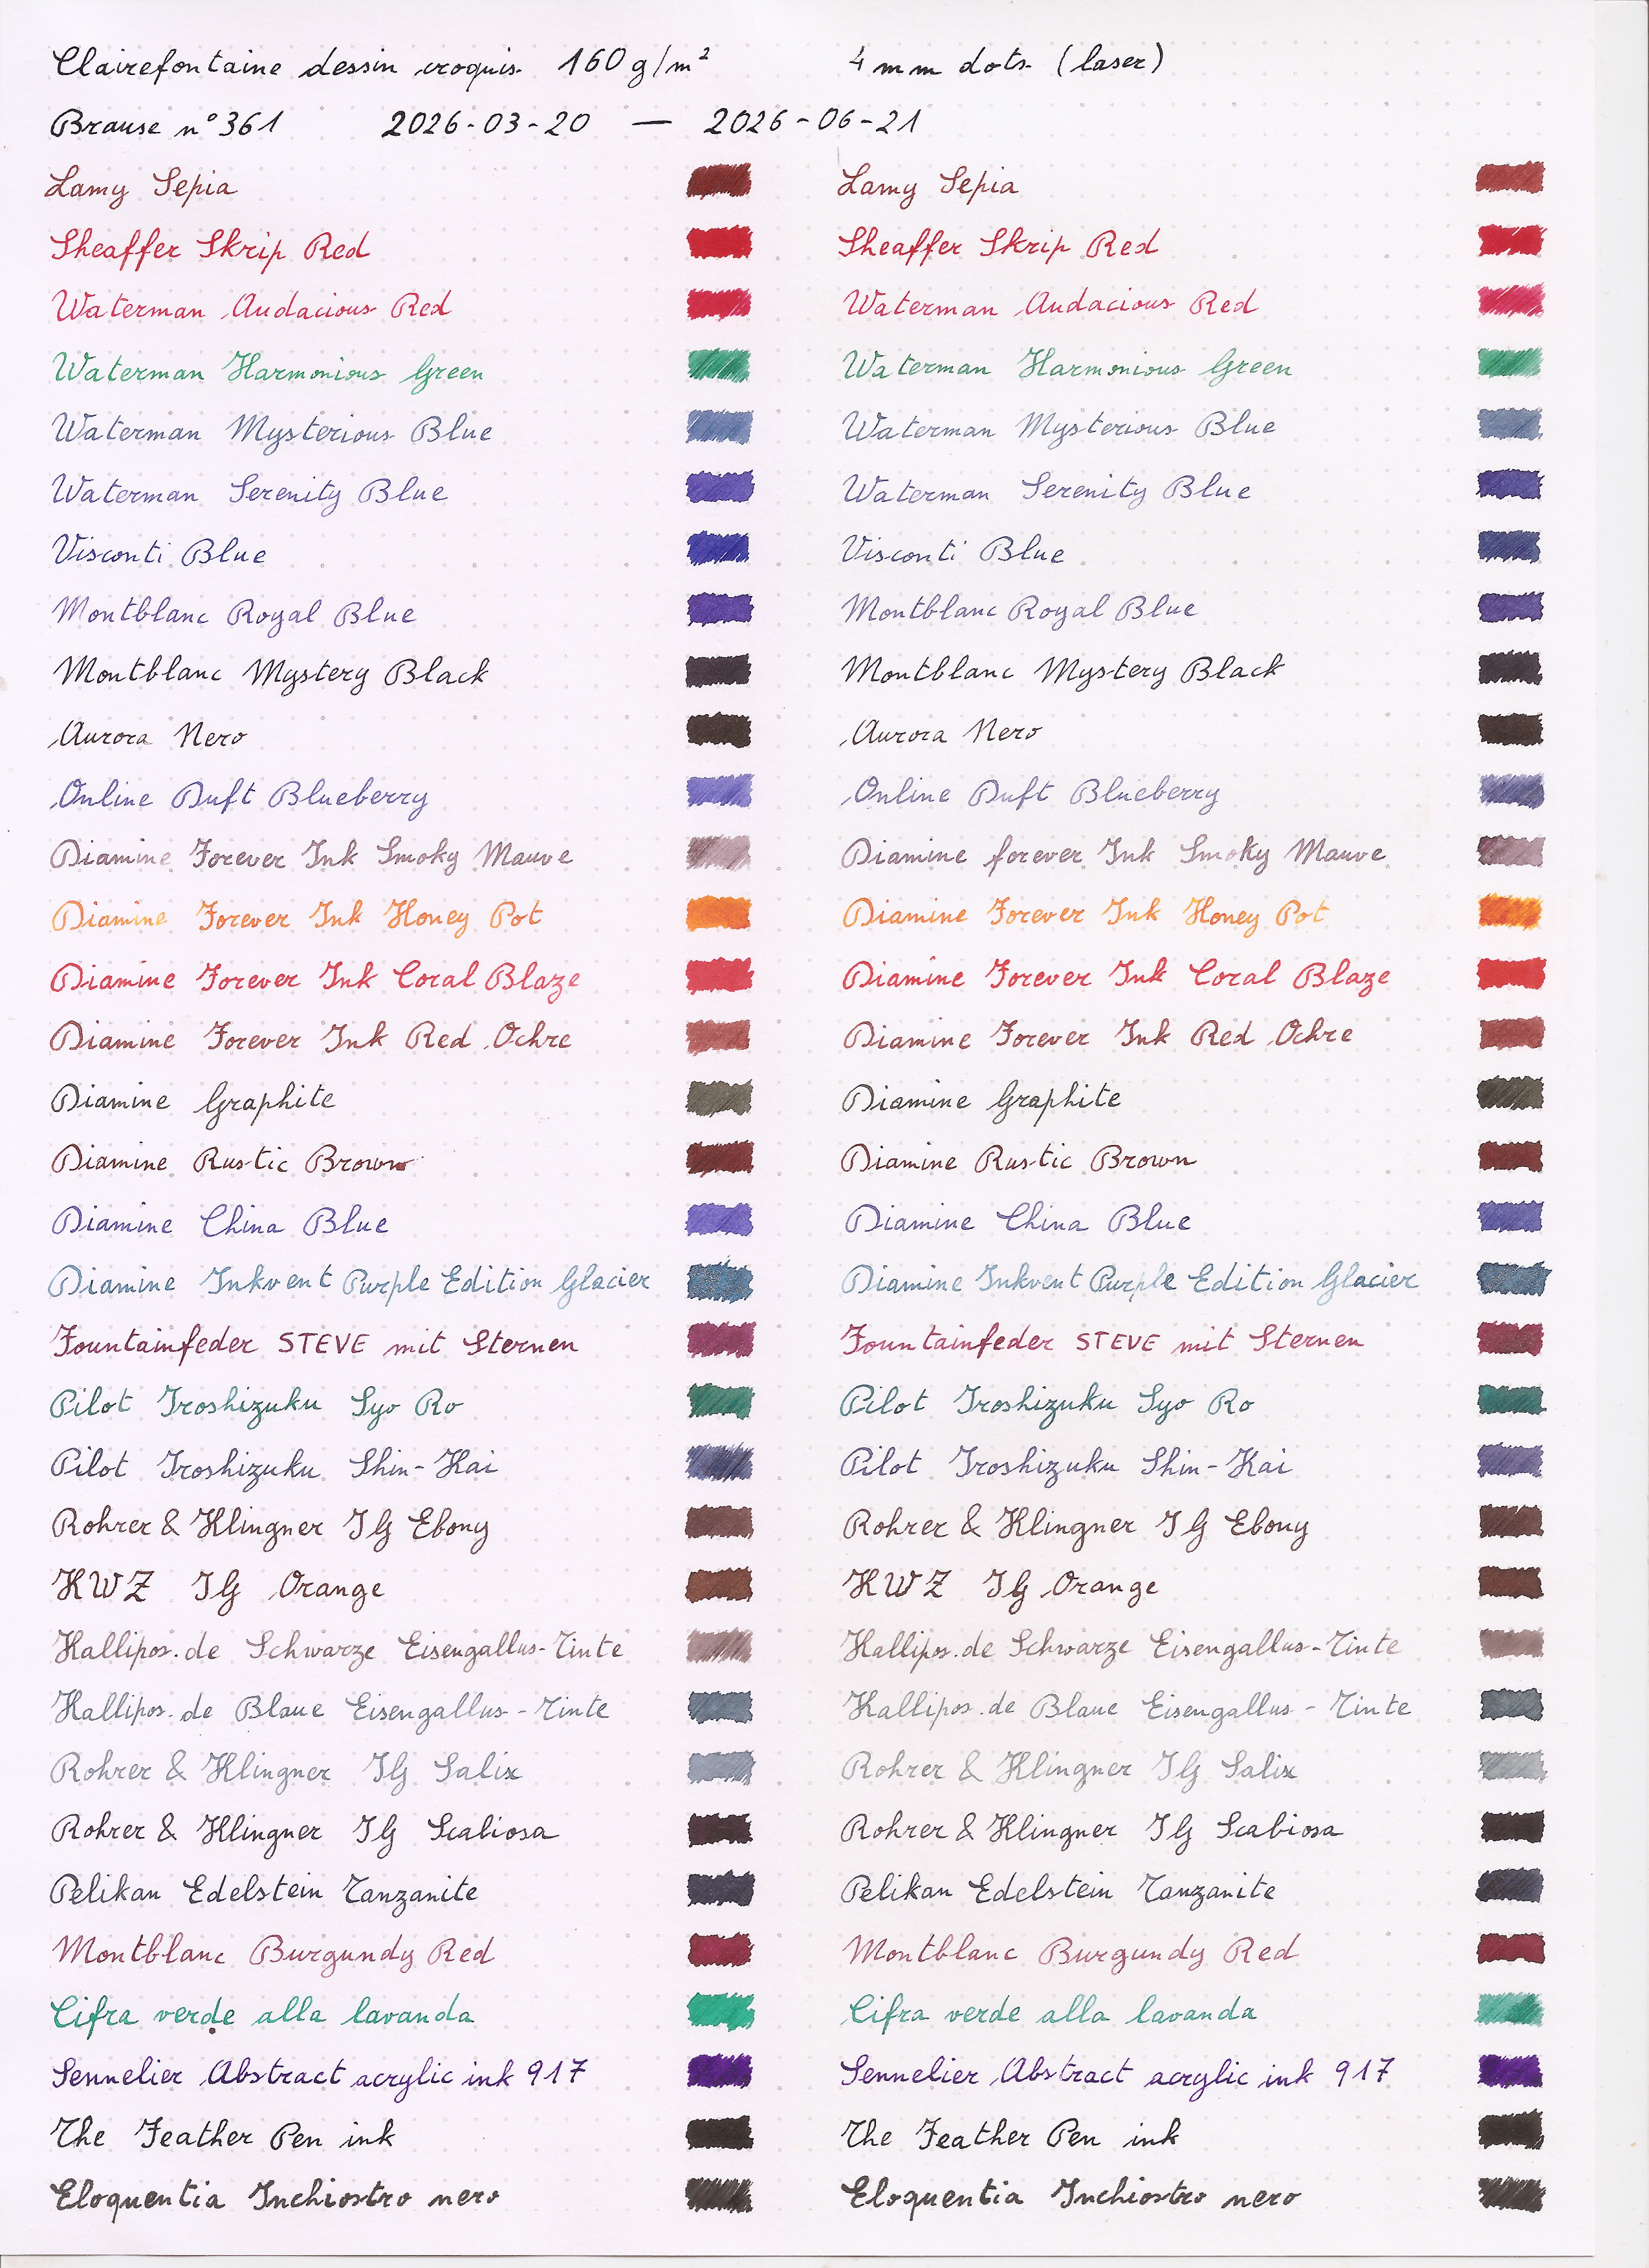
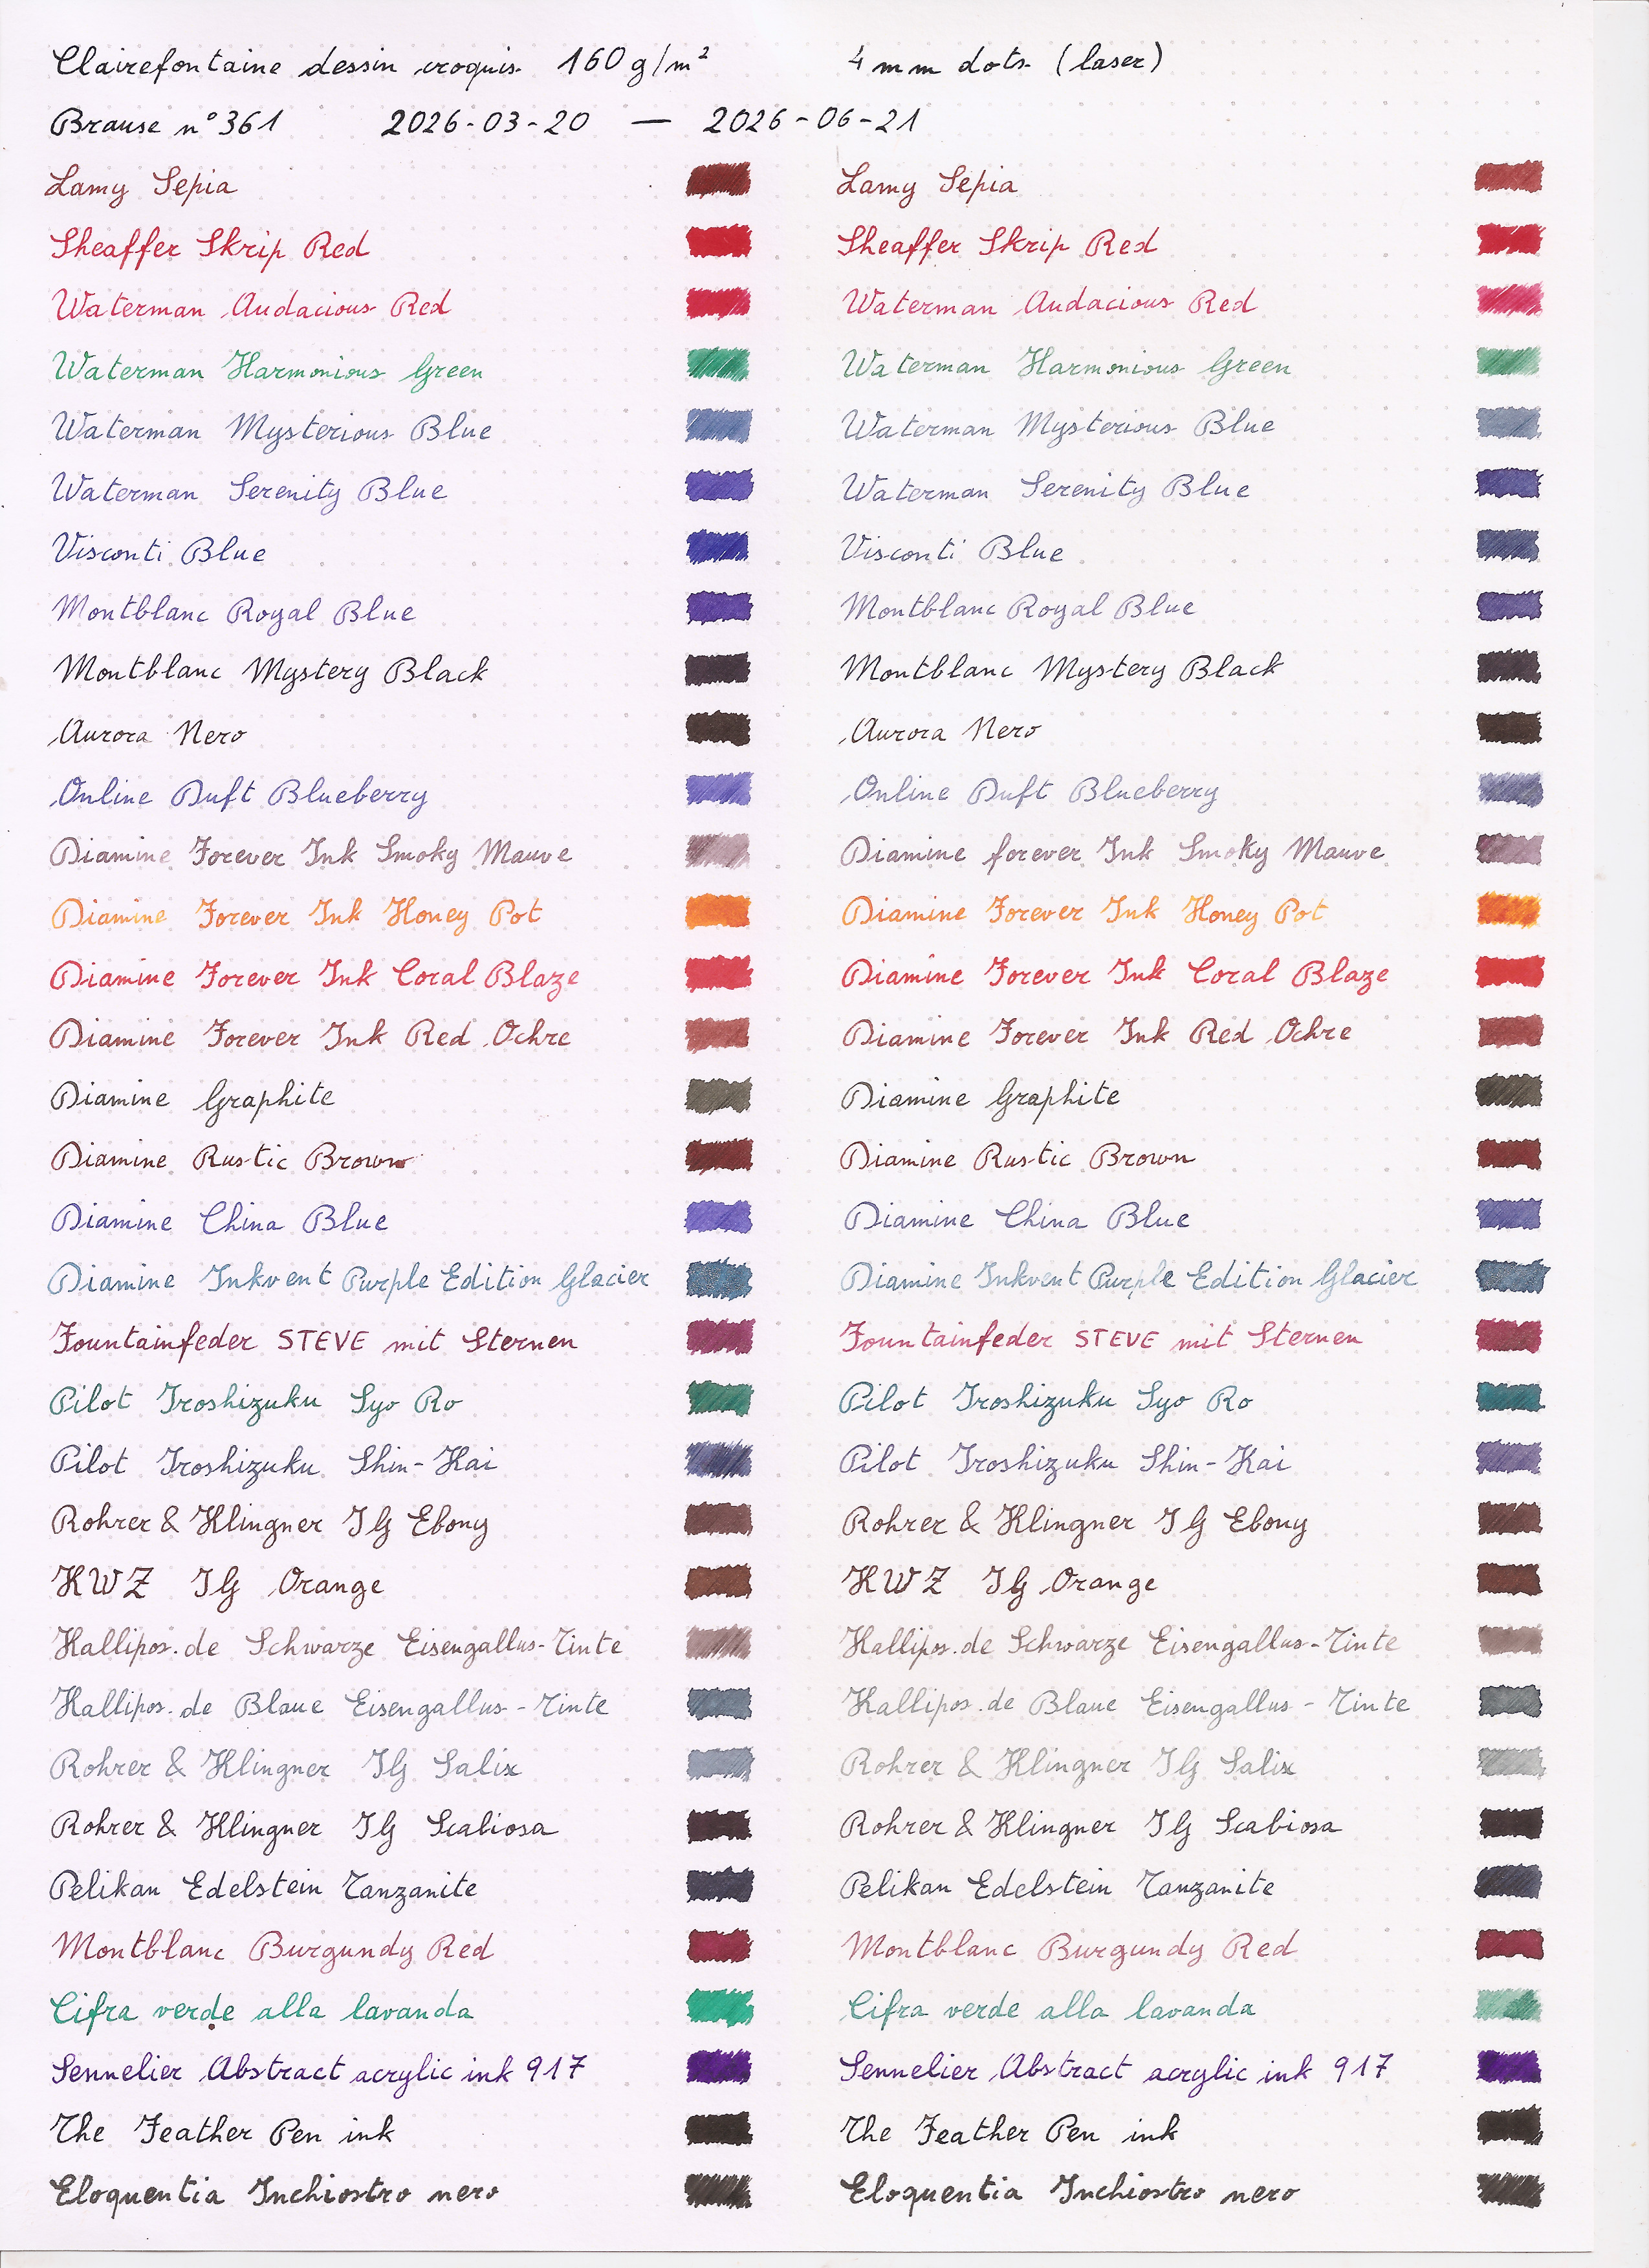
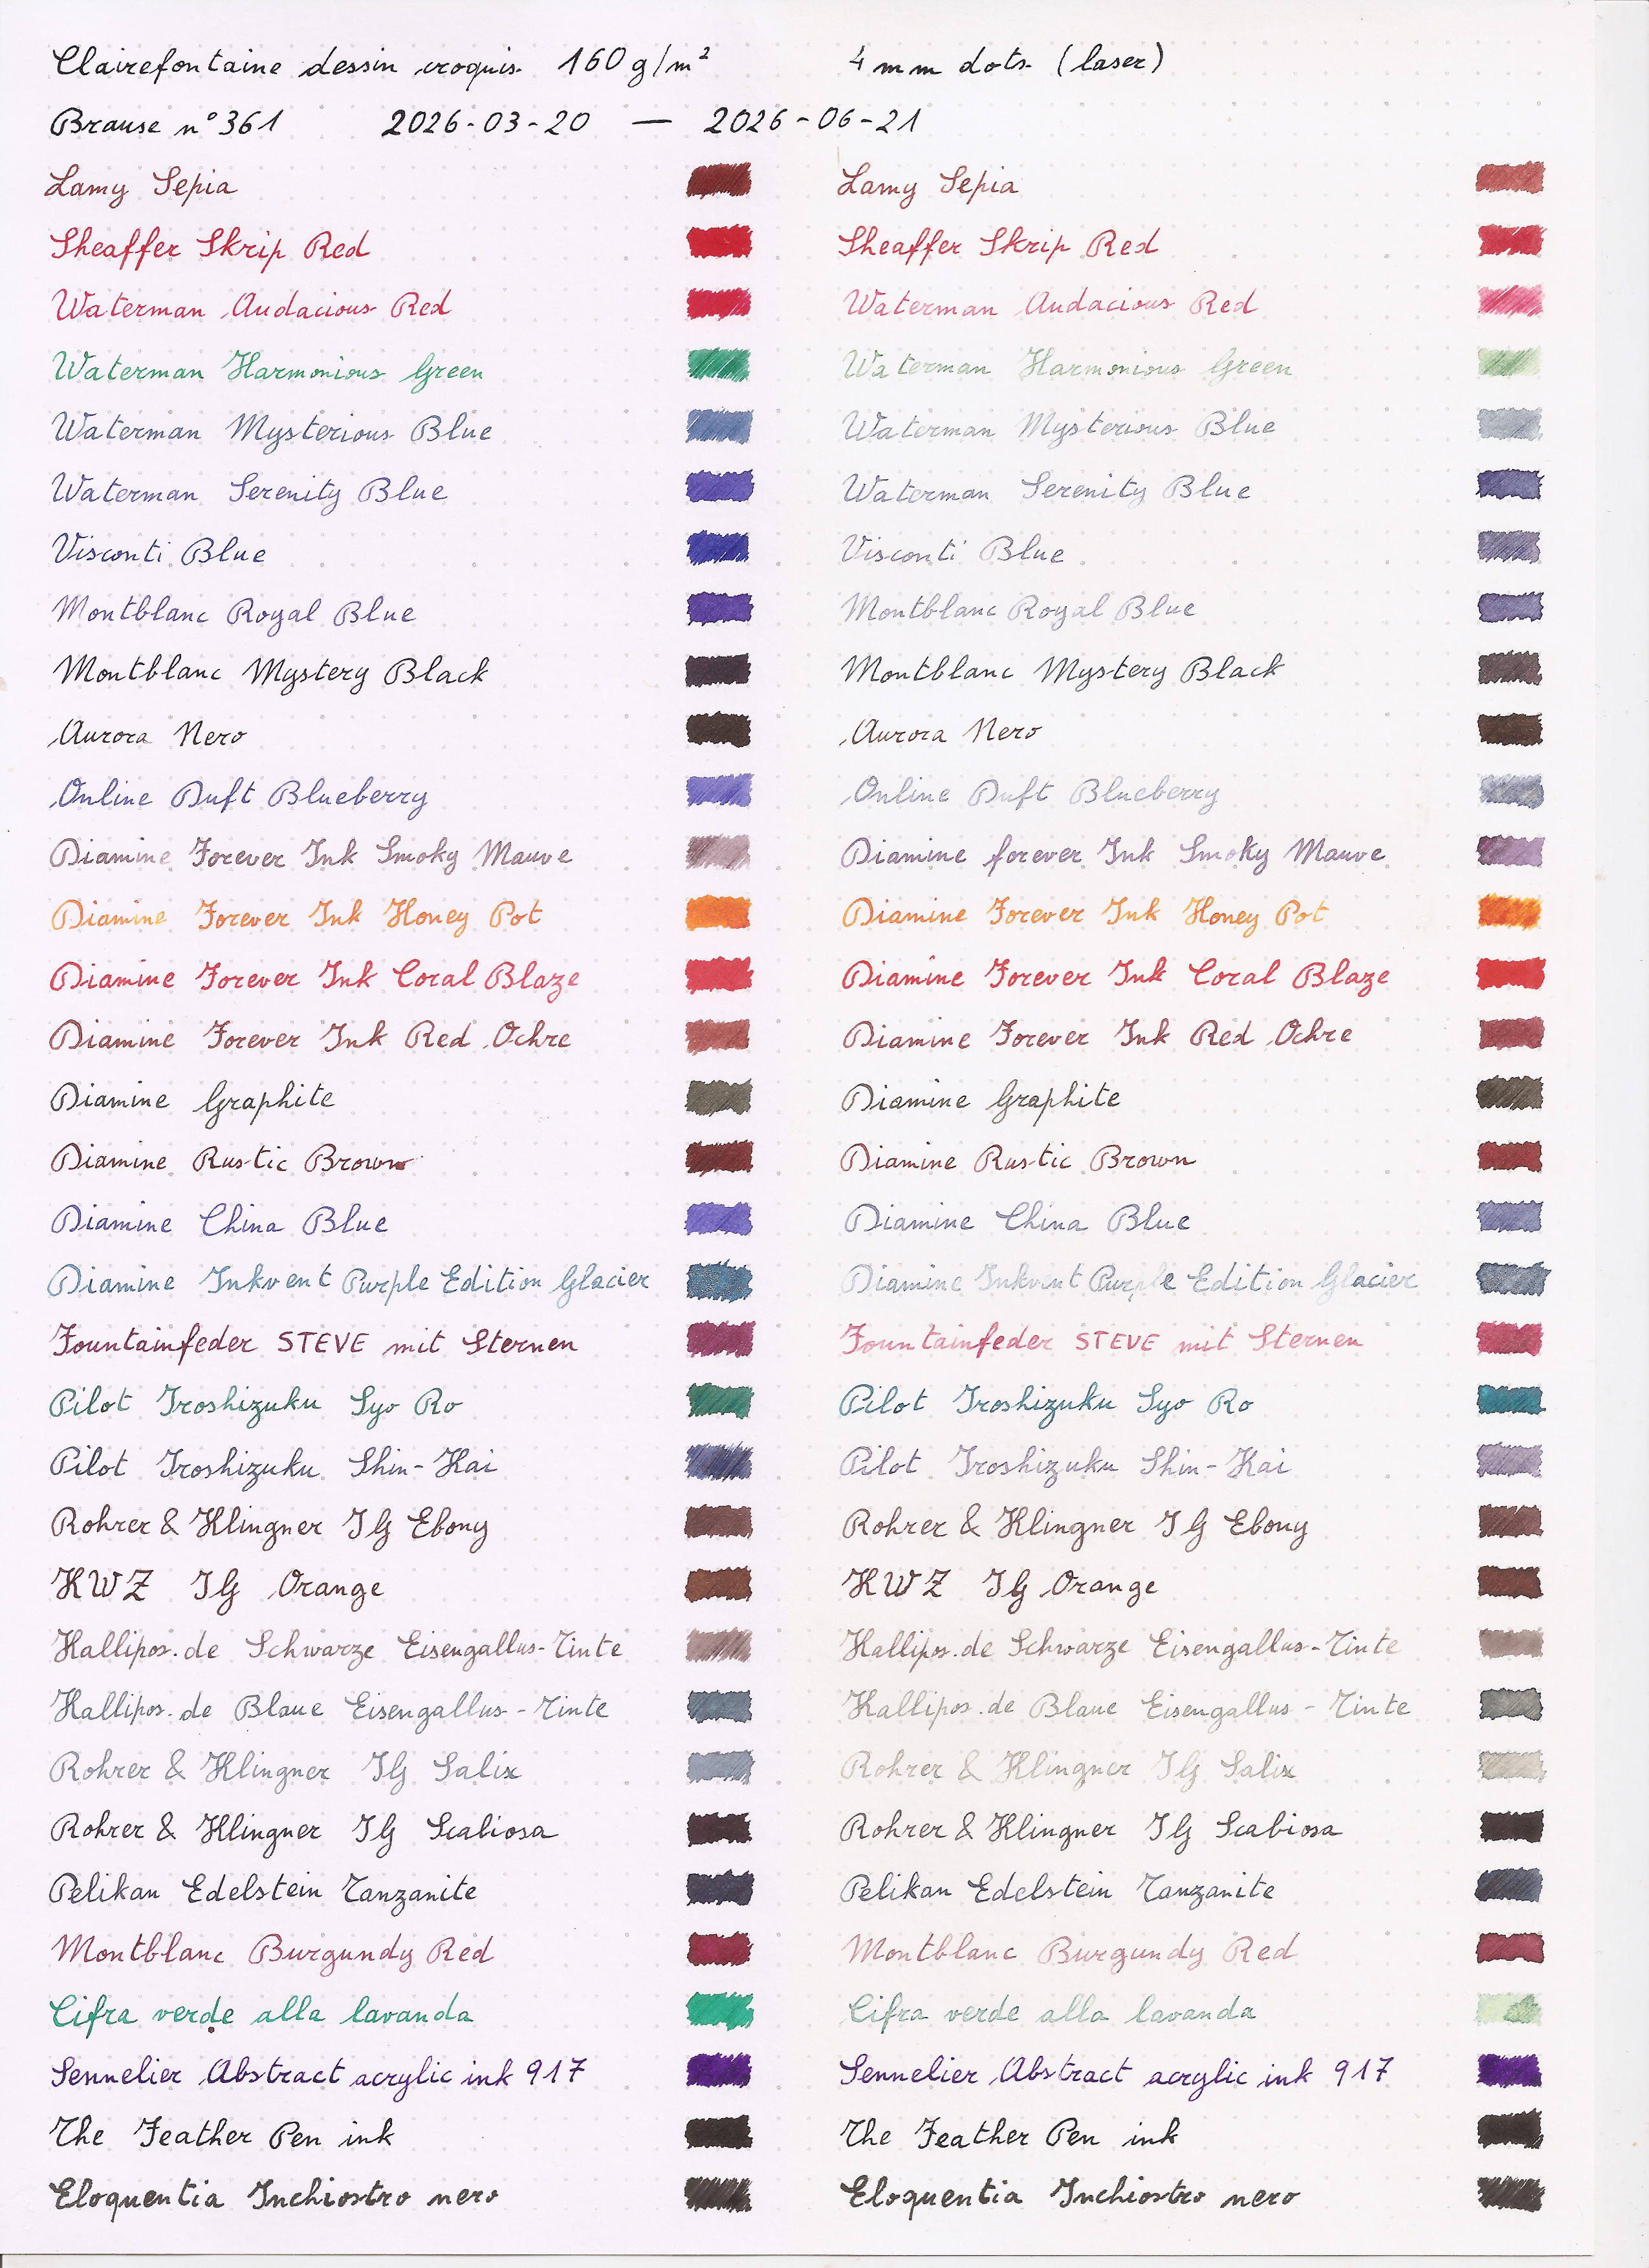
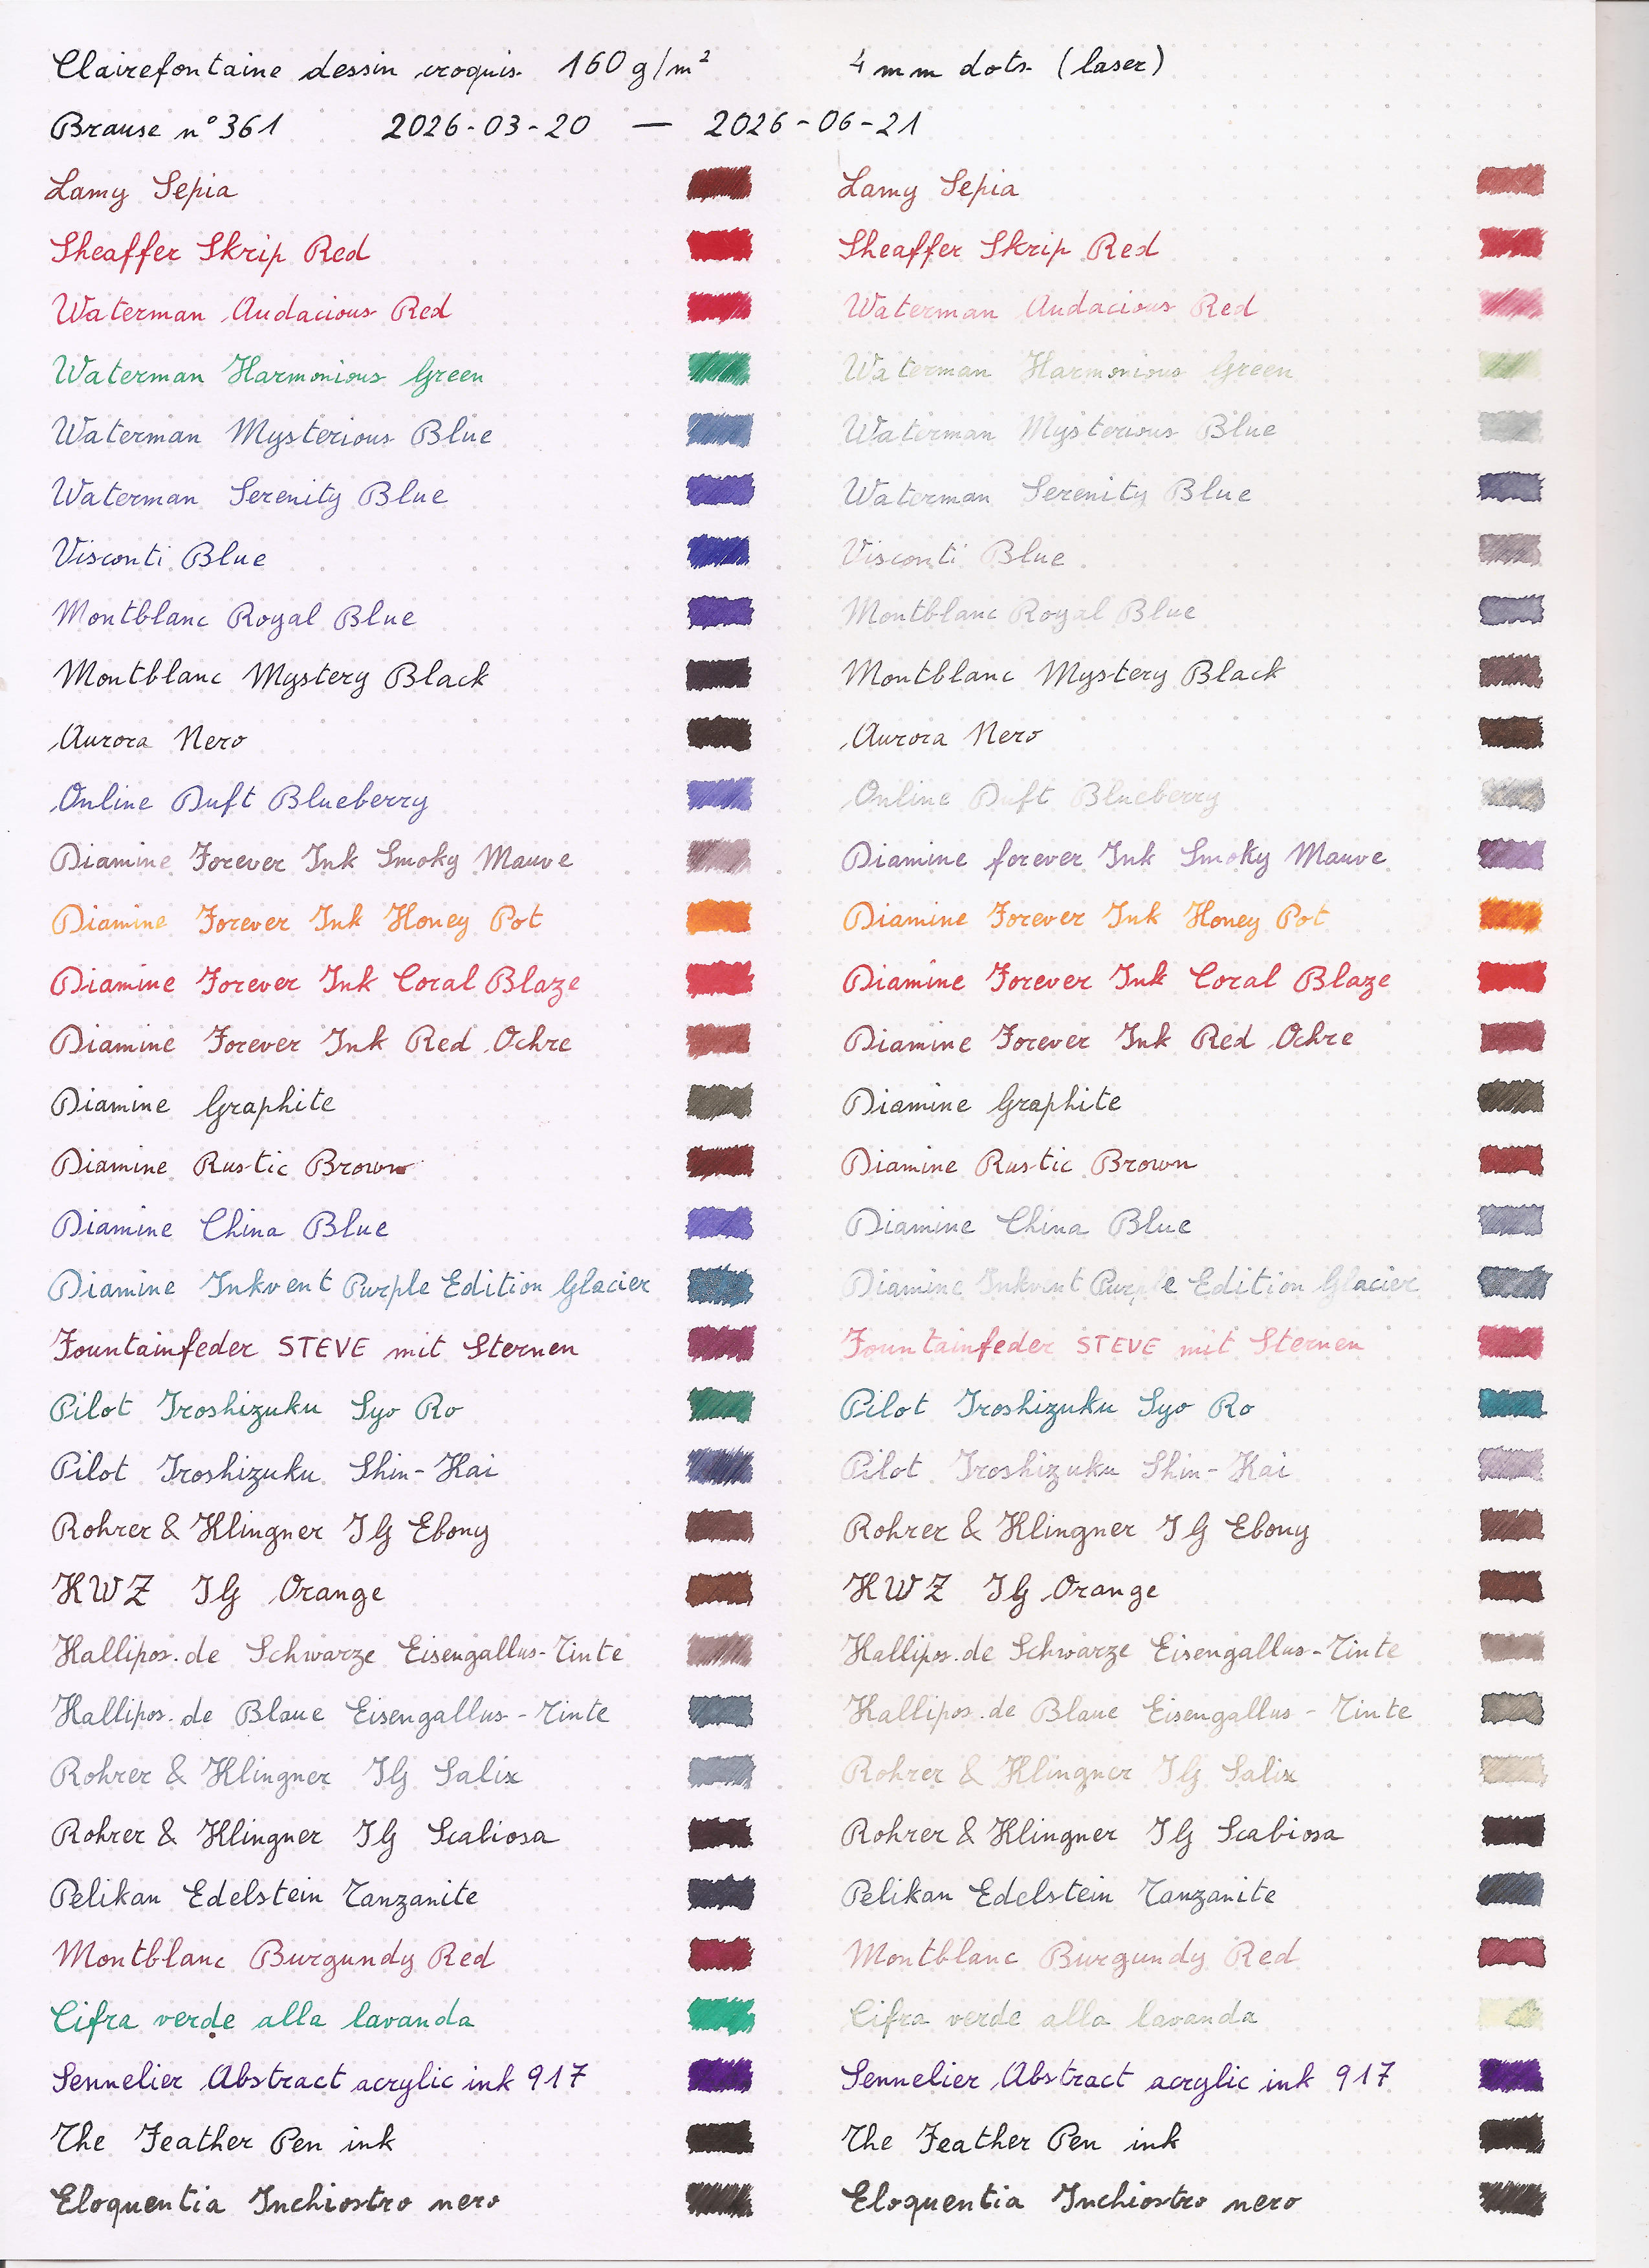
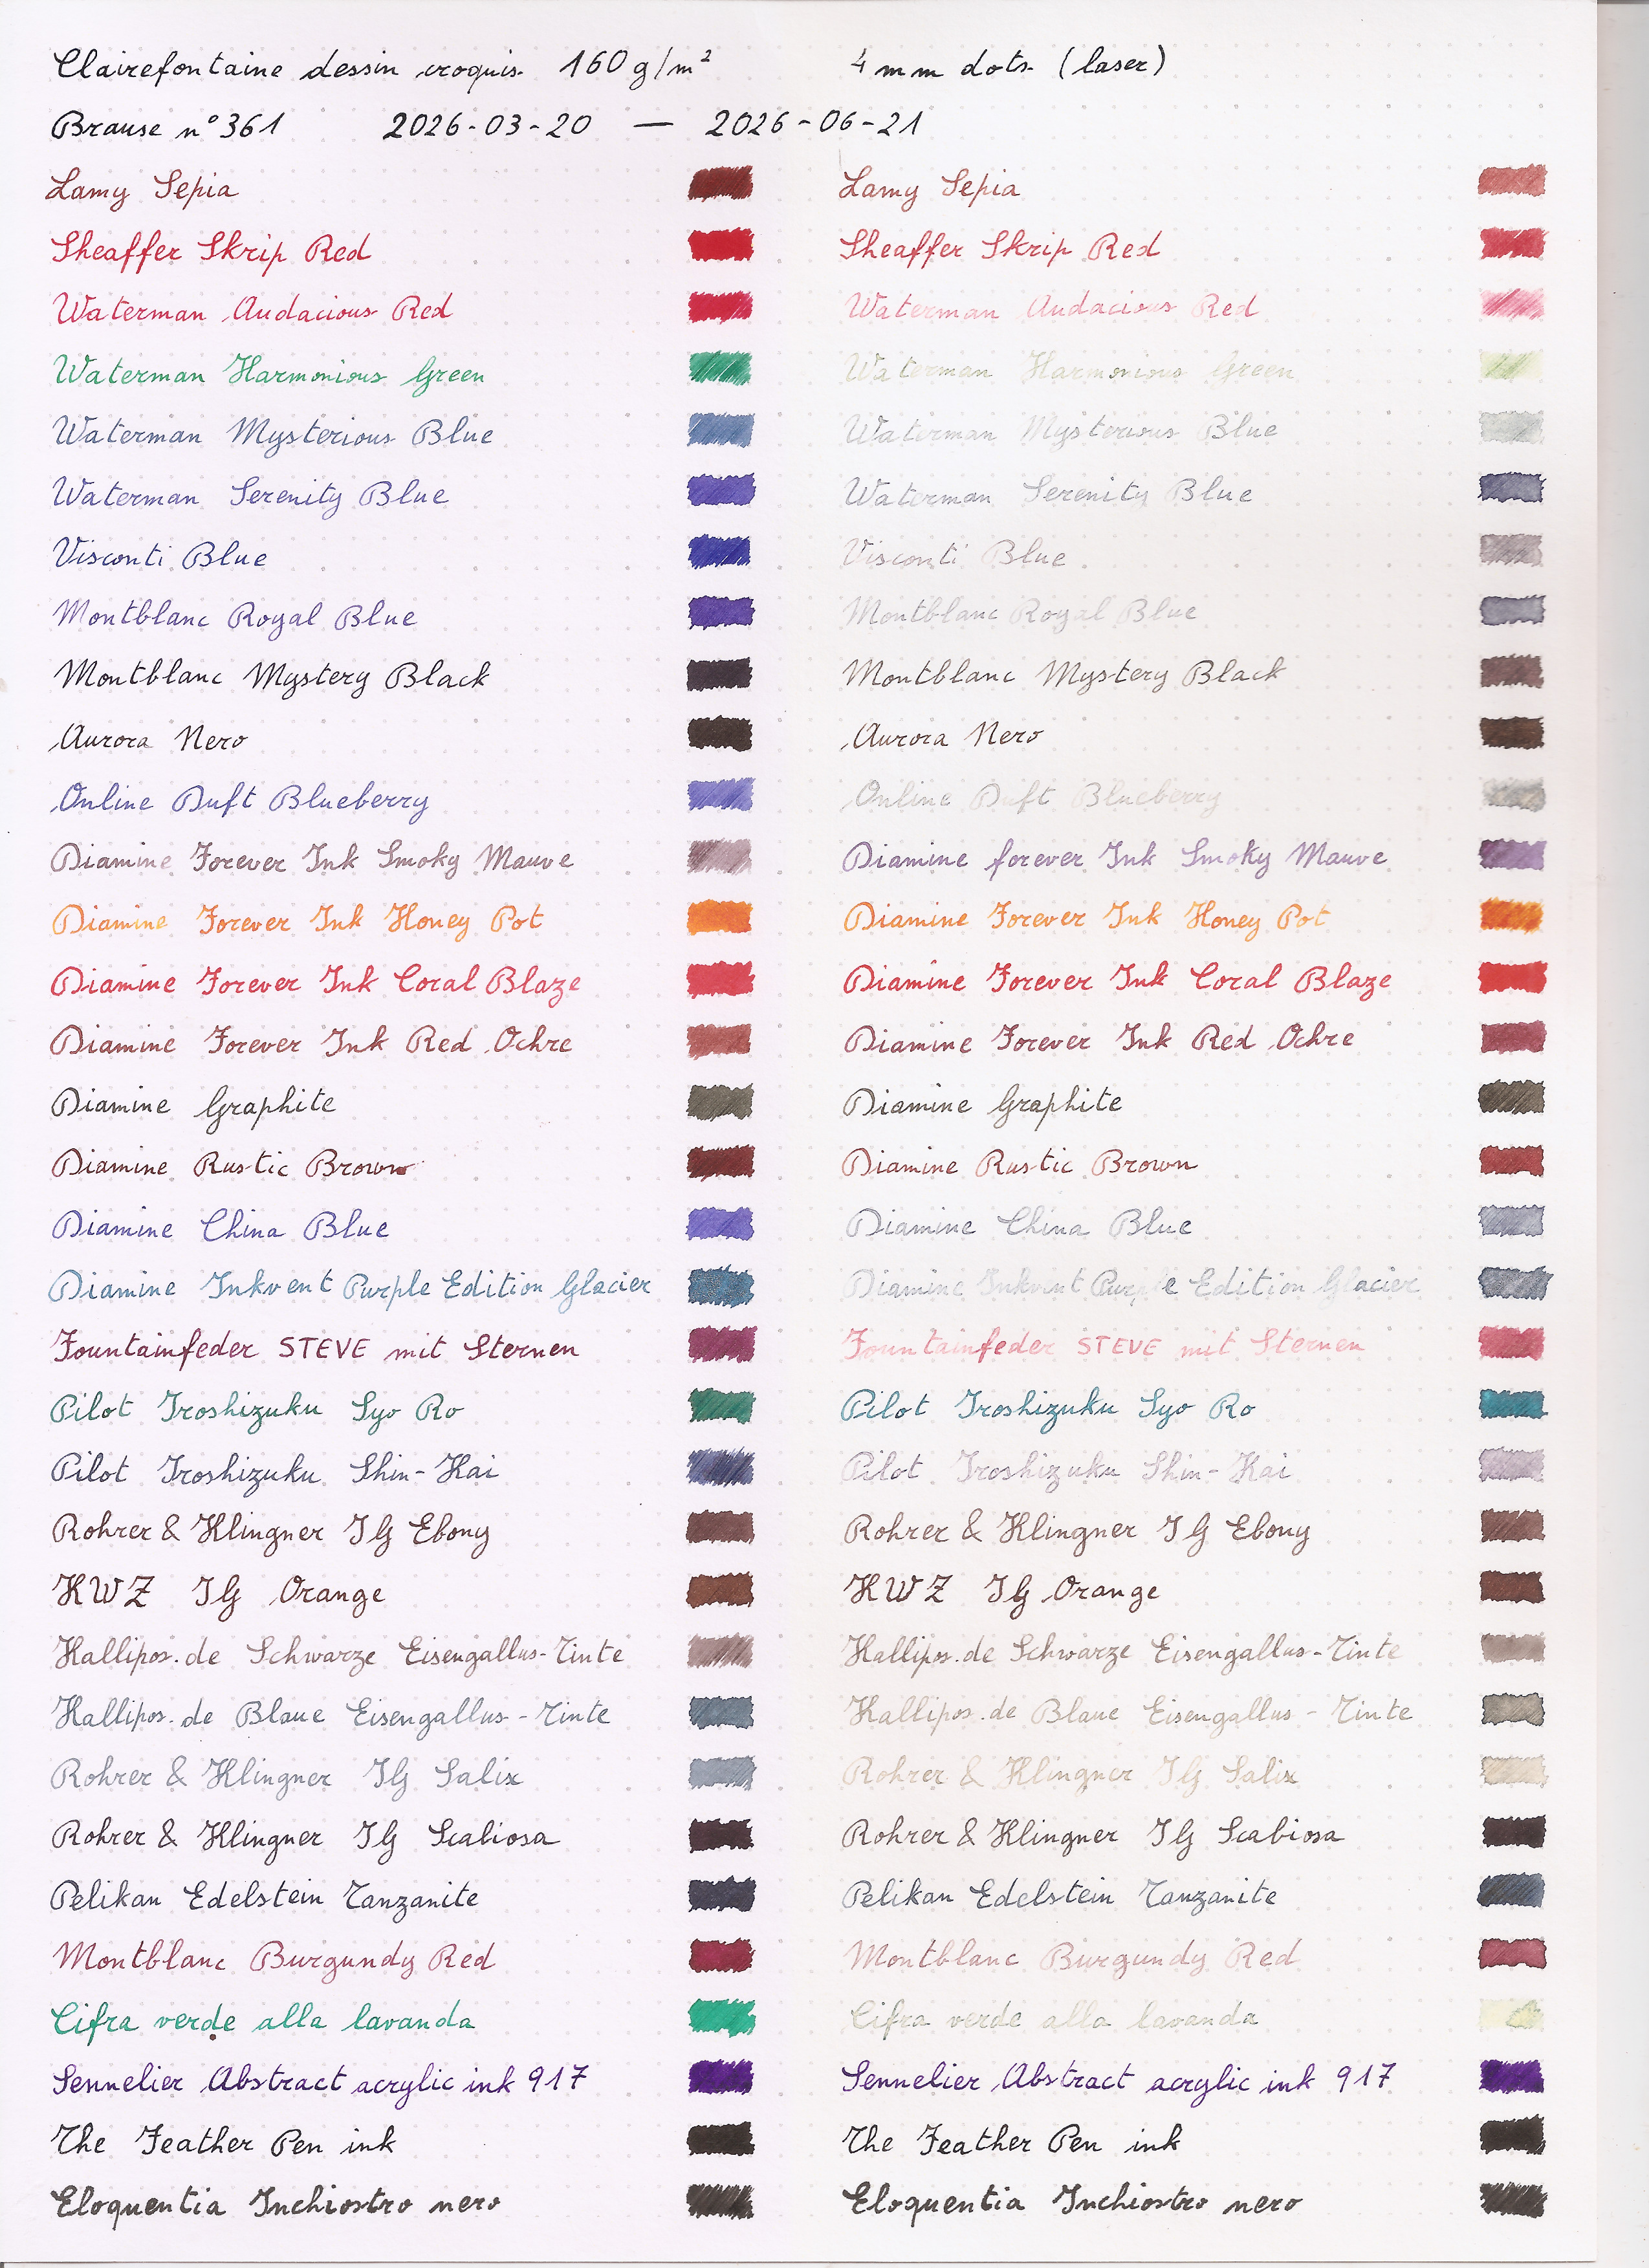
- Lamy Sepia
-
Not resistant to water, the drop becomes an uniform colour spot.
Not resistant to bleach.
After one week it started to be just slightly paler, more so after
three weeks.
After two months it was still readable, but quite pale.
- Sheaffer Skrip Red
-
Not resistant to water, the drop becomes an uniform colour spot.
Not resistant to bleach.
After one week it started to be just slightly paler, more so after
three weeks.
- Waterman Audacious Red
-
Not resistant to water, the drop becomes an uniform colour spot.
Not resistant to bleach.
After three days it started to be just slightly paler, after a week
visibly so. After four weeks it was very pale.
After two months it was only a trace.
- Waterman Harmonious Green
-
Not resistant to water, the drop becomes an uniform colour spot; the
hydrogen peroxide drop looks a bit lighter than the one with just
water.
Not resistant to bleach.
After one week it started to be just slightly paler, more so after
three weeks. After four weeks it was very pale.
After two months it was a trace, quite hard to read.
- Waterman Mysterious Blue
-
Not resistant to water, the drop becomes an uniform colour spot; the
hydrogen peroxide drop is significantly lighter and tends towards
green.
Not resistant to bleach.
After two weeks it started to be just slightly paler, after three
weeks it was more grey. After four weeks it was very pale.
After two months it was just a trace.
- Waterman Serenity Blue
-
Not resistant to water, the drop becomes an uniform colour spot; the
hydrogen peroxide drop is almost completely bleached to a light yellow.
Not resistant to bleach.
After one week it started to be a bit duller. After four weeks it was
paler and duller.
After two months it was just a trace.
- Visconti Blue
-
Not resistant to water, the drop becomes an uniform colour spot.
Not resistant to bleach.
After one week it was visibly duller, looking darker than the
original. After three weeks it was duller, and lighter. After a month
it was just a pale grey.
After two months it was just a trace.
- Montblanc Royal Blue
-
Not resistant to water, the drop becomes an uniform colour spot; the
hydrogen peroxide drop is almost completely bleached to a light
yellow.
Not resistant to bleach.
After one week it started to be just slightly duller, more so after
two weeks. After three weeks it was also paler. After a month it was
just a pale grey.
After two months it was just a trace.
- Montblanc Mystery Black
-
Not resistant to water, the drop becomes an uniform colour spot.
Not resistant to bleach.
After three weeks it started to be a bit paler.
After two months it was a pale brown.
- Aurora Nero
-
Not resistant to water, the drop becomes an uniform colour spot.
Not resistant to bleach.
After three weeks it started to be a bit more brown.
After two months it was definitely brown, but still dark.
- Online Duft Blueberry
-
Not resistant to water, the drop looks very washed out, although a
hint of the original shape can be guessed; the hydrogen peroxide drop
is almost completely bleached to a light yellow.
Not resistant to bleach.
After one week it was visibly paler and duller. After three weeks
significantly so. After a month it was a pale grey.
After two months it was just a trace.
- Diamine Forever Ink - Smoky Mauve
-
The drop of bleach causes a greenish halo, but the lines remain
readable.
After a month it looked a bit more purple.
- Diamine Forever Ink - Honey Pot
-
.
- Diamine Forever Ink - Coral Blaze
-
.
- Diamine Forever Ink - Red Ochre
-
The drop of bleach causes a greenish halo, but the lines remain
readable.
After two months it looked a bit more purple.
- Diamine Graphite
-
Not resistant to water, the drop becomes an uniform colour spot.
Not resistant to bleach.
- Diamine Rustic Brown
-
Not resistant to water, the drop becomes an uniform colour spot.
Not resistant to bleach.
After three weeks it started to be very slightly paler, a bit more
so after two months.
- Diamine China Blue
-
Not resistant to water, the drop becomes an uniform colour spot; the
hydrogen peroxide drop is almost completely bleached to a light
yellow.
Not resistant to bleach.
After three weeks it started to be paler and duller.
After two months it was just a trace.
- Diamine Inkvent Purple Edition - Glacier
-
Not resistant to water, there is a drop of uniform colour, but it
maintains a somewhat recognisable shade of the original shape.
Not resistant to bleach.
After three weeks it started to be lighter.
After two months it was just a trace, but still had some of the
shimmering.
- Fountainfeder STEVE
-
Not resistant to water, there is a drop of uniform colour, but it
maintains a somewhat recognisable shade of the original shape.
Not resistant to bleach.
After two weeks the base colour had changed to a pink rather than
purple.
After two months it was a pale orange trace.
- Pilot Iroshizuku Syo Ro
-
Not resistant to water, there is a drop of uniform colour, but it
maintains a somewhat recognisable shade of the original shape.
Not resistant to bleach.
After four weeks it was very slightly paler.
After two months it was a bit more cyan.
- Pilot Iroshizuku Shin-Kai
-
Not resistant to water, there is a drop of uniform colour, but it
maintains a somewhat recognisable shade of the original shape.
Not resistant to bleach.
After two weeks it had become lighter and more purple. After four
weeks it was a purple grey.
After two months it was little more than a trace.
- Rohrer & Klingner IG Ebony
-
Not resistant to water, there is a drop of uniform colour, but it
maintains a recognisable shade of the original shape; under
hydrogen peroxide the shade is significantly lighter.
Not resistant to bleach.
After four weeks it was a bit lighter
- KWZ IG Orange
-
Not resistant to water, the drop becomes an uniform colour spot; the
hydrogen peroxide drop is significantly bleached to a light orange.
Not resistant to bleach.
- Kallipos.de Schwarze Eisengallus-Tinte
-
Water stains the paper, leaving however the original shape quite
visible; is it almost completely bleached by hydrogen peroxide.
Not resistant to bleach.
After three weeks it started to be very slightly lighter.
- Kallipos.de Blaue Eisengallus-Tinte
-
Water stains the paper, leaving however the original shape quite
visible; is it almost completely bleached by hydrogen peroxide.
Not resistant to bleach.
After two weeks it had started to become lighter and more grey.
After two months it was a pale yellowish grey.
- Rohrer & Klingner IG Salix
-
Water stains the paper, leaving however the original shape quite
visible; is it almost completely bleached by hydrogen peroxide.
Not resistant to bleach.
After two weeks it had become lighter and significantly more grey.
After a month it was a yellowish grey.
- Rohrer & Klingner IG Scabiosa
-
Water stains the paper with a significant purple spot, leaving
however the original shape quite visible; is is a bit bleached by
hydrogen peroxide, but still quite readable.
Not resistant to bleach.
After two months it was a bit paler.
- Pelikan Edelstein Tanzanite
-
Not resistant to water, the drop becomes an uniform colour spot, but
there is a visible trace of the original shape.
Not resistant to bleach.
After three weeks it started to be slightly paler.
After two months it was visibly lighter, but still pretty readable.
- Montblanc Burgundy Red
-
Not resistant to water, the drop becomes an uniform colour spot, with
just a hint of the original shape; slightly bleached by hydrogen
peroxide.
Not resistant to bleach.
After three weeks it started to be paler.
After two months it was a bit more than a trace.
- Cifra inchiostro finissimo verde alla lavanda
-
Not resistant to water, the drop becomes an uniform colour spot;
quite bleached to a light yellowish green by hydrogen peroxide.
Not resistant to bleach.
After one week it was visibly paler. After a month it was a still
readable pale trace.
- Sennelier Abstract acrylic ink 917 purple
-
.
- The Feather Pen Ink
-
.
- Eloquentia Inchiostro nero
-
.
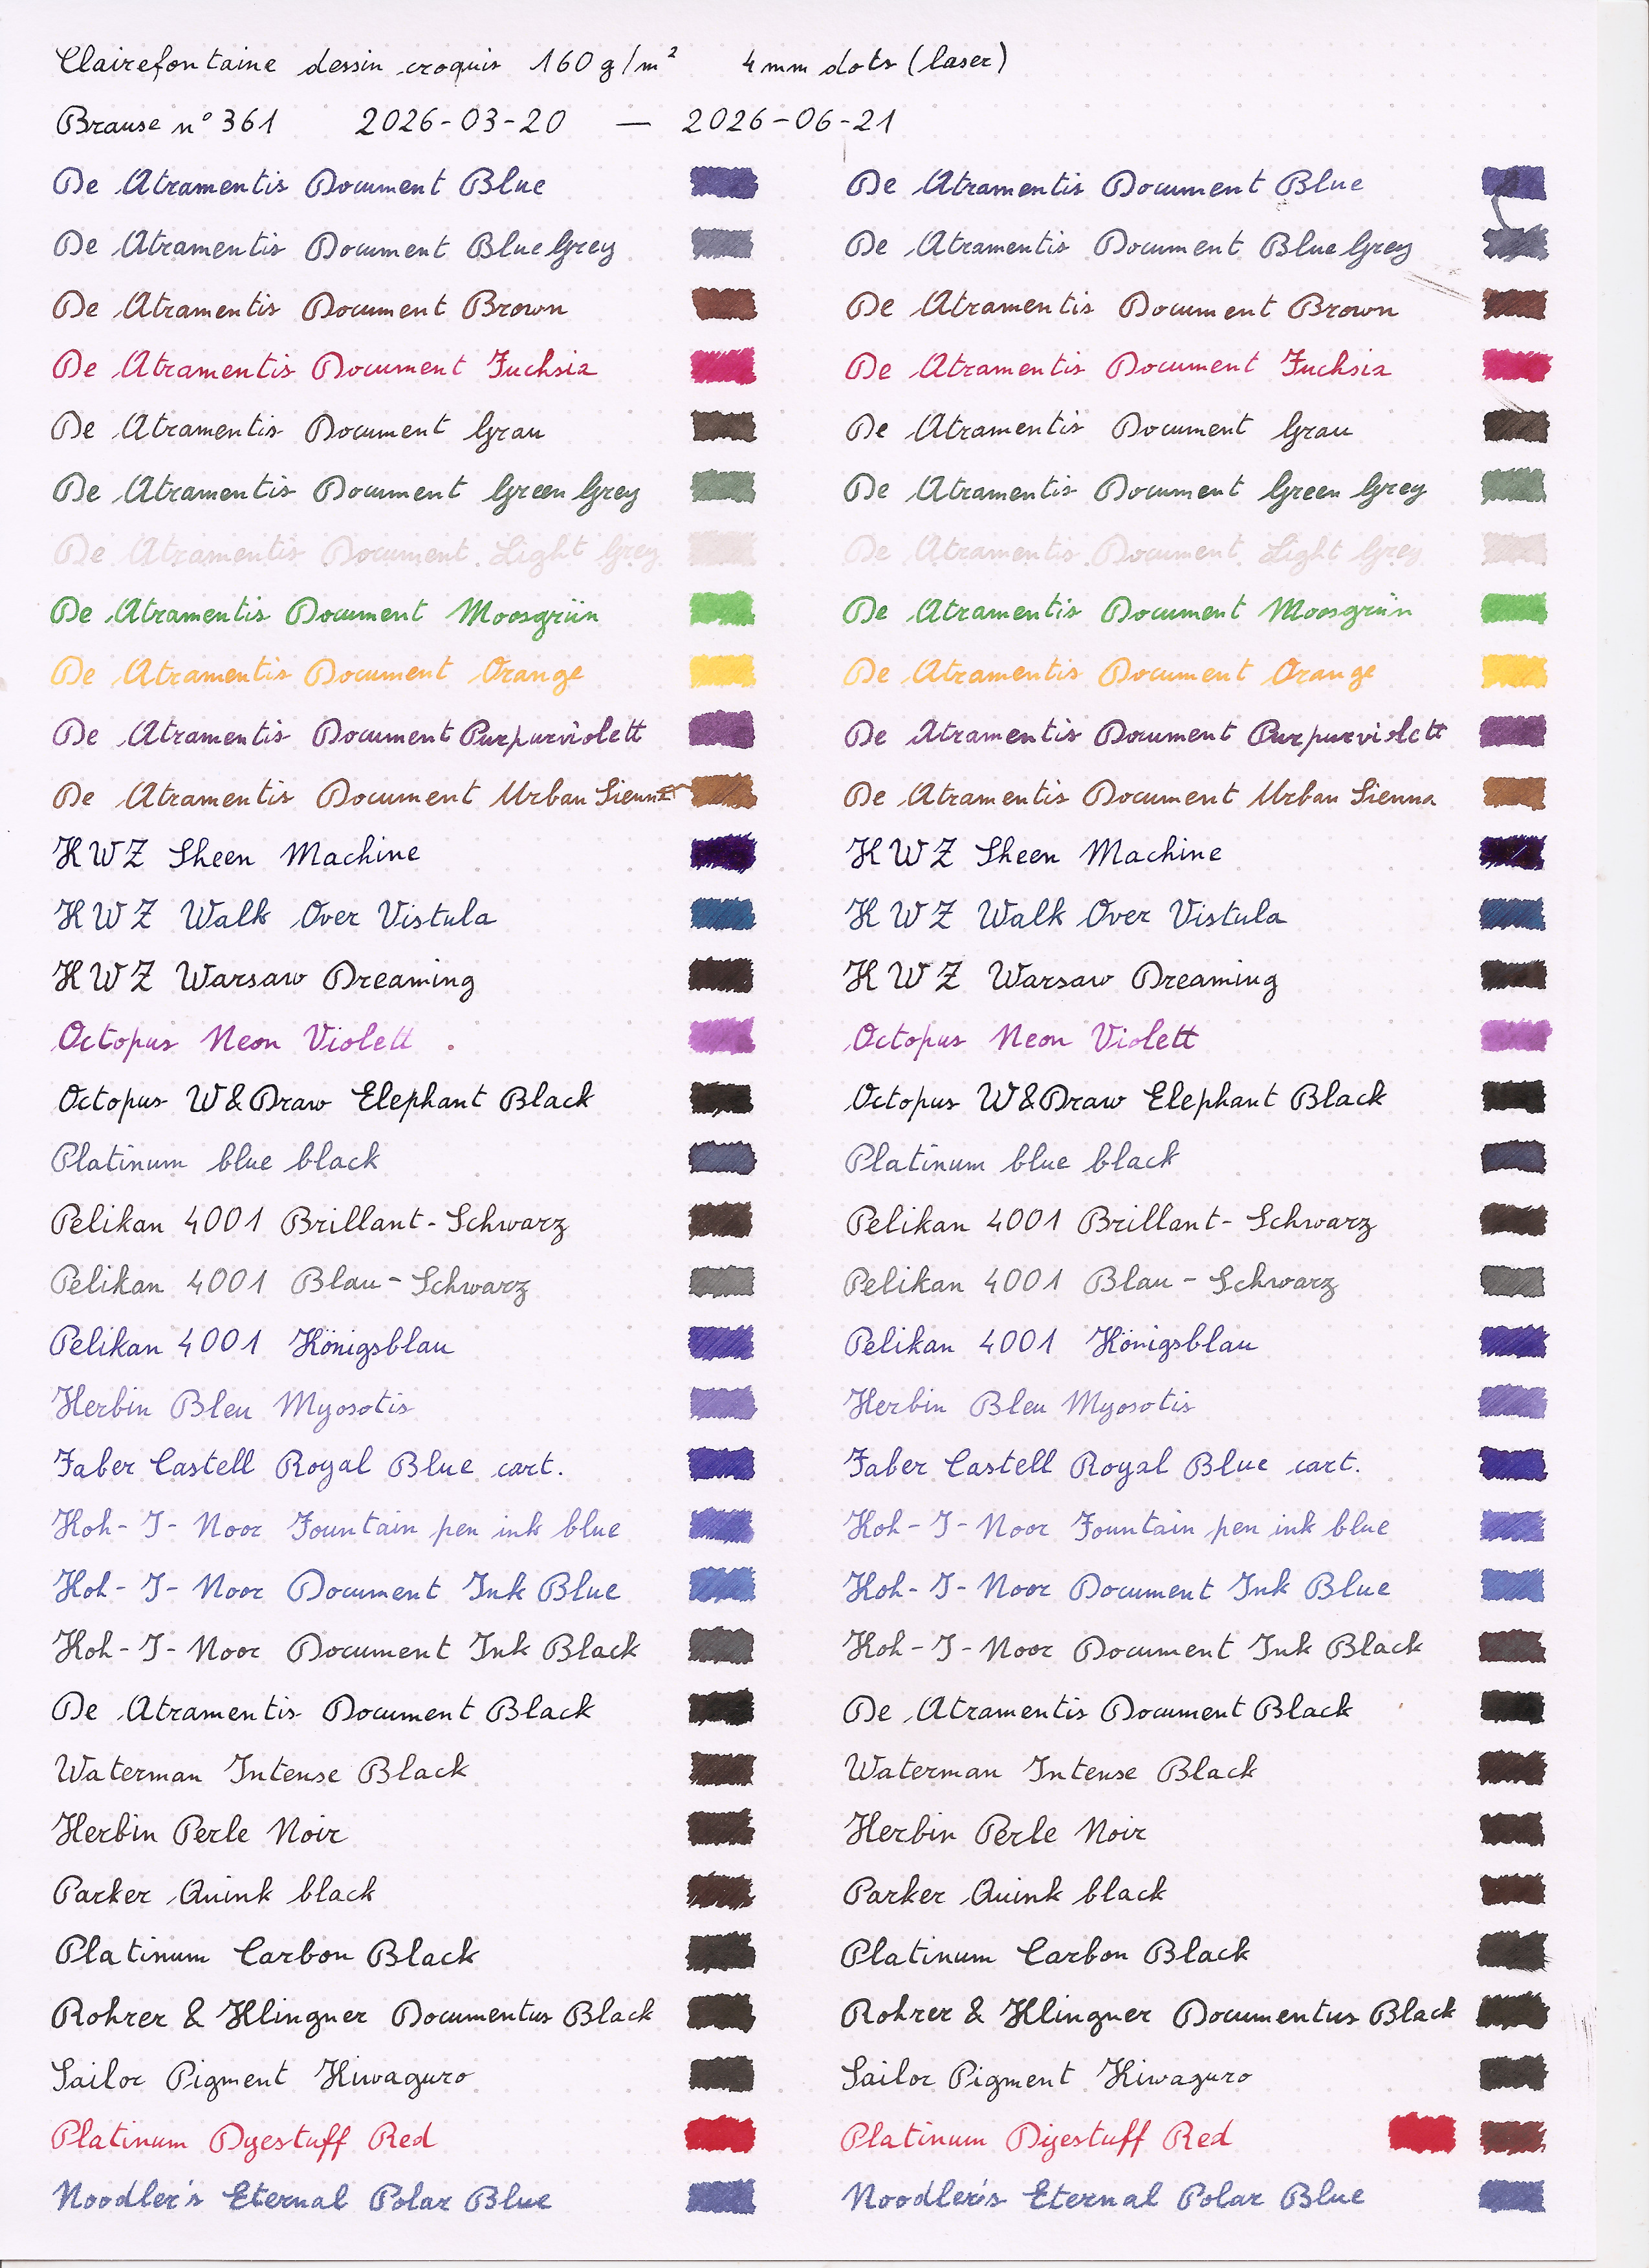
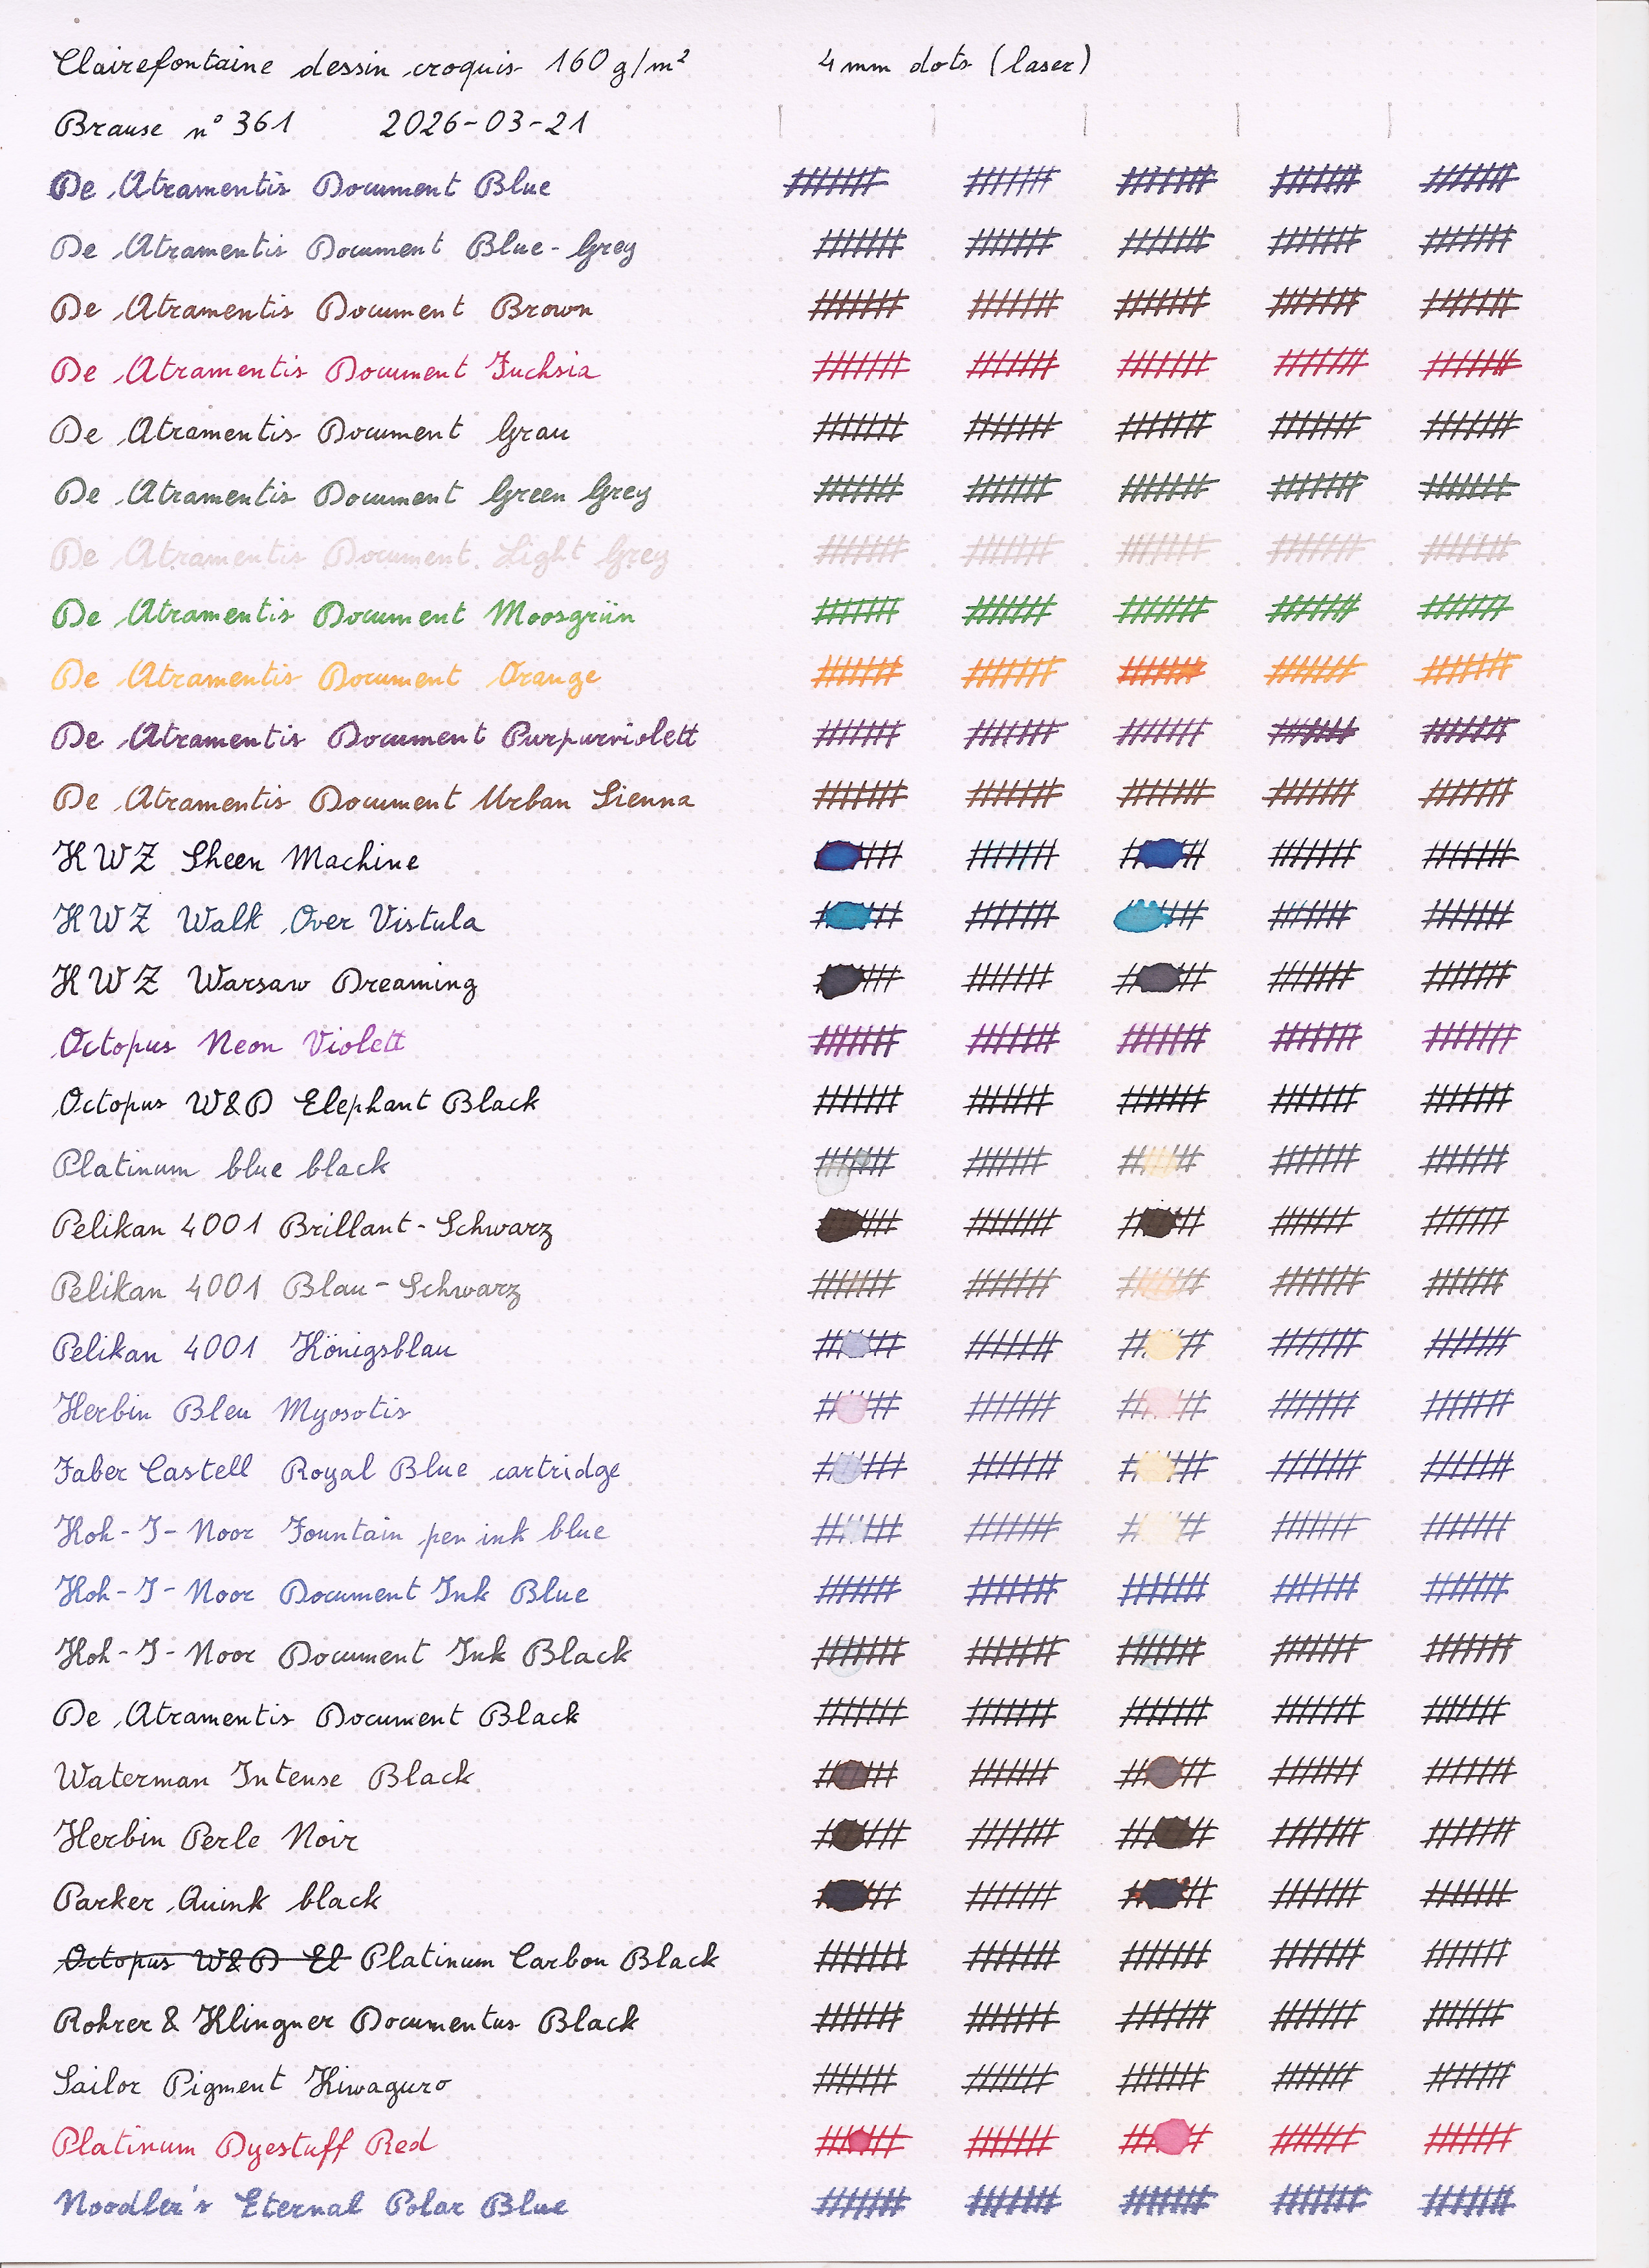
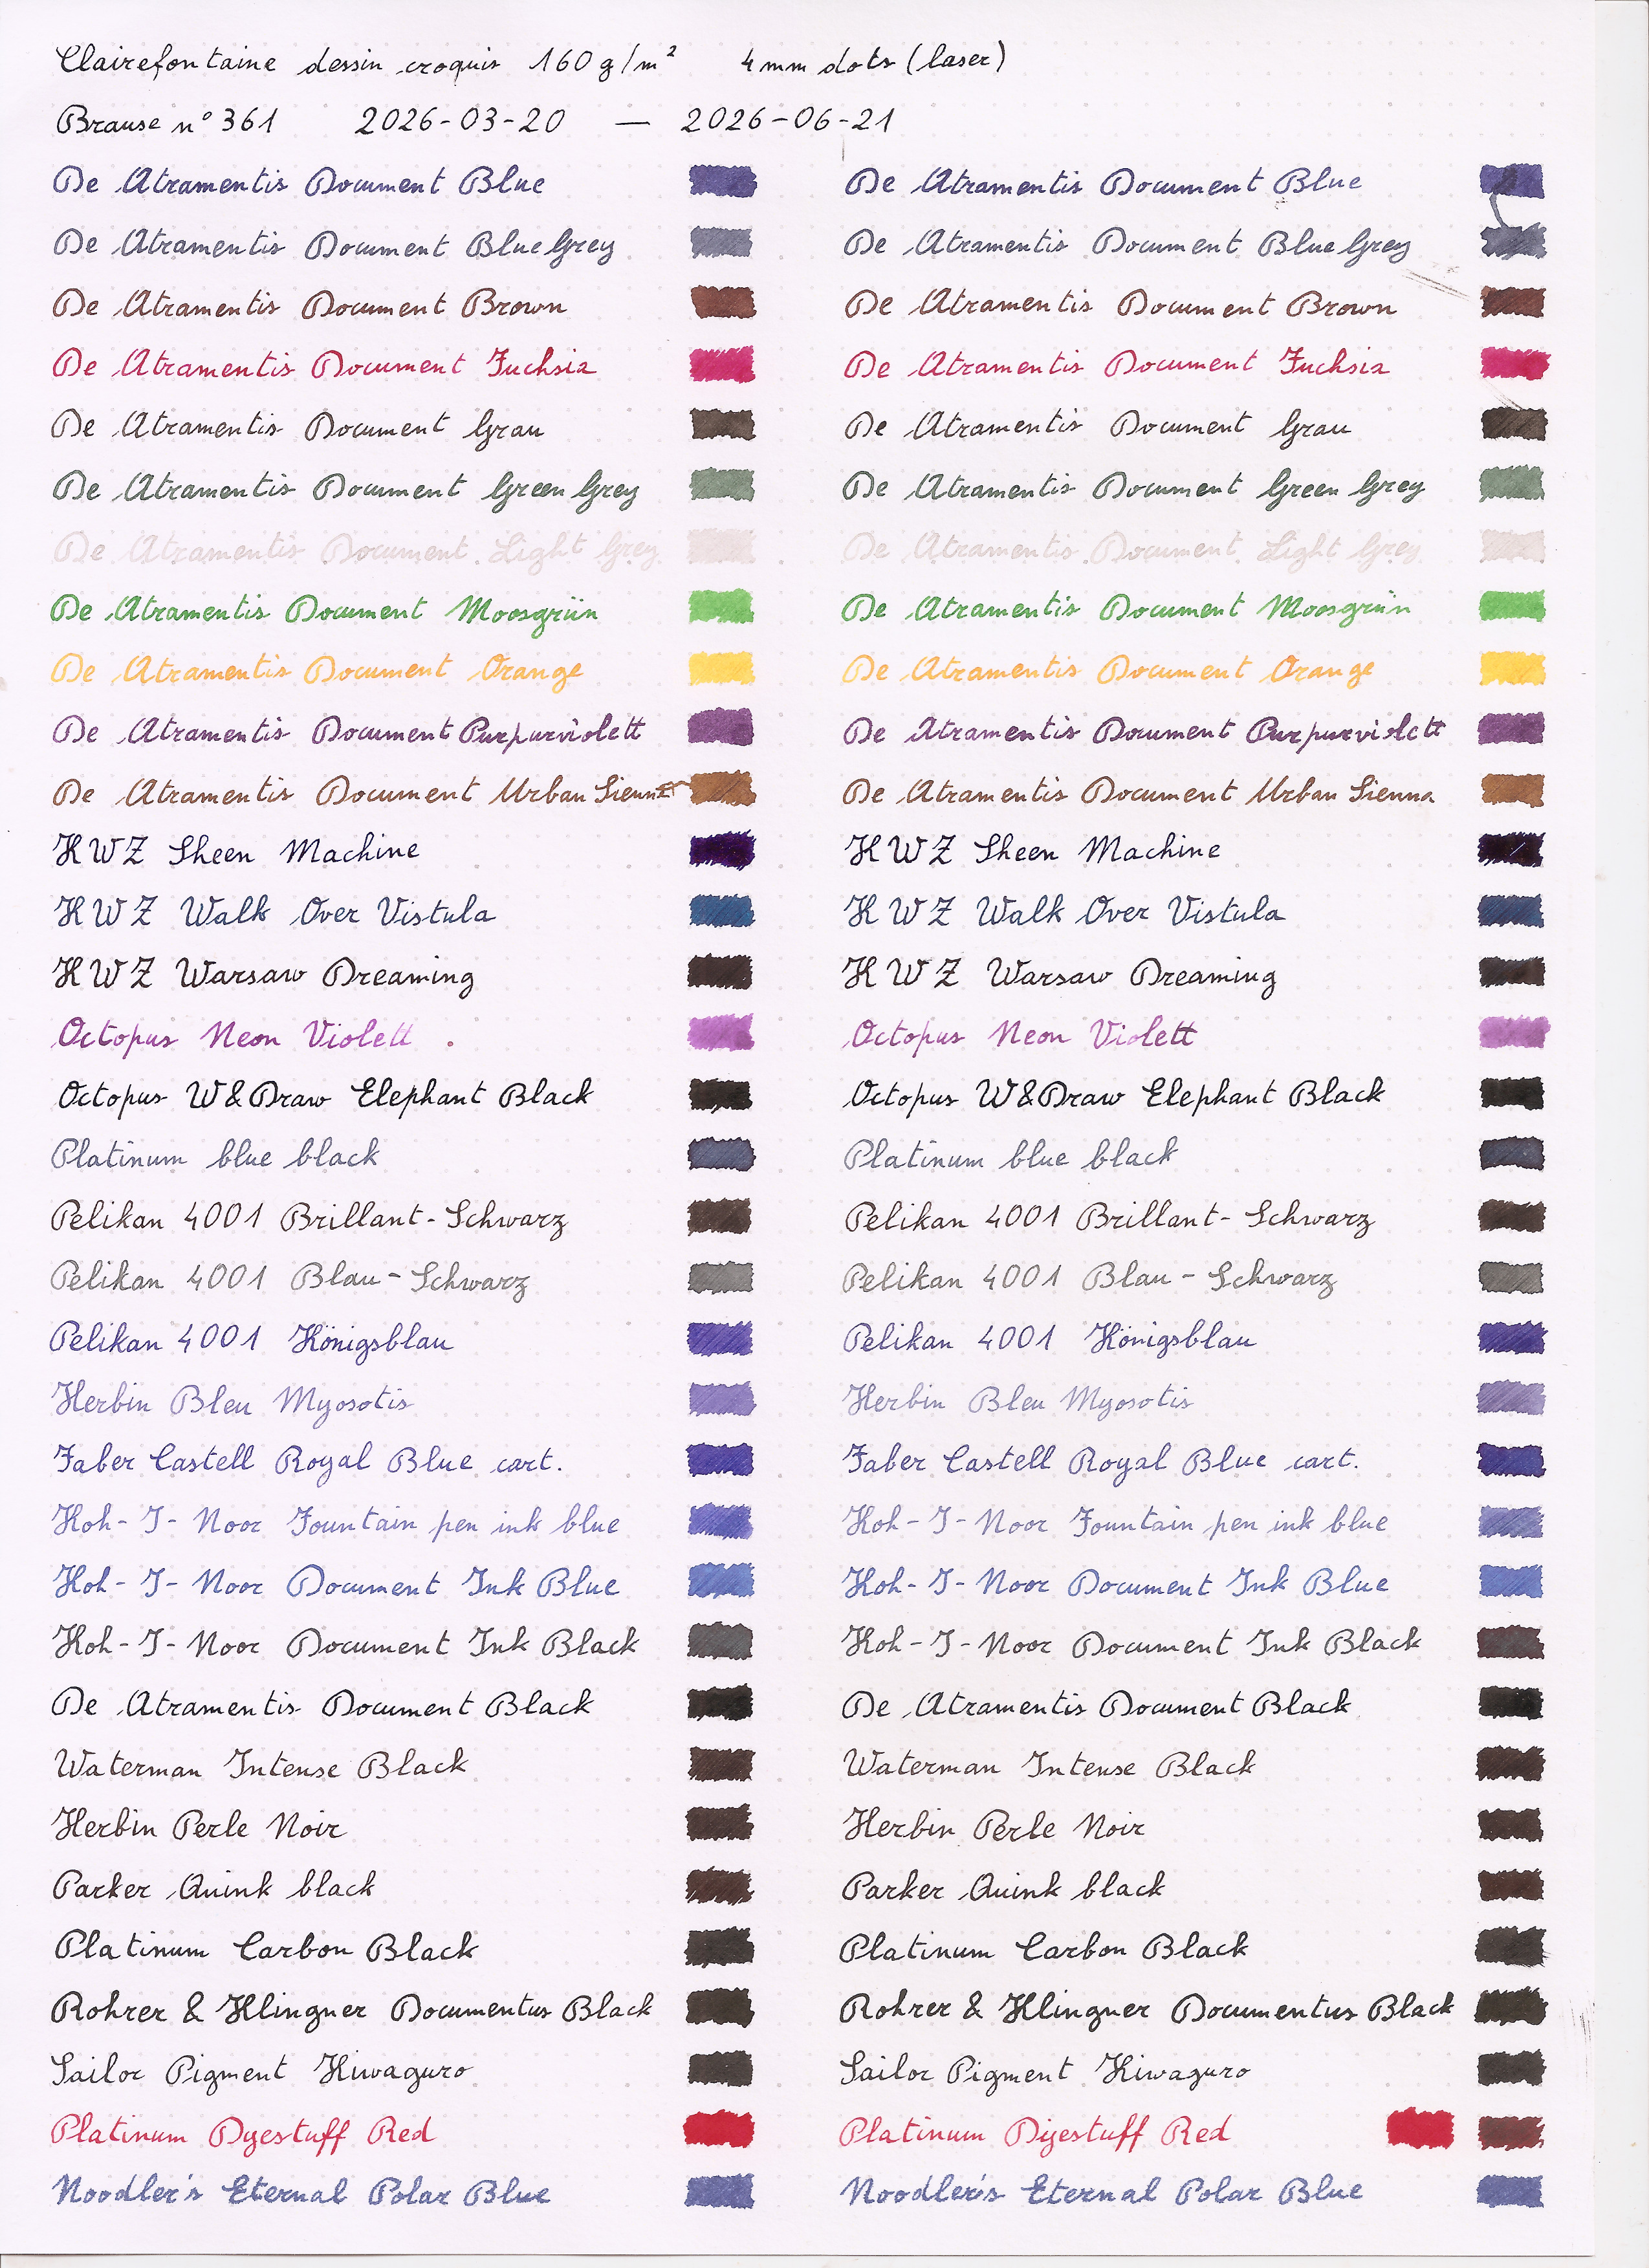
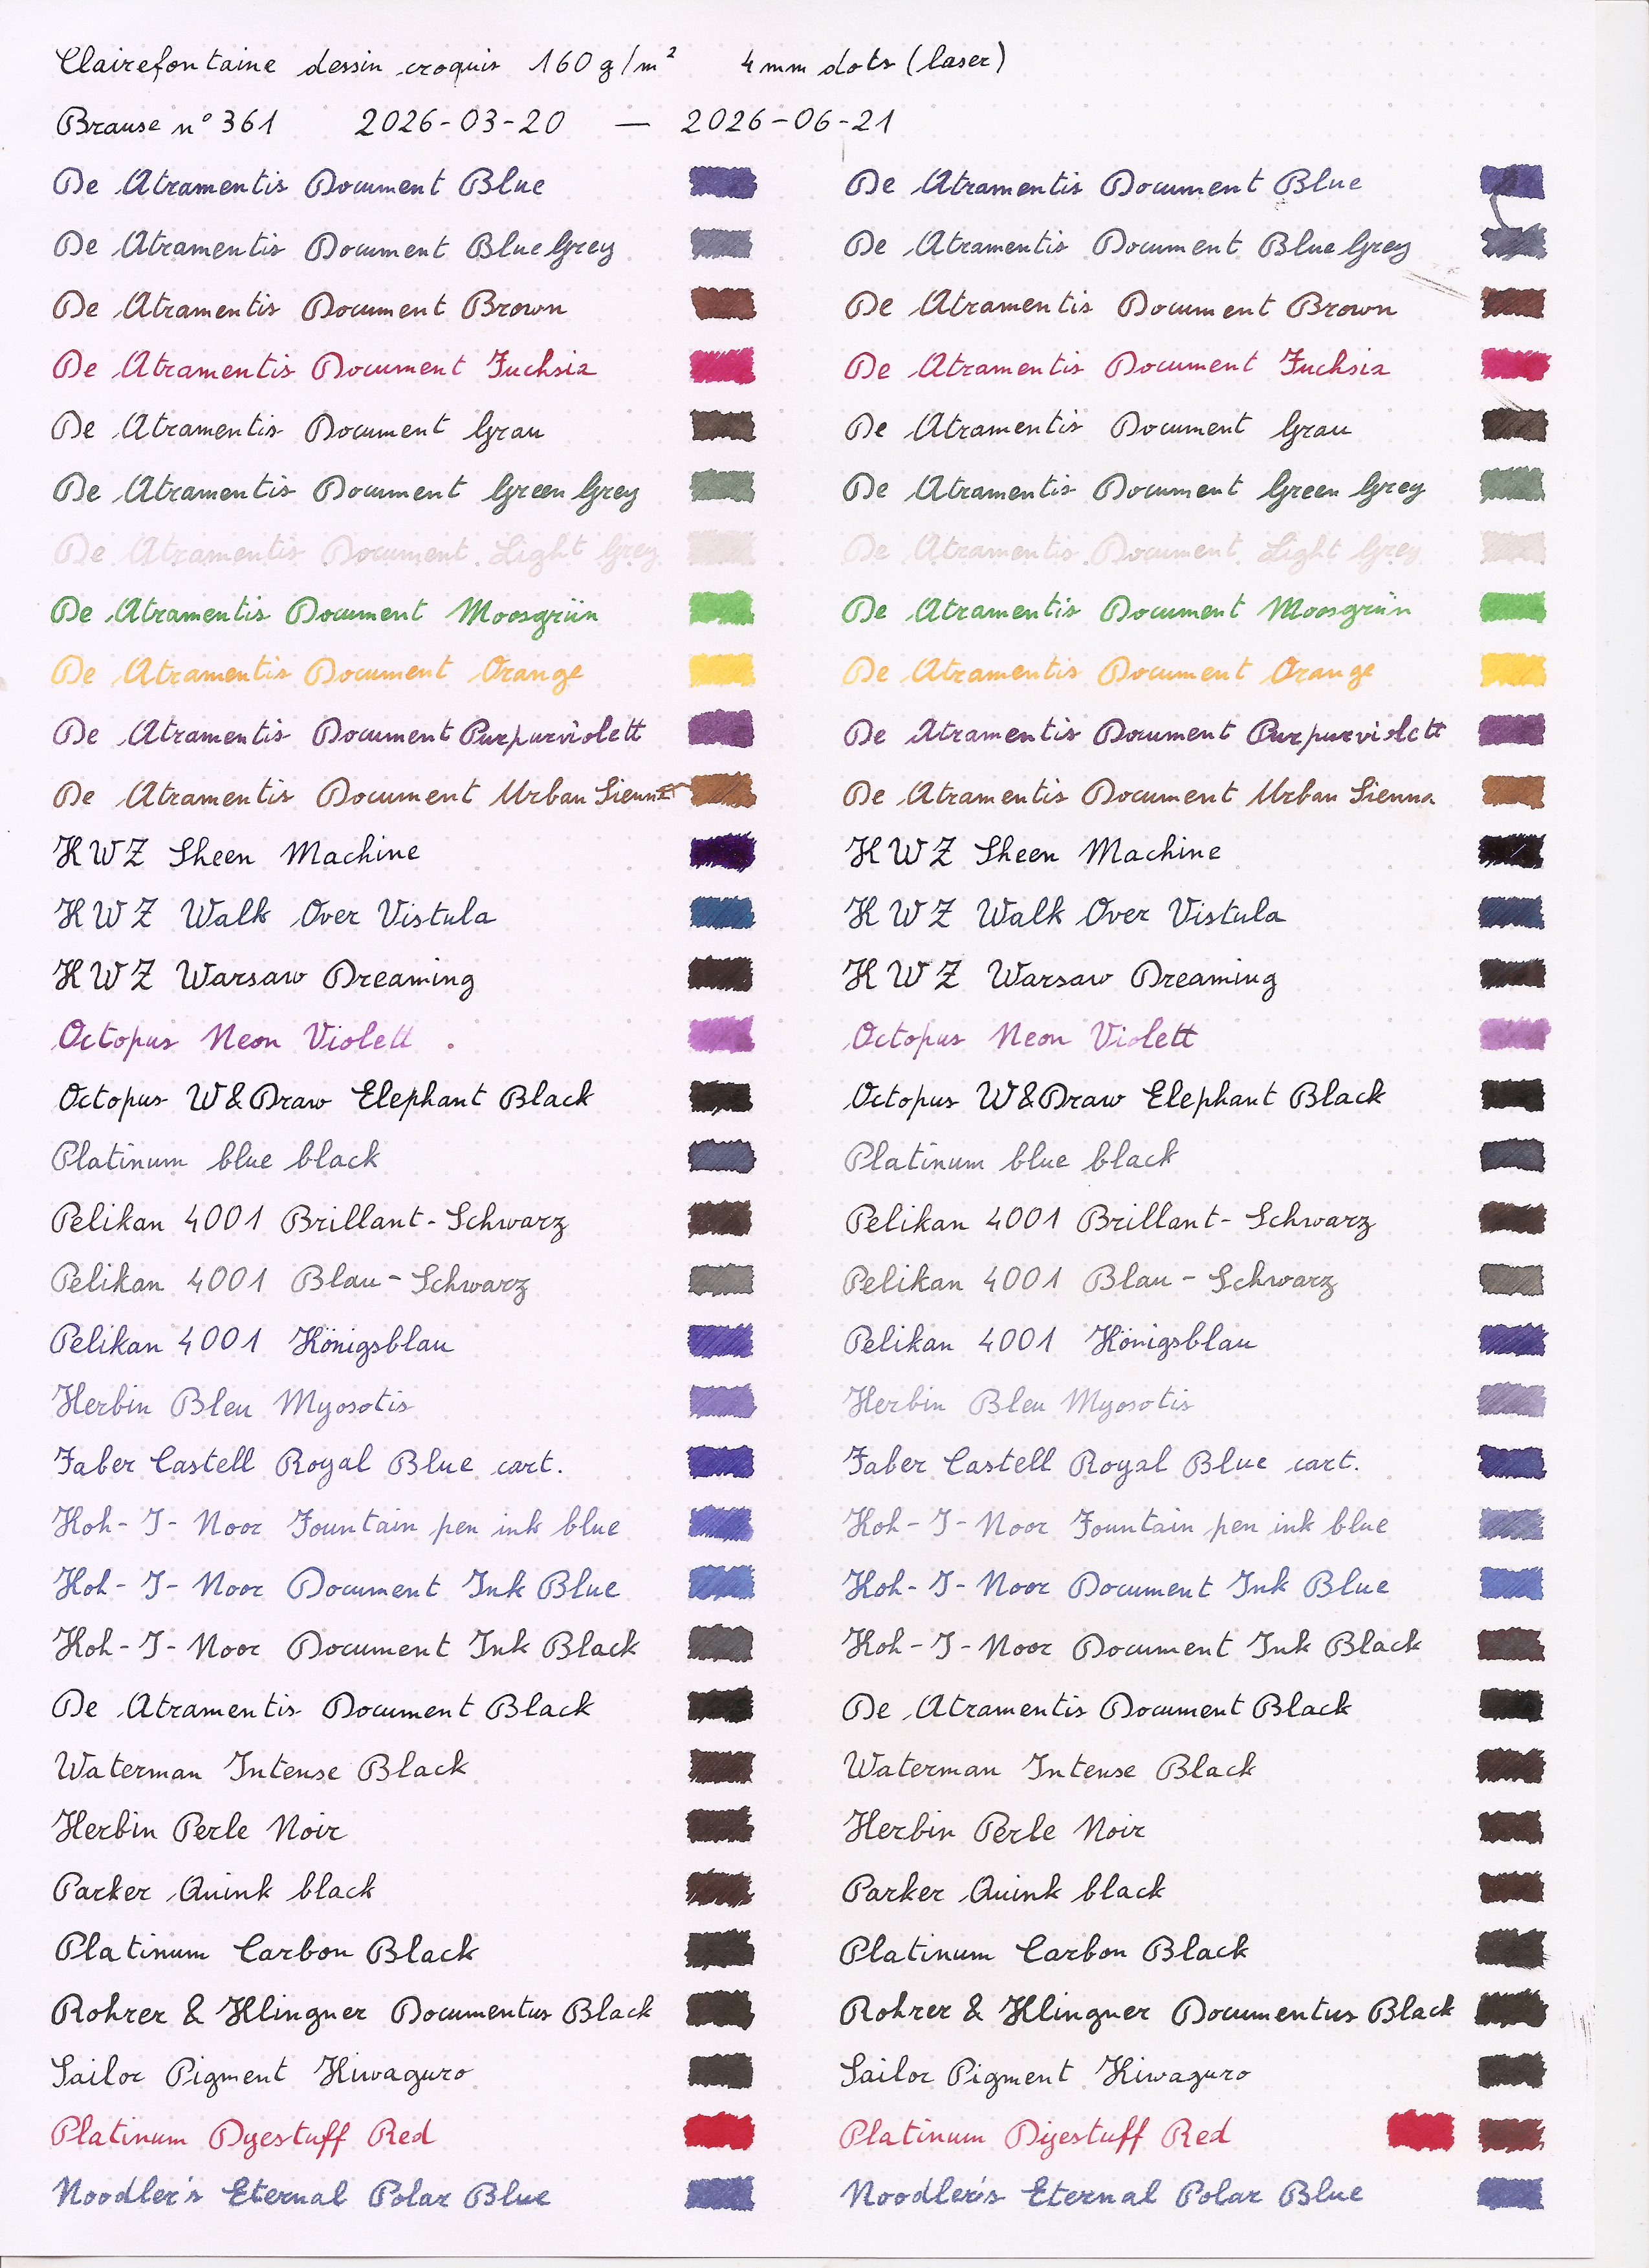
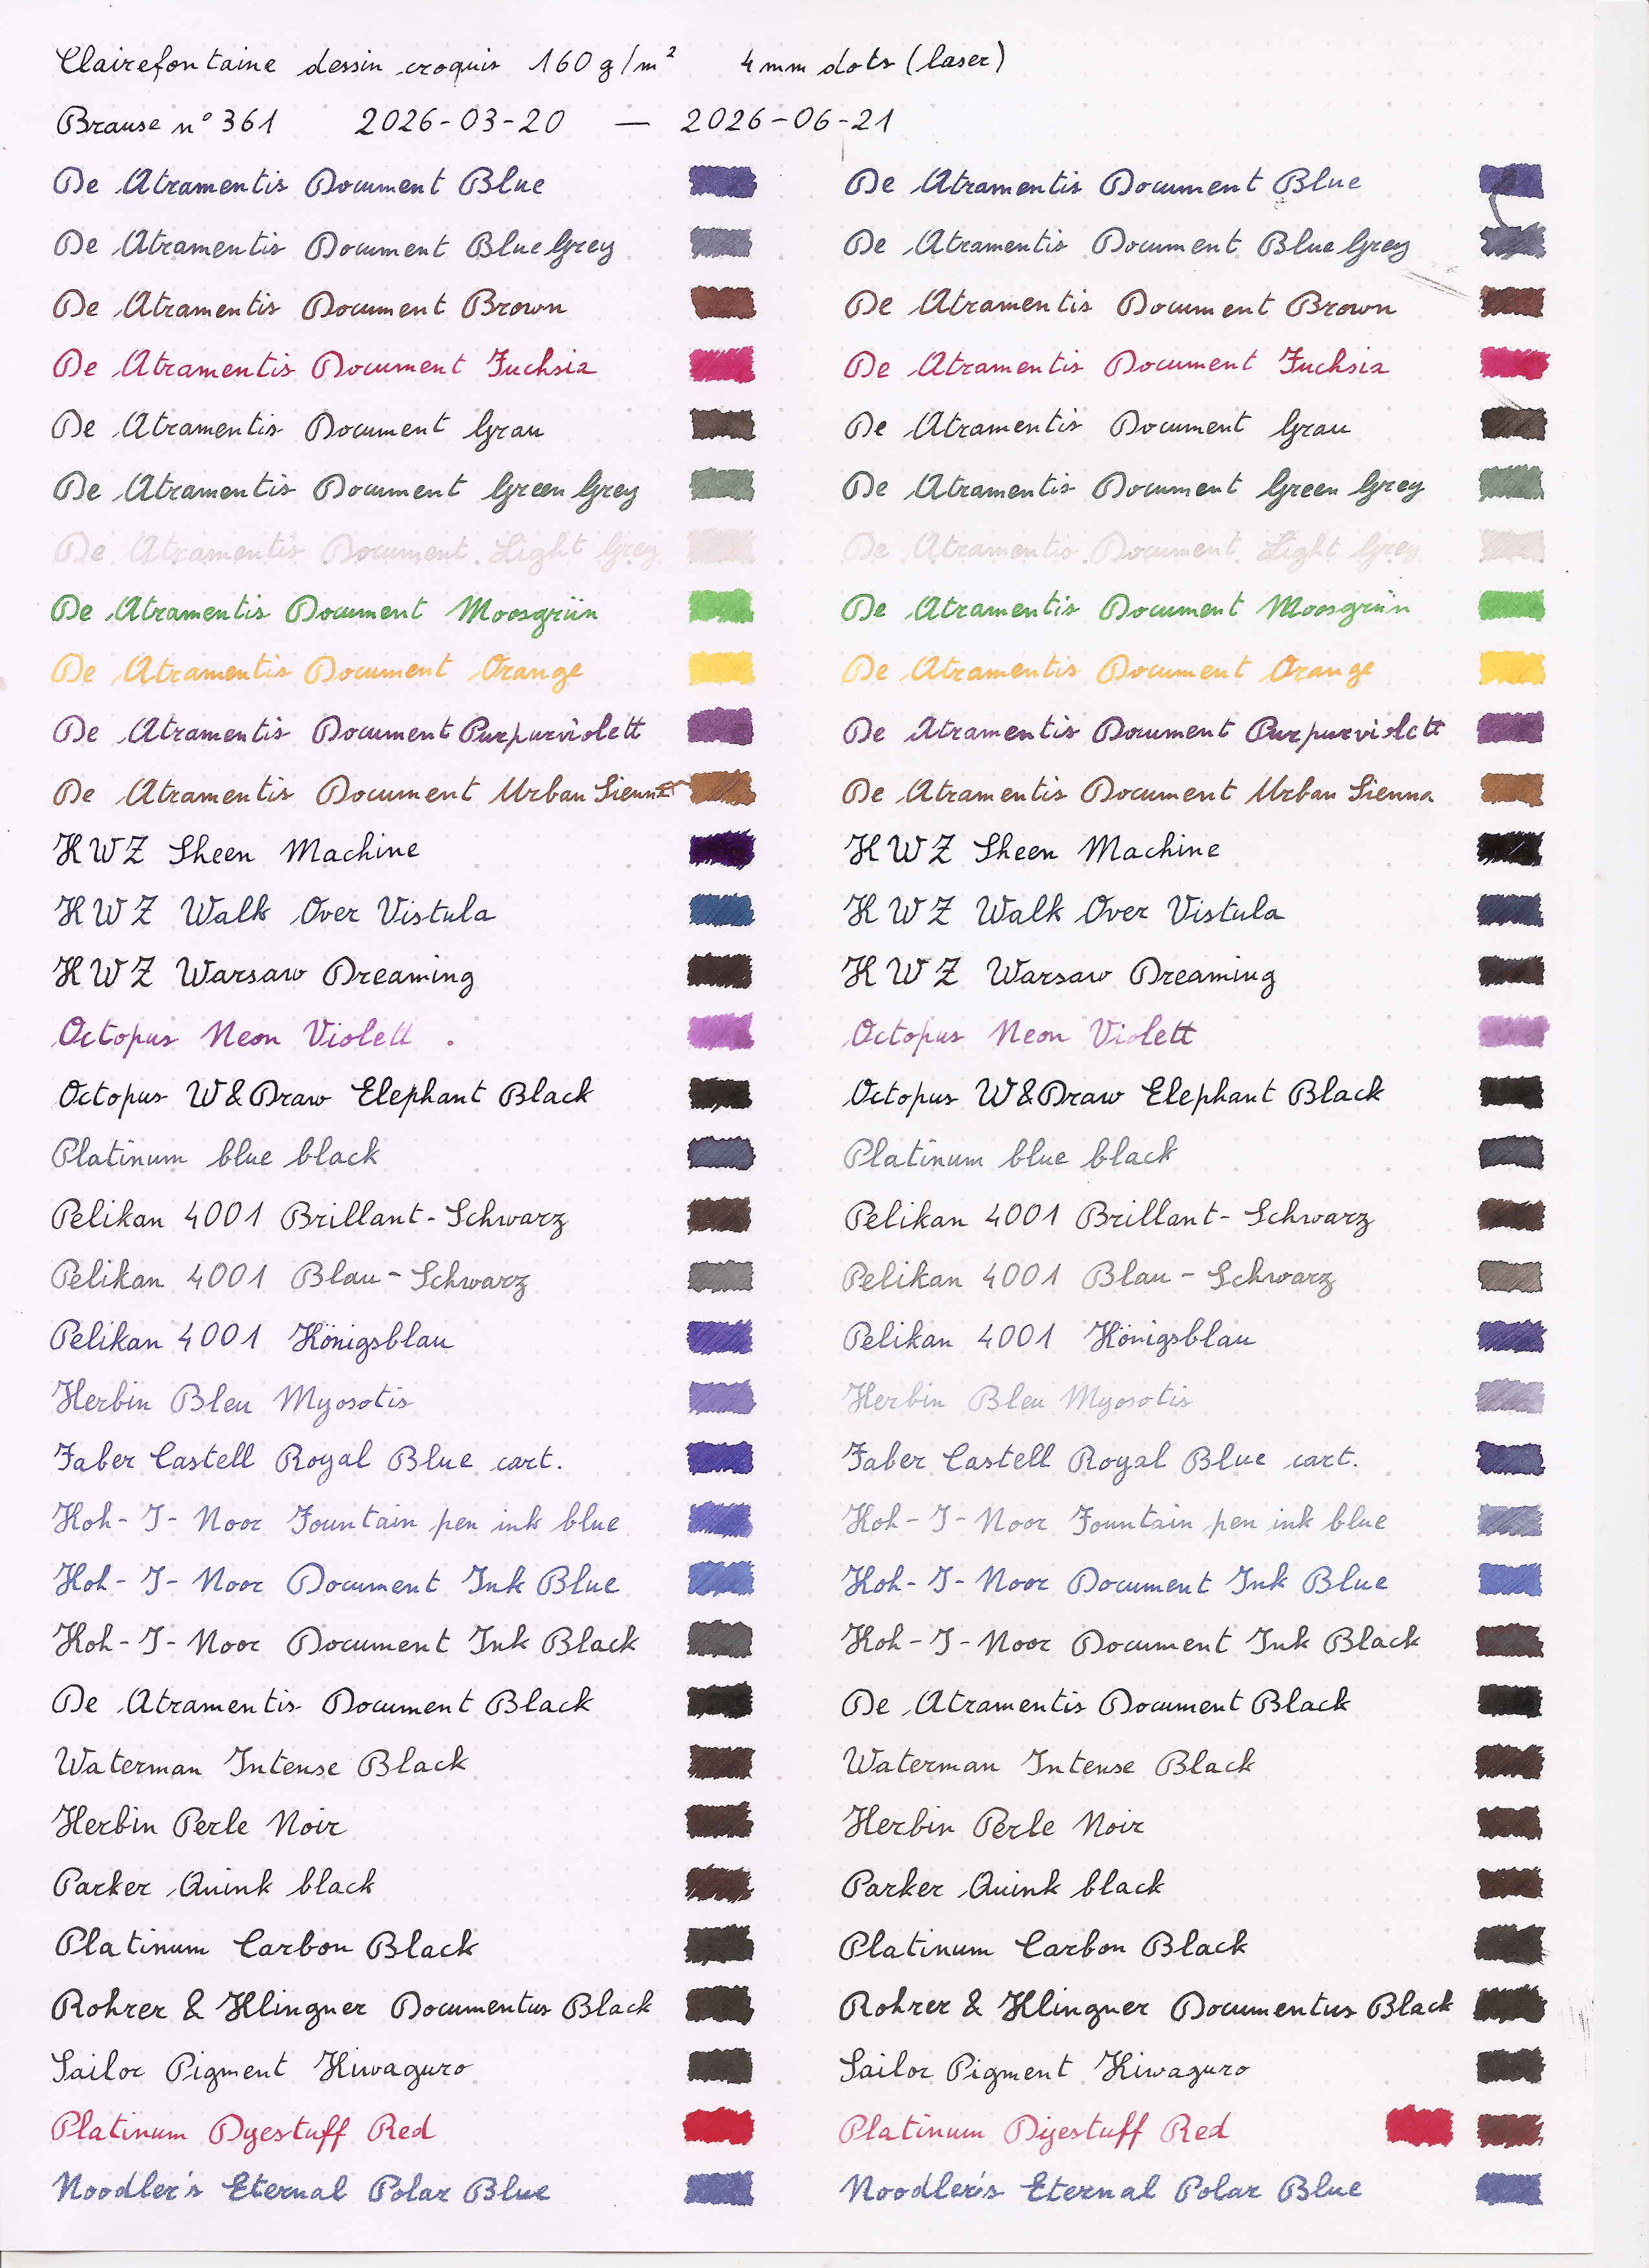
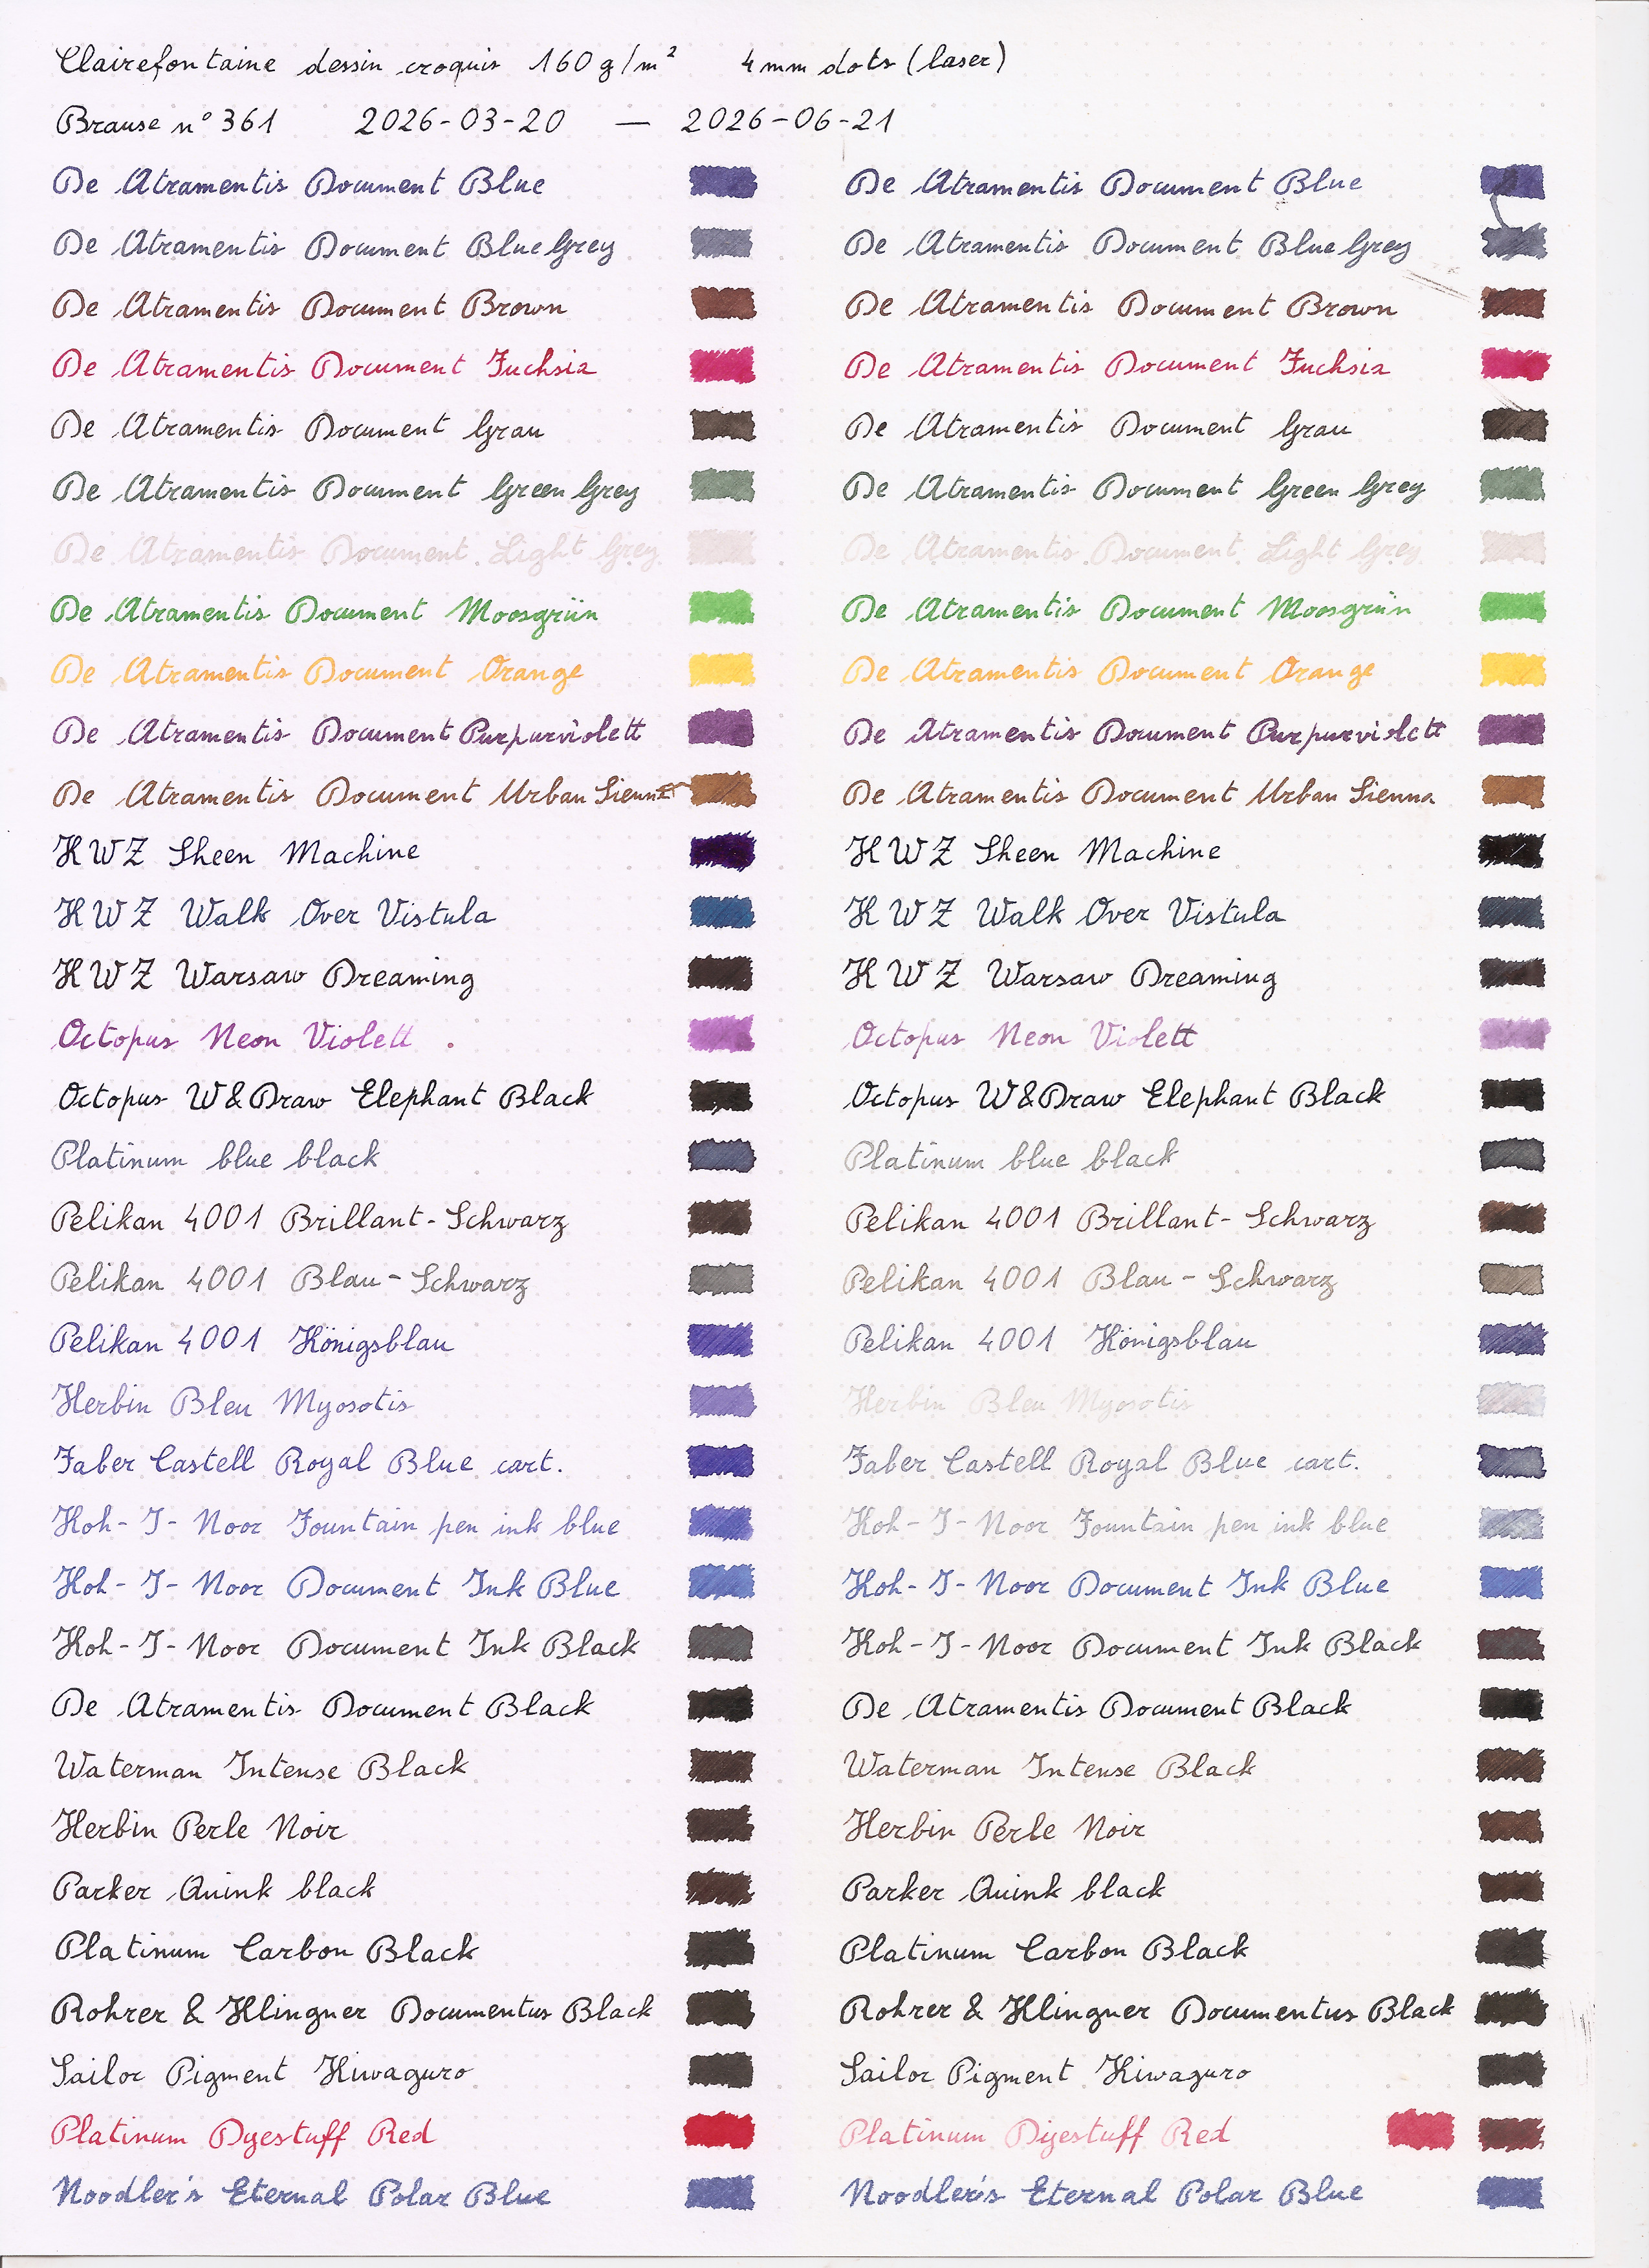
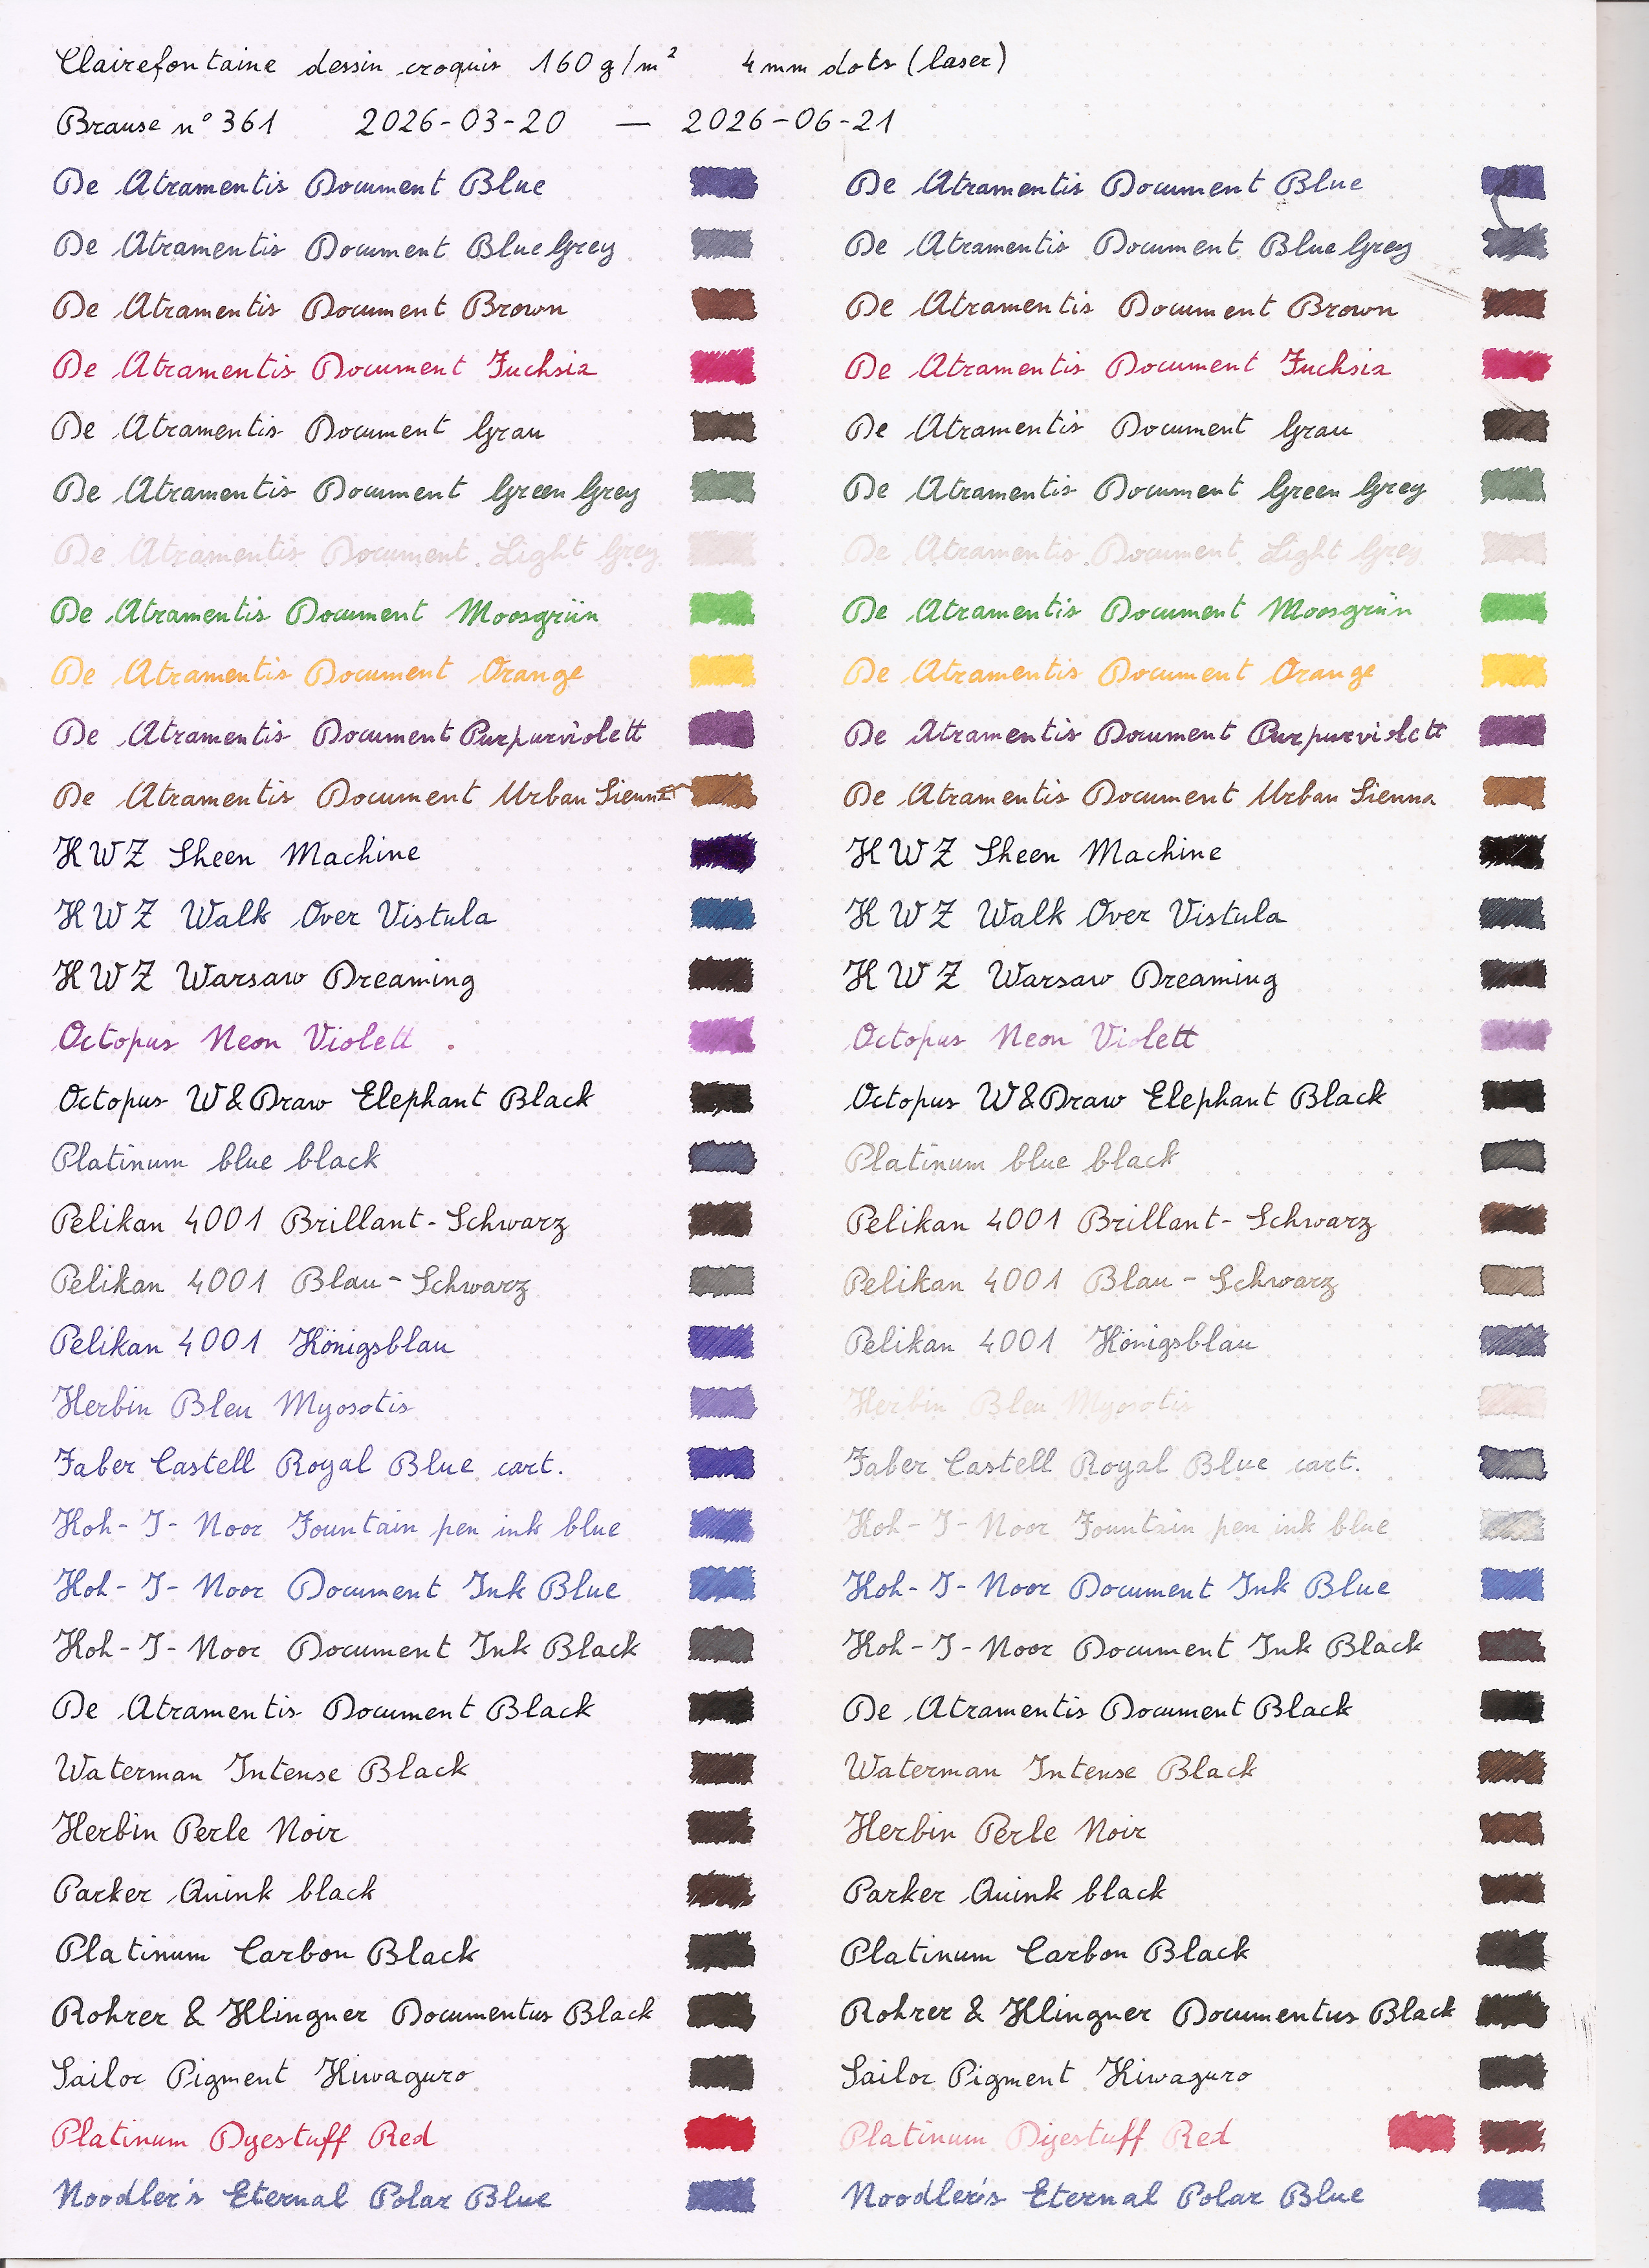
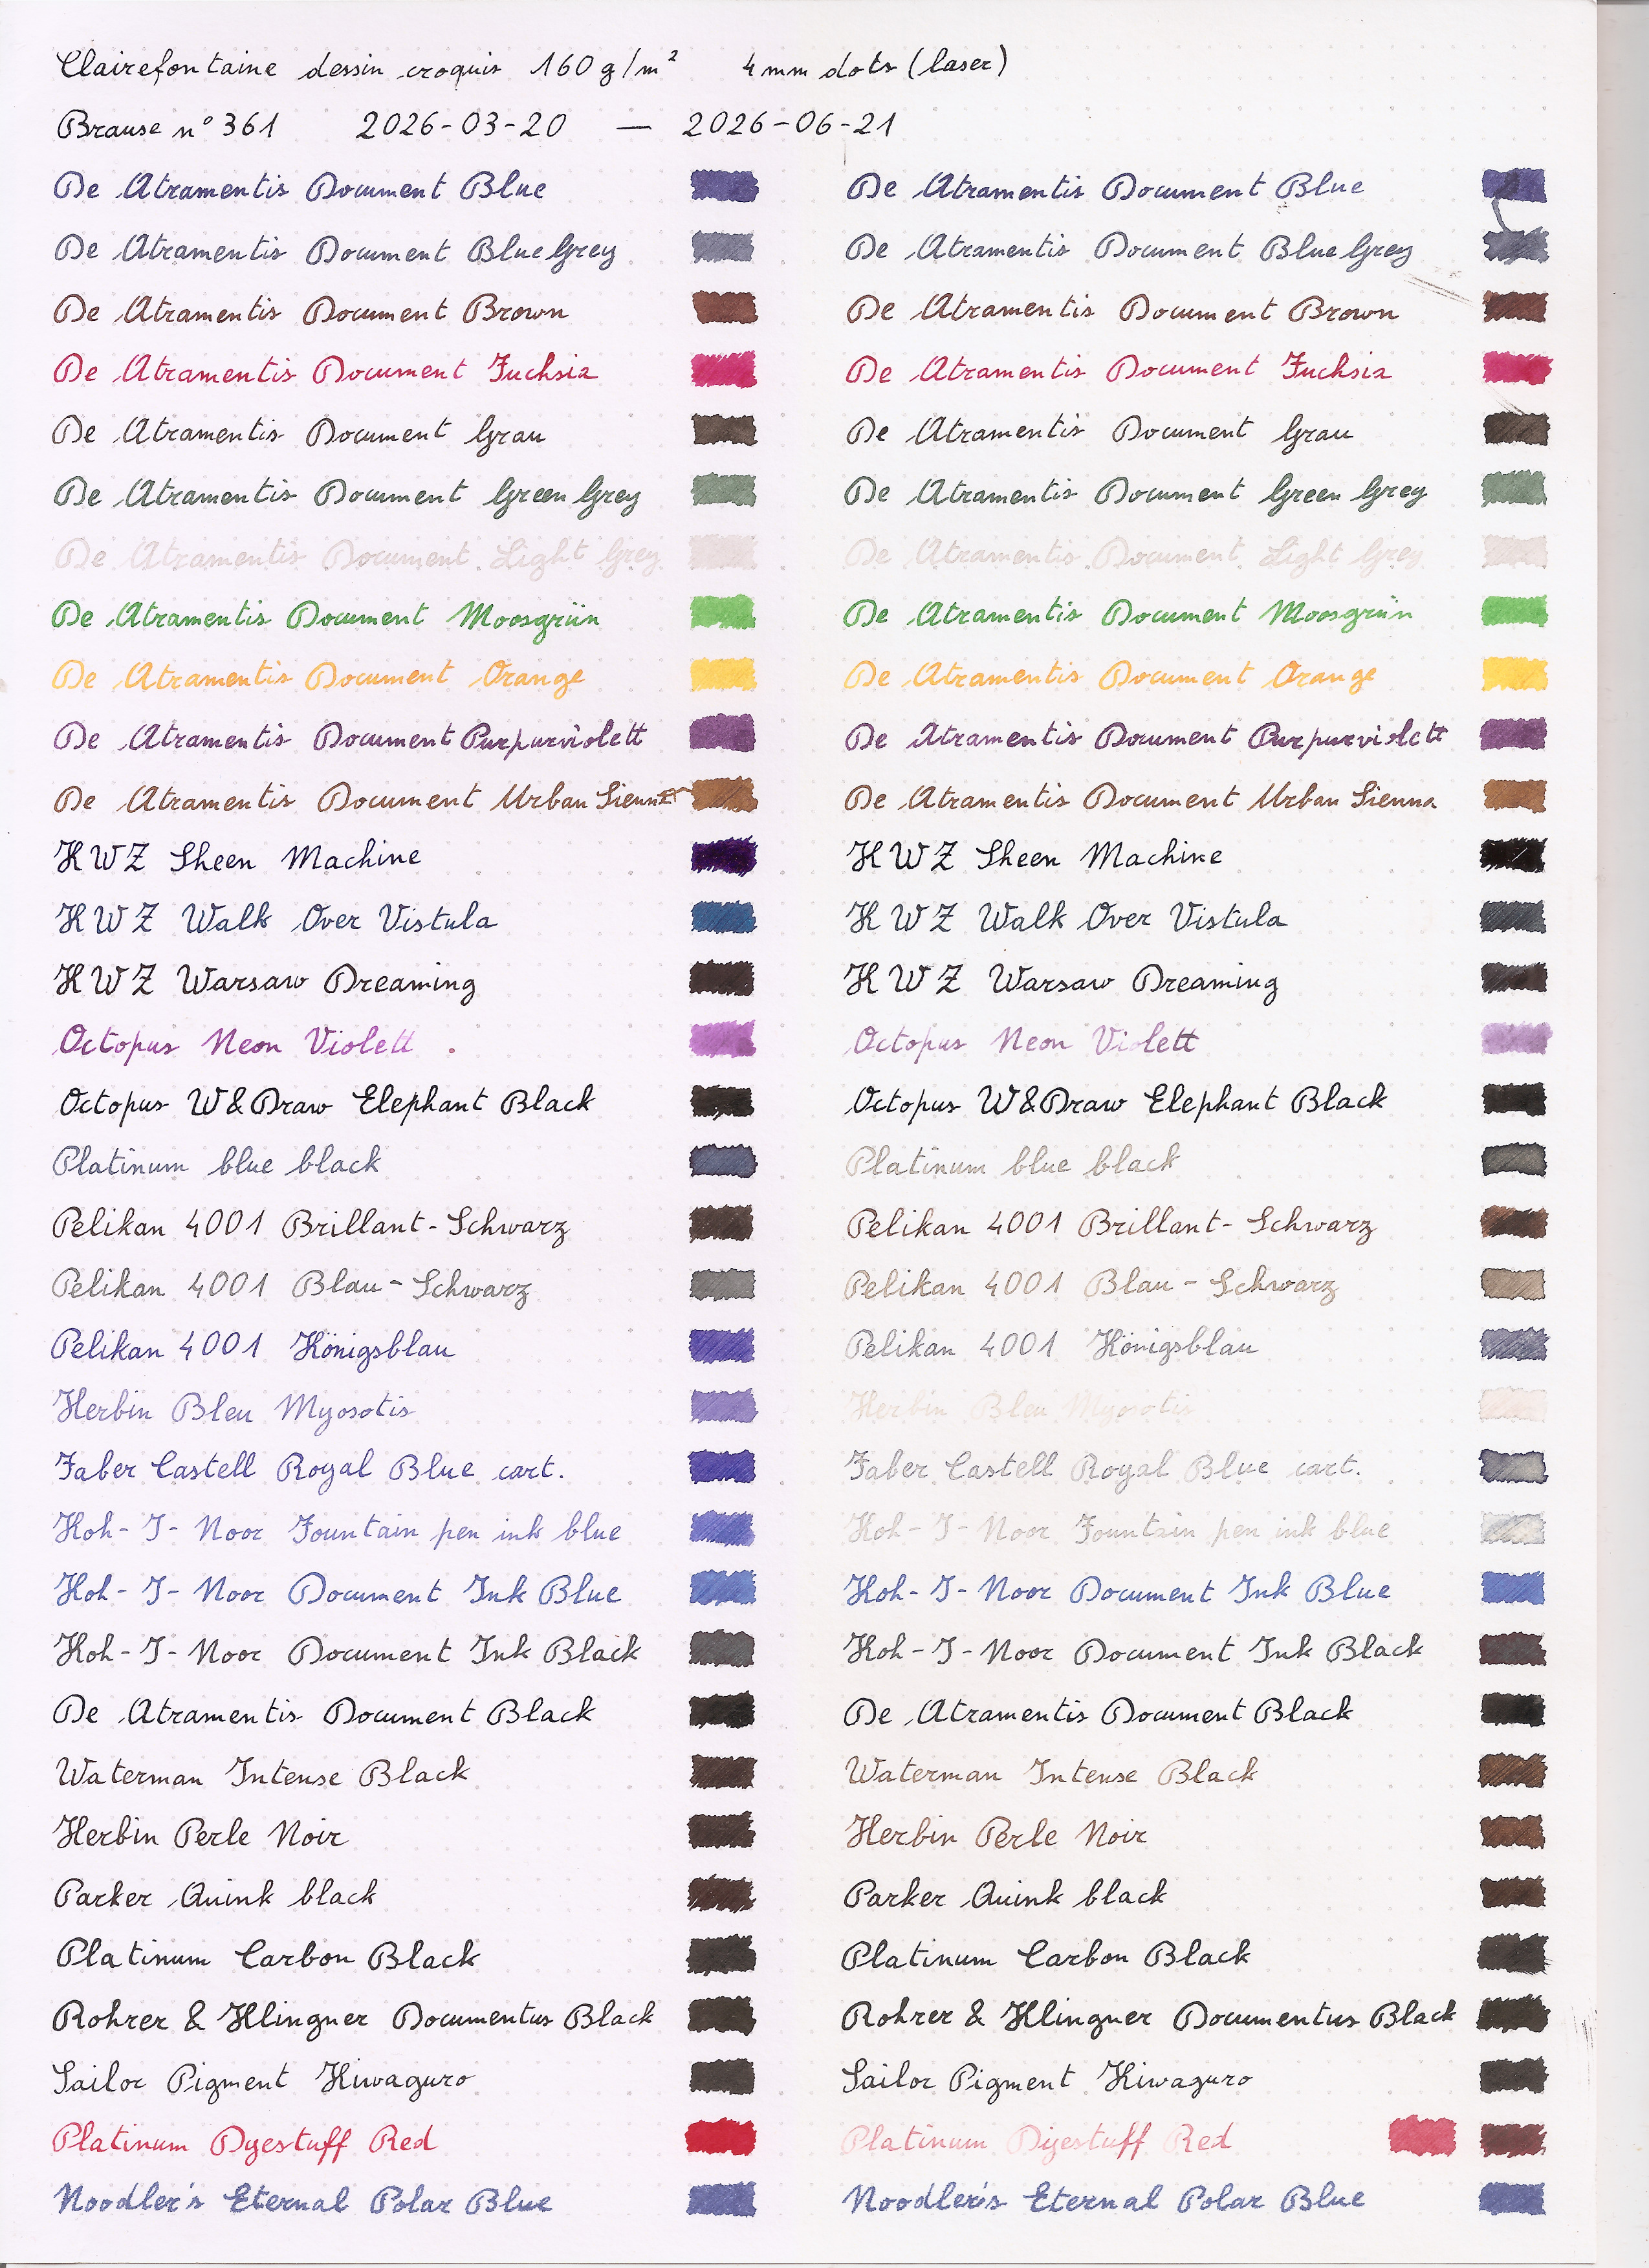
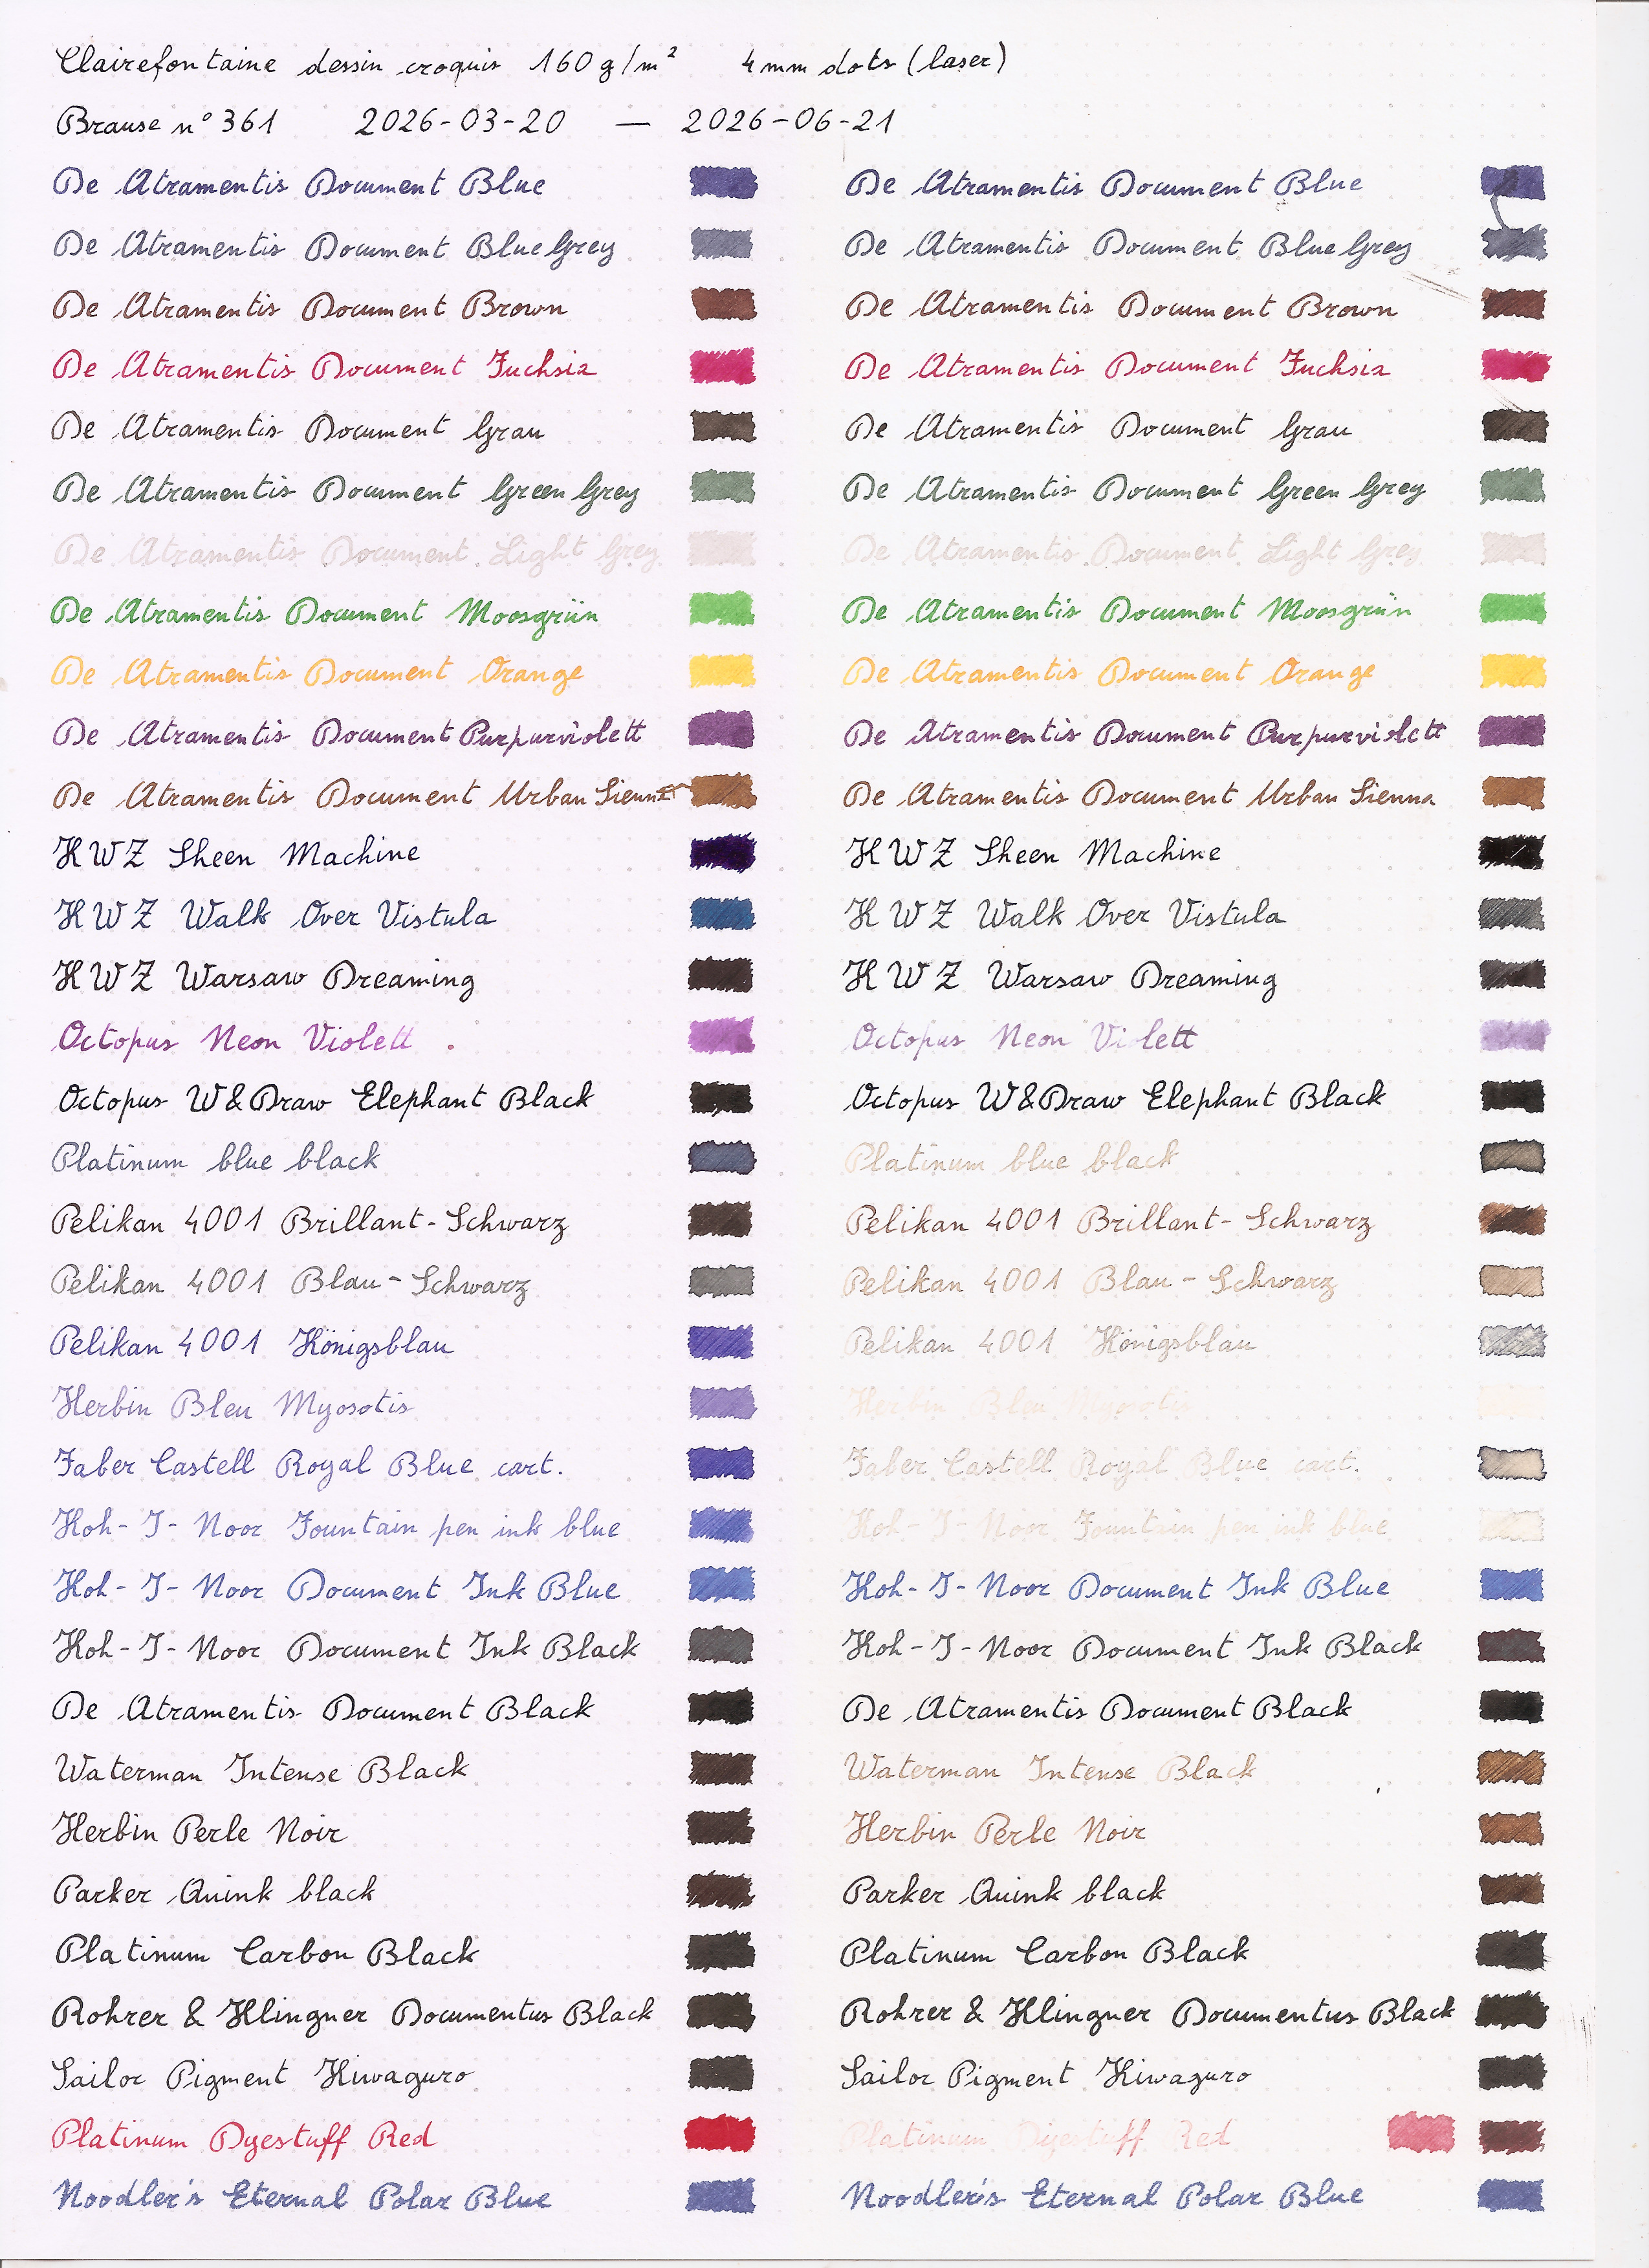
- DeAtramentis Document Blue
-
Bleach will make the colour lighter, more cyan.
- DeAtramentis Document BlueGrey
-
Bleach will make the colour lighter, more green.
- DeAtramentis Document Brown
-
.
- DeAtramentis Document Fuchsia
-
Bleach will lighten significantly the colour.
- DeAtramentis Document Grau
-
.
- DeAtramentis Document Green Grey
-
.
- DeAtramentis Document Light Grey
-
.
- DeAtramentis Document Moosgrün
-
.
- DeAtramentis Document Orange
-
Bleach will lighten significantly the colour, turning it yellow.
- DeAtramentis Document Purpurviolett
-
Bleach will lighten a bit the colour, turning it desaturated
blue.
- DeAtramentis Document Urban Sienna
-
Bleach will lighten slightly the colour.
- KWZ Sheen Machine
-
Not resistant to water, the drop becomes an uniform colour spot; the
hydrogen peroxide bleached away the red sheen. This was one of the
only two inks to react to isopropyl alcohol, which caused a pale cyan
halo around the lines.
Not resistant to bleach.
After three days it was still perfectly readable, but had visibly
lost some red sheen, after one week the red had completely gone and
it looked very dark blue (but still shiny)
- KWZ Walk over Vistula
-
Not resistant to water, the drop becomes an uniform colour spot.
Not resistant to bleach.
After four weeks it looked a bit darker and duller.
After two months it was basically grey, but still pretty readable.
- KWZ Warsaw Dreaming
-
Not resistant to water, the drop becomes an uniform colour spot.
Not resistant to bleach.
After a month it started to be a bit lighter.
- Octopus Neon Violett
-
Water very lightly stains the paper, leaving however the original
shape quite visible. The other ink that reacted to isopropyl alcohol,
with a pale purple halo around the lines.
After two weeks it was paler, more pink.
- Octopus Write & Draw Elephant Black
-
.
- Platinum blue black
-
Water stains the paper, leaving however the original shape quite
visible; it is significantly bleached by hydrogen peroxide.
Not resistant to bleach.
After three weeks it started to become grey.
After two months it was still readable, but pale grey.
- Pelikan 4001 Brillant-Schwarz
-
Not resistant to water, the drop becomes an uniform colour spot.
Not resistant to bleach.
After three weeks it was a bit more brown than black, after a month
noticeably so.
- Pelikan 4001 Blau-Schwarz
-
Water stains the paper, leaving however the original shape quite
visible; it is significantly bleached by hydrogen peroxide.
Not resistant to bleach.
After three weeks it started to become grey.
After two months it was still readable, but pale brownish grey.
- Pelikan 4001 Königsblau
-
Not resistant to water, the drop becomes an uniform colour spot, with
just a hint of the original shape; significantly bleached by hydrogen
peroxide.
Not resistant to bleach.
After three days it had started to be slightly paler.
After three weeks it was significantly desaturated.A
After two months it was still readable, but pale grey.
- Herbin Bleu Myosotis
-
Not resistant to water, the drop becomes an uniform pink spot,
significantly bleached by hydrogen peroxide.
Not resistant to bleach.
After three days it was already visibly paler, after one week it was
a pale grey. After a month it was still somehow readable, but as a
trace.
- Faber Castell Royal Blue
-
Not resistant to water, the drop becomes an uniform colour spot, with
just a hint of the original shape; significantly bleached by hydrogen
peroxide.
Not resistant to bleach.
After three days it was slightly duller, after two weeks definitely
so. After a month it was also quite paler.
After two months it was a bit more visible than the Bleu Myosotis,
but little more than a trace.
- Koh-I-Noor Fountain pen ink blue
-
Not resistant to water, the drop becomes an uniform colour spot, with
just a hint of the original shape; significantly bleached by hydrogen
peroxide.
Not resistant to bleach.
After three days it had started to be slightly paler, more so after
one week when it had also turned grey. After four weeks it was very
pale.
After two months it was a still somewhat readable, but as a trace, a
bit lighter than the Faber Castell Royal Blue.
- Koh-I-Noor Document Ink Blue
-
.
- Koh-I-Noor Document Ink Black
-
Water leaves a very light stain, but the original shape doesn’t look
changed.
- DeAtramentis Document Black
-
.
- Waterman Intense Black
-
Not resistant to water, the drop becomes an uniform colour spot, with
a trace of the original shape still visible; very lightly bleached by
hydrogen peroxide.
Not resistant to bleach.
After three weeks it started to look a bit more brown, noticeably so
after a month.
- Herbin Perle Noir
-
Not resistant to water, the drop becomes an uniform colour spot, with
a trace of the original shape still visible.
Not resistant to bleach.
After three weeks it started to look a bit more brown, noticeably so
after a month.
- Parker Quink black
-
Not resistant to water, the drop becomes an uniform colour spot.
Not resistant to bleach.
After two months it was starting to look a tiny bit more brown.
- Platinum Carbon black
-
.
- Rohrer & Klingner Documentus Black
-
.
- Sailor Pigment Kiwaguro
-
.
- Platinum Dyestuff Red
-
Not resistant to water, the drop becomes an uniform colour spot; very
lightly bleached by hydrogen peroxide.
Not resistant to bleach.
After three weeks it was a bit paler.
After two months it was still readable, but very pale.
- Noodler’s Eternal Polar Blue
-
Bleach will lighten it significantly, turning it cyan.